If the IDE initialization is started but you are prompted with a black screen, it means that there’s something wrong with the GPU or boot order. Fortunately, you can solve the issue by applying the methods offered in this post of MiniTool Partition Wizard.
When the A0 LED code shows up, it means that IDE initialization is started. It indicates that the motherboard has handed over hardware control to the operating system. Therefore, the A0 code is an indication that the BIOS has successfully finished all POST tests and is ready to run the OS.
Nevertheless, the system may still fail to load the OS and show a black screen. What causes the issue? Well, it is very likely that the display/GPU or the boot drive result in the error. You can try the methods below to troubleshoot the IDE initialization error.
Method 1: Check the Display Cable and Connection
If the display cable is damaged, the motherboard will fail to communicate with the monitor causing the mentioned issue. Hence, you should check your display cable and connection once for loose connections and physical damage you receive the display error. If you don’t find any damage on the cable, plug it into another computer to see if it works properly.
After confirming that the cable works fine, try plugging the display cable into other available ports on the monitor and motherboard.
Method 3: Reconnect Storage Device
According to user reports, reconnecting the computer’s storage device also works for solving the A0 code. You must ground yourself before you handle any components inside the PC.
Step 1: Turn off the computer and remove all the screws that hold the side panel in the CPU case to detach it.
Step 2: After you access the motherboard, remove and reconnect cables from the storage device.
Step 3: If you use an M.2 storage device, remove the screw to detach it from the motherboard. Then clean the connector side of the chip.
Step 4: Slide the M.2 back into the slot and screw it in place.
Step 5: Turn on the computer to see if it boots normally.
Further reading: To manage your storage device, you need to make use of a partition manager. MiniTool Partition Wizard is what you need. It helps you create/format/extend/shrink/copy/merge/split/delete/wipe partitions. Besides, it also enables you to migrate OS, copy disk, wipe disk, and conduct other operations on hard drives or partitions.
MiniTool Partition Wizard FreeClick to Download100%Clean & Safe
![Format Floppy Disks: Why and How to Do That [Full Guide]](https://images.minitool.com/partitionwizard.com/images/uploads/2023/05/format-floppy-disk-thumbnail.jpg)
Method 4: Check BIOS Settings
Incorrect BIOS settings sometimes can also cause IDE initialization errors. So, you’d better check if your BIOS settings related to IDE devices are right when the error occurs. To do that, follow these steps.
Step 1: Turn off your computer.
Step 2: Turn the device back on and keep pressing the BIOS key while the PC boots up. By doing so, you can boot into the BIOS setup.
The BIOS key varies according to the brands and models of the computer. It could be F1, F2, F8, F10, F12, or Del.
Step 3: Navigate to the Advanced tab and click System Agent Configuration > Graphics Configuration.
Step 4: Set Primary Display to PCIe graphics if the system has a dedicated GPU. On the contrary, if the system runs on an integrated GPU, configure the display to CPU graphics.
Step 5: Press F10 and Enter keys to save and confirm the operation.
Method 5: Configure Boot Order
The hard drive containing the OS should be set as the first boot option. If you receive the error when you boot the PC, check and set the boot order.
Step 1: Likewise, boot your computer into BIOS.
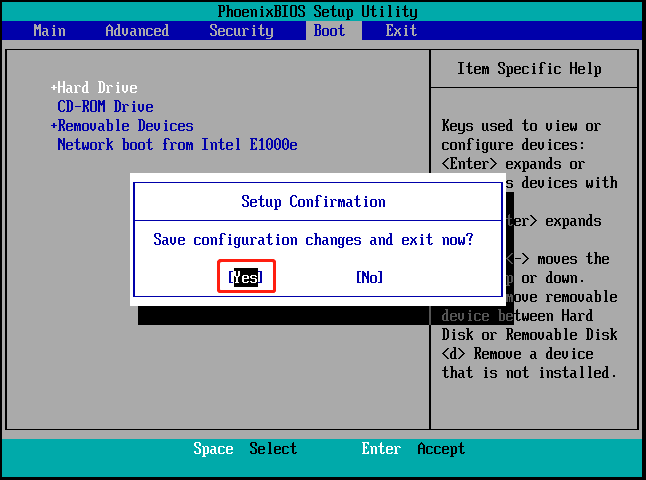
Step 2: Navigate to the Boot tab and set the hard drive containing OS as the first boot option.
Step 3: Press the F10 and Enter keys to save the change you’ve made.
Step 4: Then check if your computer boots properly.
![Wipe or Erase a Hard Drive from BIOS [2 Effective Methods]](https://images.minitool.com/partitionwizard.com/images/uploads/2023/06/wipe-or-erase-a-hard-drive-from-bios-thumbnail.jpg)
Method 6: Reseat the Graphics Card
The IDE initialization error could be triggered by the improperly located graphics card as well. In this scenario, reset the graphics card.
Step 1: Turn off the computer.
Step 2: Unplug the display cable from the graphics card.
Step 3: Remove the side panel from the CPU case.
Step 4: Unplug the power cable that connects to the graphics card.
Step 5: Push the lock on the PCI slot outwards to unlock the GPU from the motherboard.
Step 6: Remove the screws that hold the GPU to the CPU case.
Step 7: Take the GPU out of the system.
Step 8: Insert the GPU back into the motherboard and reconnect all items that have been disconnected.
Step 9: Power on the PC and check if it boots into the OS. If it fails, connect the graphics card to another PCIe slot. Then turn on the device again.
If these steps don’t work, boot the system by using an integrated graphics card. To do that, remove the graphics card from the PC > connect the monitor to the display port on your motherboard > turn on the device. However, you need to ensure that your CPU supports it before starting the operation.
IDE initialization is started but stuck on a black screen? If you are in this case, apply this “IDE initialization is started” fix guide now! It provides you with 6 methods to fix the error.
User Comments :