Some users reported: “After converting a Windows 10//11 UEFI machine’s physical disk to a virtual hard disk (VHD or VHDX) and attaching the VHD/VHDX file to a new VirtualBox machine, the VM fails to boot with a fatal error: INT18: BOOT failed or guest operating system failed to start with error code: 0x0000225.”
Why Is My VirtualBox Failing to Boot
This problem may be caused by the following reasons.
- The VM file is corrupted.
- Part of the boot sector is inactive.
- The Operating System (OS) fails to boot due to an inactive partition containing Boot Configuration Data (BCD) storage.
- The operating system cannot boot due to a corrupted BCD.
- The operating system cannot start because the boot sector was not found.
How to Fix FATAL INT18 BOOT FAILURE in VirtualBox
Here we summarize several feasible ways for you to solve the fatal int18 boot failure VirtualBox issue.
# 1. Enable I/O APIC and UEFI in VirtualBox
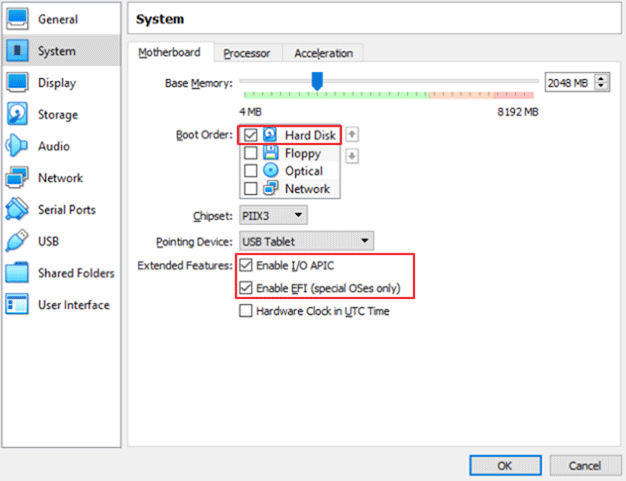
The FATAL INT18 BOOT FAILURE error in VirtualBox usually appears when you attach a VHD/VHDX/VMDK file containing a UEFI operating system. To fix this, just go ahead and enable UEFI on the VirtualBox machine’s settings. The steps are as follows:
Step 1: Close the VM machine window and Power Off the machine.
Step 2: Open the VM settings. Then go to System > Motherboard.
Step 3: In the Boot Order section, make sure that the Hard Disk is selected and is the first boot device.
Step 4: In the Extend Features section, select both the Enable I/O APIC and Enable EFI (special OSes only) options. Then click OK.

# 2. Disable Hyper-V on the Host Machine
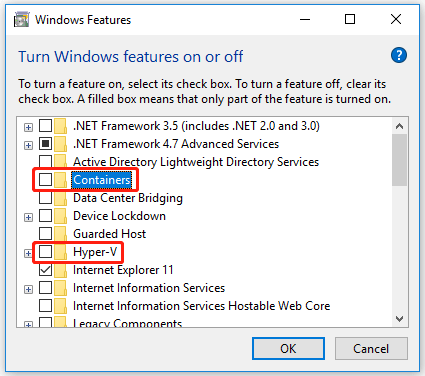
If the Hyper-V feature is enabled on your system, it may interfere with the normal startup of the VirtualBox VM. So, you need to disable Hyper-V on the Host machine.
Step 1: Press Win + R to open the Run dialog box. Then type appwiz.cpl in it and press Enter.
Step 2: In the Program and Features window, click Turn Windows features on or off.
Step 3: Uncheck the following features and click OK to apply the changes.
- Containers
- Hyper-V
- Virtual Machine Platform
- Windows Hypervisor Platform
- Windows Sandbox

Step 4: Restart the computer after disabling it.
Step 5: Open Command Prompt as administrator. Then type the following command and press Enter.
bcdedit /set hypervisorlaunchtype off
Step 6: Restart your PC again. Then start the VirtualBox and see if the FATAL INT18 BOOT FAILURE VirtualBox problem is fixed.
# 3. Fix Boot Problems
The ultimate way to resolve FATAL: INT18: BOOT FAILURE VirtualBox error is to fix the booting issue on the guest machine by booting it from a bootable Windows 10 ISO file.
Note: If you don’t have a Windows 10 ISO file, you can use the Media Creation Tool to download one directly from Microsoft.
Step 1: Open the Settings of the VirtualBox machine and go to Storage.
Step 2: Click the 1st plus (+) button next to Controller to add optical Storage.
Step 3: in the Optical Disk Selector window, click Add. Then find and open the Windows.iso file.
Step 4: Then select the Windows.iso file and click Choose.
Step 5: After attaching the Windows.iso file to the Storage devices, go to System and drag Optical to the top to boot the VM from the attached Windows.iso. Also, make sure that the Enable EFI option is unchecked, otherwise, you will not be able to boot from the ISO file. When done, click OK.
Step 6: Start Virtual Machine and click Next > Repair Your computer. Then select Troubleshoot > Startup Repair.
Step 7: Allow the Startup Repair to run and depending on the result do the following actions:
- If Startup Repair completes successfully, shut down the virtual machine, set the hard disk as a first boot device, and try to start the virtual machine again.
- If Startup Repair can’t complete the repair, continue to the next step.
Step 8: Click Advanced Options > Troubleshoot > Command Prompt.
Step 9: In Command Prompt, type the following commands in order and press Enter after each command.
- diskpart
- select disk 0
- list partition
Step 10: Now notice the size of the System partition. Then type the following command and find out the volume number of the System partition by using its size as a reference.
list volume
Step 11: Type the following commands to select the system partition (using its volume number), and to assign the drive letter Z: to it. Then exit DISKPART:
- select volume 2
- assign letter=Z
- exit
Step 12: In Command Prompt, type this command to repair the boot files:
bcdboot C:\windows /s Z: /f ALL
Close all windows, shut down the virtual machine, set the hard disk as the first boot device, and start the virtual machine.

![[Solved] Conversion from FAT32 to NTFS Is Not Available](https://images.minitool.com/partitionwizard.com/images/uploads/2023/06/conversion-from-fat32-to-ntfs-is-not-available-thumbnail.png)


User Comments :