How to create virtual drive from a folder? If you are bothered by this question, you come to the right place. Here, Partition Magic provides a step-by-step guide to help you do that. Let’s dive in.
Do you want to create virtual drive from a folder? If so, continue reading to get a step-by-step guide.
MiniTool Partition Wizard FreeClick to Download100%Clean & Safe
How to Create Virtual Drive from a Folder?
How to create virtual drive from a folder? In this section, I introduce some detailed methods to help you mount a folder as virtual drive temporarily and persistently. You can choose the method that suits you best, according to your needs.
Method 1. Create Virtual Drive from a Folder Temporarily
In Windows, you can use the “subst” command to mount a folder as a virtual drive with a specific drive letter. This allows you to access the folder’s contents directly through the virtual drive, with any saved files being stored in the original folder. However, these virtual drives are not persistent; they will be removed if you sign out, restart, or shut down your computer.
Here’s the guide:
Step 1. Press the Win + R keys simultaneously to open the Run window, type “cmd” in the box, and press Enter.
Step 2. Type the following command and press Enter:
subst drive: path\to\folder
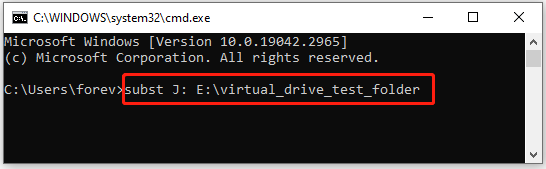
Step 3. After that, the drive is created. Now, press the Win + E keys simultaneously to open File Explorer and check out the This PC folder. You will see a new drive there.
Further Reading:
If you forget the path of the virtual drive, you can execute the “subst” command in the Command Prompt window to get it. If you want to remove the Virtual Drive that you created from a folder, you can type “subst <Drive:> /D” in Command Prompt and press Enter to remove it.
Method 2. Create Virtual Drive from a Folder Persistently
If you want to keep the virtual drive after sign out, restart, or shut down your computer, you can do the following steps:
Step 1. Press the Win + S keys simultaneously to open the Search window.
Step 2. Type “Notepad” in the search box and press Enter.
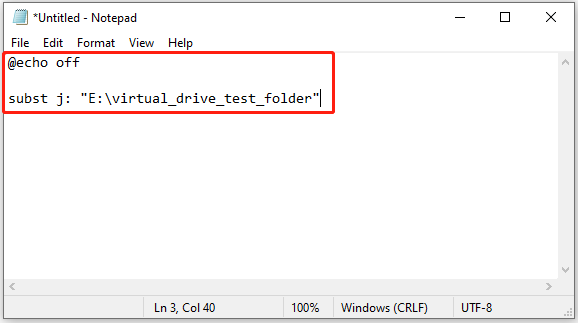
Step 3. Type the commands below into Notepad:
- @echo off
- subst <virtual drive letter>: “Full path of folder”
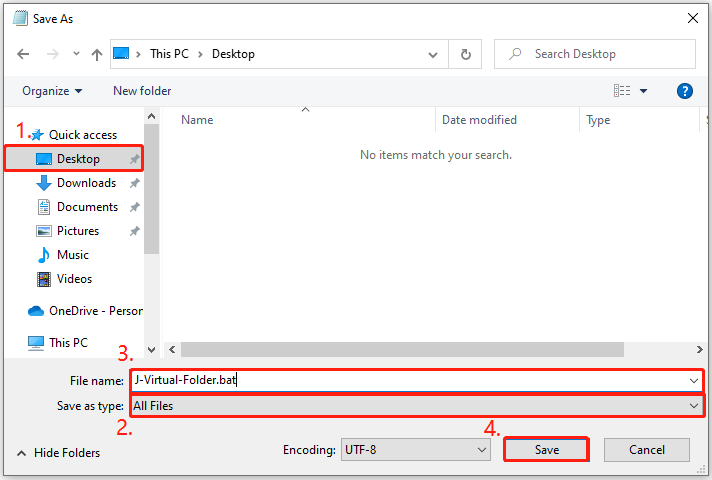
Step 4. Click File and select Save as.
Step 5. Then, choose Desktop or anywhere you want to save the .bat file, select All Files from the drop-down menu of Save as type, and then type a name you want for this batch file along with the .bat file extension. After that, click Save.
Step 6. Then, you can close the Notepad window.
Step 7. Open the File Explorer window, and navigate to the Setup folder and copy the newly created bat file here.
- Startup folder location for user: C:\Users\<username>\AppData\Roaming\Microsoft\Windows\Start Menu\Programs\Startup
- Startup folder location for all users: C:\ProgramData\Microsoft\Windows\Start Menu\Programs\Startup
Step 8. Once done, close the File Explorer window. Then, the created virtual drive will be persistent.
Method 3. Create Virtual Drive from a Folder to Network Location
In addition to creating virtual drive from a folder via the above methods, you can also do the following steps to mount a folder as virtual drive to Network Location:
Step 1. Open the File Explorer window, and go to the location of the target folder. Then, right-click it and select Properties.
Step 2. Go to the Sharing tab, click the Share button, choose the people to share with in the pop-up window, and then click Share. Next, click Done to confirm.
Step 3. Next, copy the Network path and click the Close button.

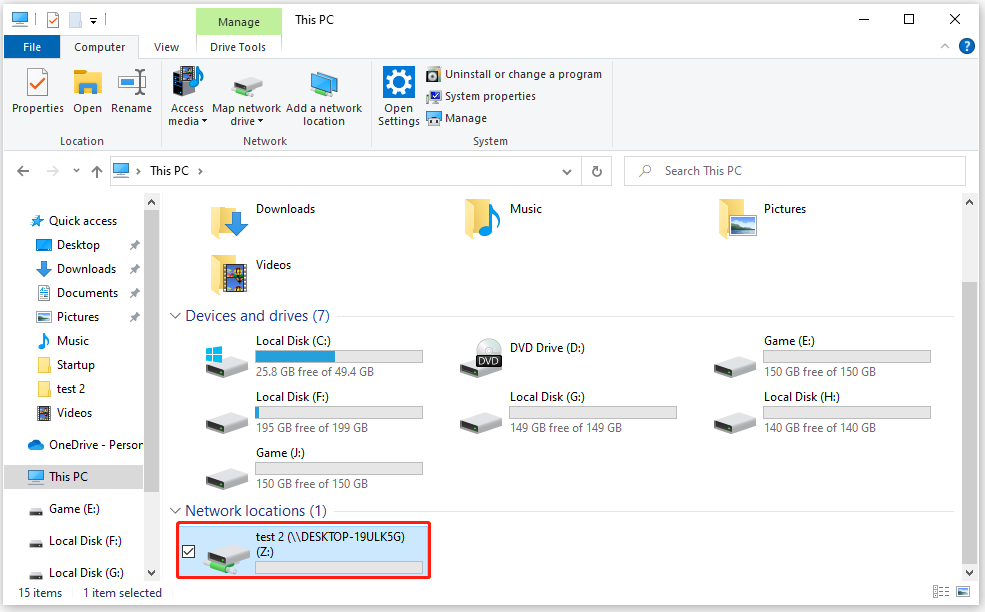
Step 4. In the File Explorer window, click This PC from the left panel. Then, click Map network drive under the Computer tab.
Step 5. In the Map Network Drive window, choose a drive letter from the drop-down menu of Drive, and paste the copied path into the Folder text box. Then, click Finish to confirm.
Step 6. After that, the created virtual drive folder will open automatically. Close the window, you can see the created virtual drive under the Network location section.
Bottom Line
This post provides a detailed guide on creating virtual drive from a folder. If you also have the same need, you can try the mentioned ways.
About The Author

Position: Columnist
Charlotte is a technology columnist with a strong focus on the Windows operating system, specializing in disk management, backup, and data recovery. She is passionate about analyzing computer errors, identifying root causes, and delivering practical solutions. In her free time, she stays updated on the latest developments in computer systems and hardware while continuously learning new technologies to broaden her expertise. Her writing style is clear and easy to understand, making complex technical topics accessible even to users with limited computer knowledge.
User Comments :