ReFS, standing for Resilient File System, is a new Microsoft file system that was first introduced with Windows Server 2012. It’s not designed to replace NTFS and is not as compatible as NTFS. However, it really overcomes some limitations of NTFS, specifically in data corruption resiliency and capacity.
A ReFS drive contains checksums that can determine the integrity of the data on the drive, highly protecting data from corruption. If your PC supports the ReFS file system, you can convert NTFS to ReFS for high data protection.
This post summarizes multiple methods to help convert NTFS to ReFS. You can pick one to perform the conversion according to your preference.
Method 1: Convert NTFS to ReFS with Disk Management
Step 1: Right-click the Start icon and select Disk Management.
Step 2: Locate and right-click the drive you want to convert to ReFS. Then select Format from the context menu.
Step 3: In the pop-up window, select REFS from the File system drop-down menu.
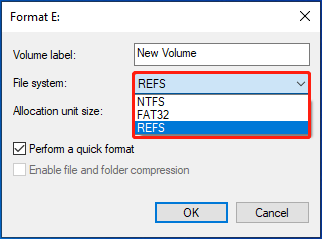
Step 4: After that, tick the checkbox next to the Perform a quick format option. Then click OK.
Step 5: When a box warning that formatting this volume will erase all data on it prompts, click OK to confirm the operation.
Method 2: Convert NTFS to ReFS with Diskpart
Step 1: Press Windows + R to open the Run dialog.
Step 2: Type cmd in the text box. Then press Ctrl + Shift + Enter simultaneously to open Command Prompt with administrative privileges.
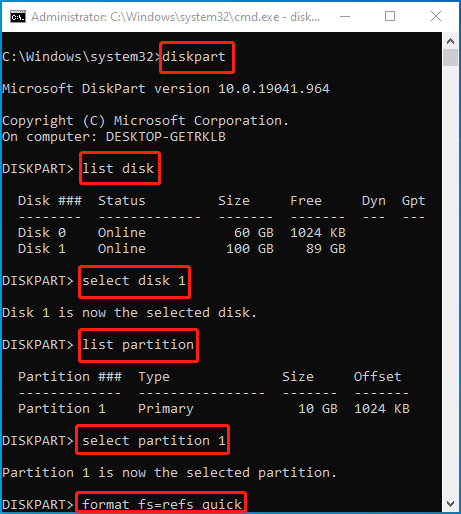
Step 3: In the elevated Command Prompt, type the following commands one by one and press Enter after each.
- diskpart
- list disk
- select disk 1 (1 represents the number of the disk containing the target partition)
- list partition
- select partition N (Replace N with the number of the partition you need to format to ReFS)
- format fs=refs quick
Method 3: Convert NTFS to ReFS with File Explorer
Step 1: Press the Windows and E keys at the same time to open File Explorer.
Step 2: Go to This PC. Then right-click the target drive from the right side and select Format.
Step 3: In the Format window, select REFS in the File system field and then check Quick Format.
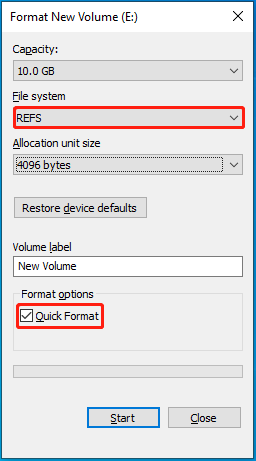
Step 4: Once done, click the Start icon to start the conversion. When prompted, click OK for confirmation.
Bonus Tip: Do More Formatting by Using MiniTool Partition Wizard
In addition to NTFS to ReFS conversion, you can also execute other file system conversions based on your needs. For instance, you can convert NTFS to FAT32 and vice versa, convert FAT32 to exFAT, etc. You can use Windows built-in tools to change the file system of your drive.
Here, we’d like to recommend you take advantage of MiniTool Partition Wizard, particularly when you convert NTFS to FAT32. It enables you to complete the conversion without losing data. Moreover, compared with the Windows built-in utilities, it provides more file systems like Ext2/3/4 to choose from.
With MiniTool Partition Wizard, you can also partition/resize/format/clone hard drive, convert MBR to GPT without data loss, recover data from hard drive, and more.
MiniTool Partition Wizard FreeClick to Download100%Clean & Safe
Bottom Line
You can learn how to effectively convert NTFS to ReFS without losing data from this post. If you have any problems with the conversion, feel free to leave a message in the following comment area.
About The Author

Position: Columnist
Charlotte is a technology columnist with a strong focus on the Windows operating system, specializing in disk management, backup, and data recovery. She is passionate about analyzing computer errors, identifying root causes, and delivering practical solutions. In her free time, she stays updated on the latest developments in computer systems and hardware while continuously learning new technologies to broaden her expertise. Her writing style is clear and easy to understand, making complex technical topics accessible even to users with limited computer knowledge.
User Comments :