Many users received the “an internal error was detected when enabling BitLocker” in the Control Panel. What causes the “BitLocker an internal error was detected”? How to fix it on Windows 11/10? Let’s explore the answers together with MiniTool Partition Wizard.
BitLocker is a practical drive encryption utility widely used by people to encrypt their storage devices on Windows PCs. Sometimes, however, users encounter various issues and errors when using the tool, such as “The drive protected by BitLocker is already unlocked”, “view BitLocker keys stuck in loading cycle”, “forgot BitLocker recovery key”, and the one discussed here.
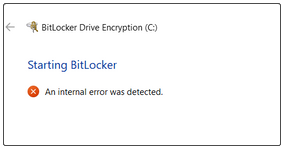
BitLocker an internal error was detected. On my PC, the encryption option doesn't show up in settings. However, I managed to find BitLocker in the control panel. On my try, BitLocker can encrypt all the drives except drive C. When enabling BitLocker, it shows “An internal error was detected”.
What Causes the BitLocker an Internal Error Was Detected
According to user reports, the error often occurs when enabling the C drive in the Control Panel. The “BitLocker an internal error was detected” issue is related to TPM. If your motherboard/CPU doesn’t have TPM enabled on Windows 11/10, you will receive the error. Besides, an outdated BIOS or UEFI version is also responsible for the BitLocker error.
![Can I Reinstall Windows on BitLocker Drive? [Answered]](https://images.minitool.com/partitionwizard.com/images/uploads/2024/01/reinstall-windows-on-bitlocker-encrypted-hdd-thumbnail.jpg)
How to Fix BitLocker an Internal Error Was Detected on Windows 11/10
After analyzing extensive user reports from different forums, we summarize 3 feasible ways to fix BitLocker an internal error was detected on Windows 11/10. Let’s try them in order.
Fix 1. Enable BitLocker via Global Policies
If your motherboard doesn’t have a TPM chip, you can try enabling BitLocker via Global Policies. It can help enable BitLocker without TPM on Windows 11/10.
Step 1. Press the Win + R keys to open the Run dialog box, and then type gpedit.msc in it and press Enter.
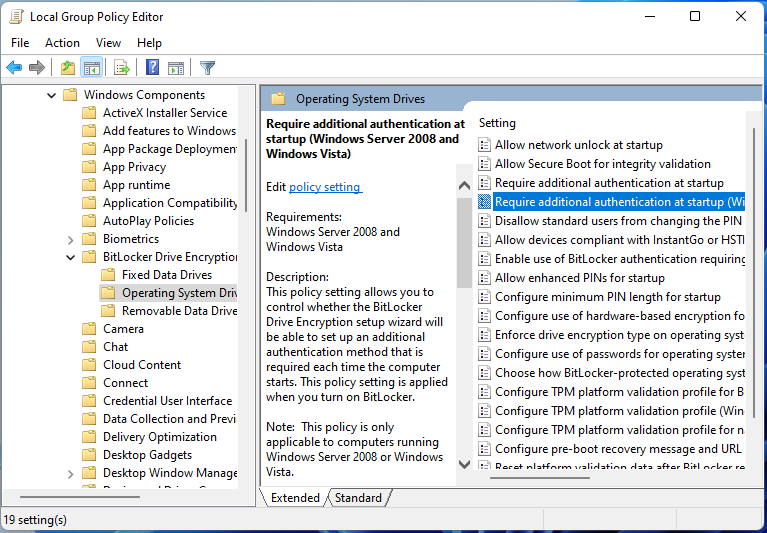
Step 2. In the Local Group Policy Editor window, navigate to the following path:
Computer Configuration > Administrative Templates > Windows Components > BitLocker Drive Encryption > Operating System Drives
Step 3. Highlight Operating System Drives and then double-click Require additional authentication at startup policy on the right pane.
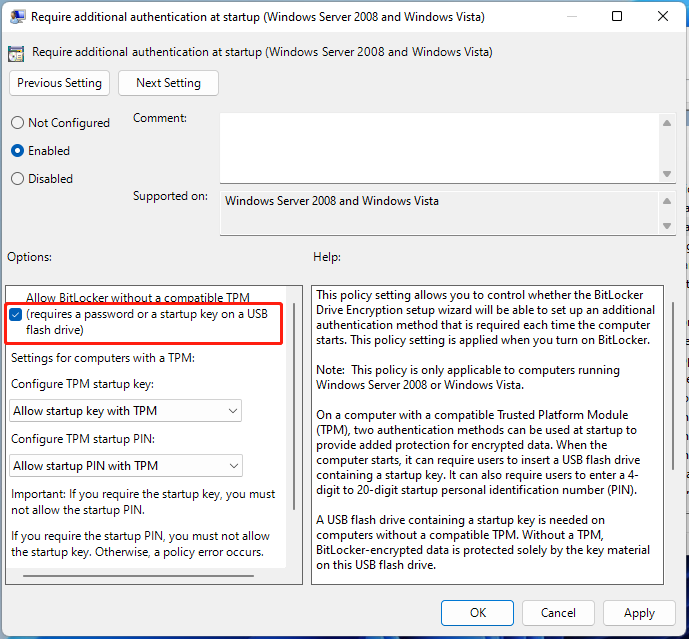
Step 4. Select Enabled at the top and check the Allow BitLocker without a compatible TPM (requires a password or a startup key on a USB flash drive) box under Options. Then, click the Apply and the OK button to save changes.
Once done, you can open the Control Panel again and enable BitLocker for the C drive to see if the error persists. If you still receive the “an internal error was detected BitLocker” warning message, try other methods.
Fix 2. Update BIOS/UEFI
If the BIOS or UEFI firmware is out of date, it may trigger the Windows 11 BitLocker an internal error was detected. In this case, you can try updating BIOS/UEFI to the latest version if accessible. To know more details, you can refer to this guide “How to Update BIOS Windows 10/11 | How to Check BIOS Version”.
Fix 3. Clean TPM in BIOS
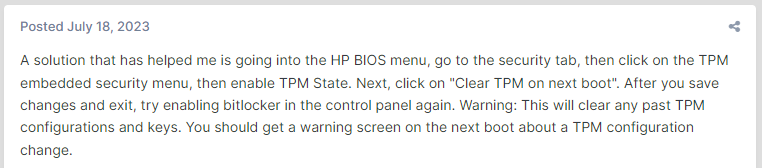
Some users from the elevenforum forum reported that the “an internal error was detected BitLocker” issue can be solved by clearing TPM in BIOS. But this process will delete all TPM-protected keys and may lead to data loss on the BitLocker encrypted drive.
So, we highly recommend you make a backup or recover all data beforehand using a professional tool. All these works can be done via MiniTool Partition Wizard. It can recover data, clone hard drive, migrate OS, copy partitions, convert MBR to GPT, etc.
MiniTool Partition Wizard DemoClick to Download100%Clean & Safe
Now, you can follow the guide below to clear TPM in BIOS:
Step 1. Power off your computer, then start up your computer and immediately press the F2 or Delete key when the first log screen appears to enter BIOS.
Step 2. In the BIOS setup menu, navigate to the Security tab and select the TPM embedded security menu, then enable TPM state.
Step 3. Select the Clear TPM on next boot option, and press the F10 and Enter keys to save the change.
Step 4. Exit BIOS, and then you can re-enable BitLocker for the drive and see if the error is gone. This will clear all past TPM configurations and keys.
Further reading: Manage BitLocker more conveniently with MiniTool Partition Wizard:
When troubleshooting or resolving BitLocker issues, you may need to perform tasks such as enabling, disabling, locking, or unlocking BitLocker.
Compared to using multiple Windows tools for management, the BitLocker Manager feature in MiniTool Partition Wizard provides a more convenient solution.
This feature offers an intuitive interface that allows you to easily manage BitLocker-encrypted drives, including enabling, disabling, locking, and unlocking BitLocker, without manually entering complex commands.
MiniTool Partition Wizard FreeClick to Download100%Clean & Safe
Here comes the end of this post. It provides 3 feasible ways to fix Windows 11 BitLocker an internal error was detected. Have you other troubleshooting methods? Please share them with us in the following comment zone.
About The Author

Position: Columnist
Cecilia has been an editor at MiniTool for two years. She primarily focuses on disk and partition-related content, with particular expertise in disk cloning, partition recovery, and PDF document conversion. She is dedicated to providing users with clear and accurate solutions to help them efficiently resolve common computer problems.
User Comments :