Many users complain that Windows 10 update keeps installing the same updates over and over. It’s so annoying, right? Don’t worry. This post of MiniTool summarizes 6 proven ways to fix the Windows 10 keeps updating issue.
Fix 1. Delete the SoftwareDistribution Folder
Windows updates files are stored in Software Distribution Folderuntil they are downloaded completely. If the contents of this folder get corrupted, you may encounter various issues like “we couldn’t complete the updates undoing changes”, “update error 0x80070020”, and the one discussed here. In this case, you can fix the error by deleting all contents in the SoftwareDistribution folder.
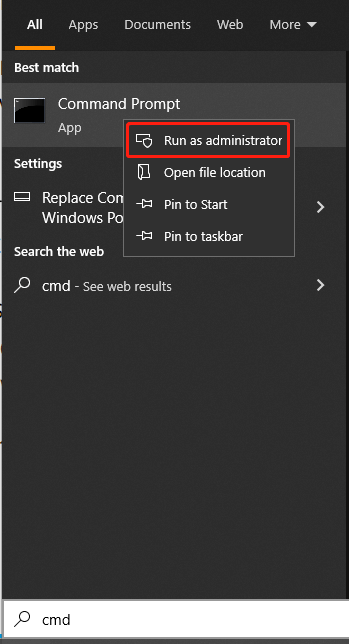
Step 1. Type cmd in the Search box, and then right-click Command Prompt and select Run as administrator.
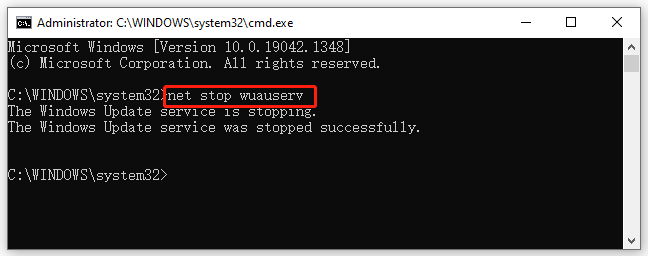
Step 2. In the elevated Command Prompt window, type the net stop wuauserv and press Enter to stop the Windows Update service first.
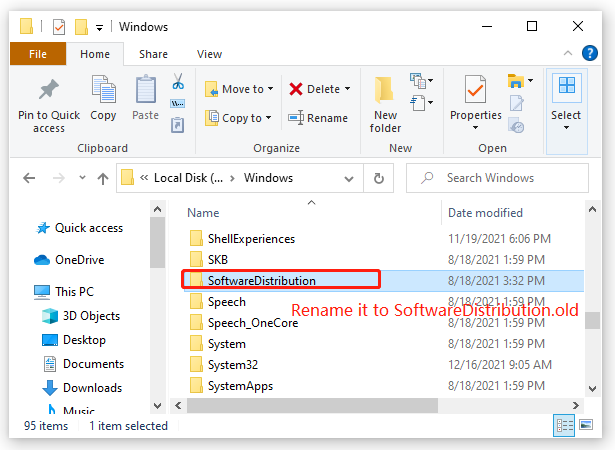
Step 3. Press Win + E keys to open File Explorer, and then go to the C:Windows SoftwareDistribution directory and rename the SoftwareDistribution as SoftwareDistribution.old. By doing so, you can check if there are any issues with the folder. If no problems are found after renaming, you can delete the folder.
Step 4. Run the start wuauserv command in the elevated Command Prompt window to start the Windows Update service. After that, restart your computer and check if the “Windows 10 constantly updating” issue gets solved.
Fix 2. Manually Remove the Problematic Updates
Sometimes Windows 10 update keeps installing the same updates over and over due to problematic updates. If the Windows updates are interrupted or properly installed, you may encounter this issue. Here you can fix it by removing the problematic updates.
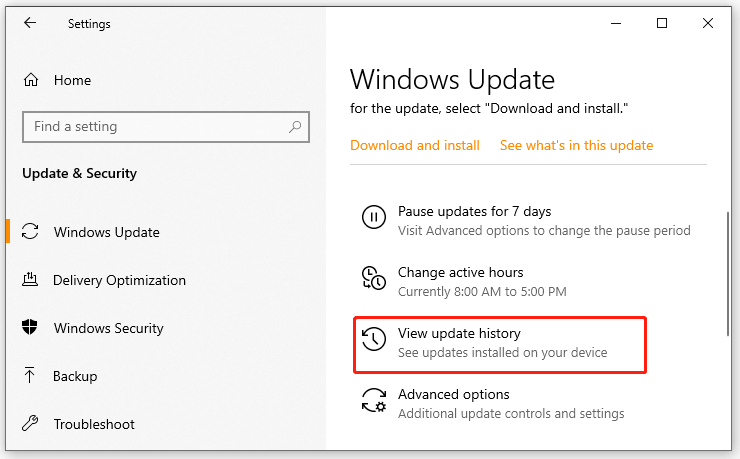
Step 1. Press Win + I keys to open the Settings app, and then select Update & Security > View update history.
Step 2. Click on Uninstall updates, and then right-click the most recent updates and select Uninstall. Then follow the on-screen prompts to complete the uninstallation.
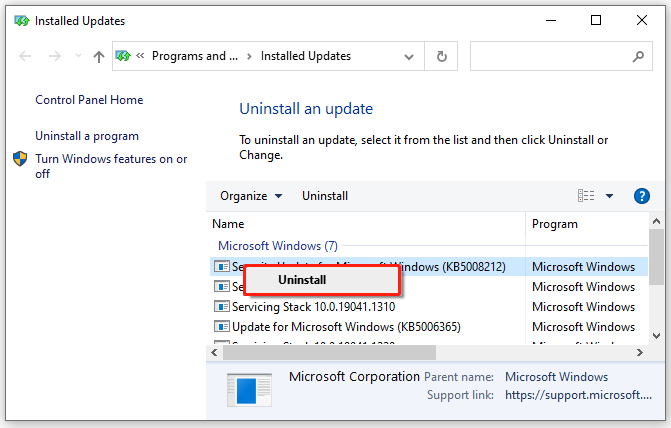
Step 3. After you uninstalled all problematic updates, restart your PC and check if the “Windows update keeps installing the same updates over and over” issue is fixed. Alternatively, you can revert your system to an earlier date where your Windows update works normally.
Fix 3. Run Windows Update Troubleshooter
Windows Update Troubleshooter is a practical built-in tool that enables you to detect and fix errors related to corrupted updates or other Windows updates issues. Here’s how to use it.
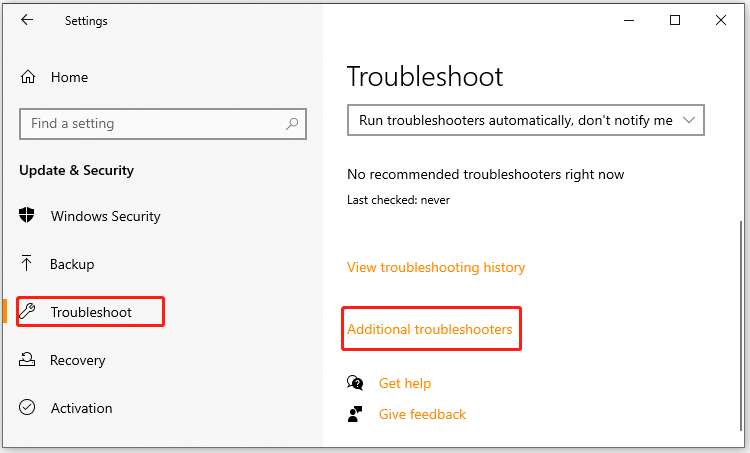
Step 1. Open the Settings window and select Update & Security.
Step 2. Select Troubleshoot from the left-hand pane and click on Additional troubleshooters from the right pane.
Step 3. Then you will see a list of troubleshooters. Select Windows Update and click on Run the troubleshooter.
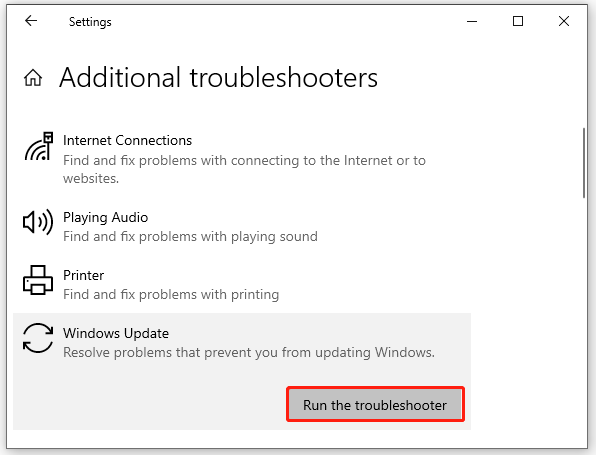
Step 4. Now, this tool will automatically detect problems with Windows updates and give you applicable fixes to the detected error.
Once completed, close the troubleshooter and see if the “Windows 10 keeps updating” issue is gone.
Fix 4. Check Windows Update Log
In addition, you can check if the Windows update is installed correctly via the WindowsUpdate.log file. Once you find out what causes the “Windows keeps updating every day” issue, you can take corresponding solutions to fix it.

Fix 5. Run an SFC Scan
The “Windows 10 update keeps installing the same updates over and over” error can occur due to corrupted or missing system files. You can repair them using System File Checker. Here’s how:
Step 1. Run Command Prompt as an administrator like Step 1 in Fix 1.
Step 2. In the elevated Command Prompt, type sfc /scannow command and hit Enter. After that, this tool will scan and repair the corrupted system files. This process may take you some time, so please wait patiently.

Once done, reboot your PC and check if the “Windows 10 constantly updating” issue is fixed.
Fix 6. Manually Install the Update from the Microsoft Update Catalog
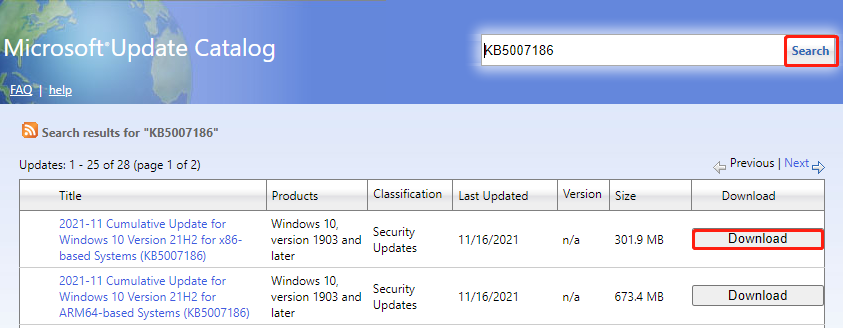
If the problem still occurs after trying all the above solutions, you can try installing your desired updates from the Microsoft Update Catalog manually. To do so, enter your desired update version code in the search bar and click on Search. Then click on Download to save the pack on your computer and install it.
User Comments :