Is your Panasonic Toughbook laptop running slower than usual? Rather than investing in a new device, consider the more budget-friendly option of upgrading to an SSD. In this article from Partition Magic, I’ll walk you through everything you need to know about the Panasonic Toughbook SSD upgrade process.
Why Do You Need to Upgrade Panasonic Toughbook SSD
Panasonic is a well-known Japanese electronics brand, and its computer products are most famous for the Toughbook series. Panasonic Toughbook is a little different from the laptops we use every day. It is designed for people who work in harsh environments.
Whether it is in an environment with high temperature, low temperature, humidity, dust, or strong vibration, the Panasonic Toughbook can maintain stable operation. It has three major features: waterproof, dustproof, and shockproof.
If you own a Panasonic Toughbook laptop, after many years of use, you may find that the system performance has significantly decreased. In this case, the best way is to upgrade Panasonic Toughbook from HDD to SSD, or from SSD to a larger SSD.
Specifically, some older Panasonic Toughbook laptops mostly use mechanical hard disks (HDD), so you need to migrate the operating system from HDD to SSD. If it is a newer version of the Panasonic Toughbook laptop, then you need to clone the data of the original SSD to the larger SSD.
These steps are not difficult as long as you use the right tools and follow the steps below. After upgrading to an SSD, your computer’s performance can be significantly improved in the following aspects:
- Improved boot and loading speed: SSD reads much faster than HDD, and boots up in just a few seconds.
- Faster system response: The system responds almost in seconds, is more stable when running multiple tasks, and has significantly less lag.
- Noiseless: Compared with HDD, SSD has no “clicking” sound or slight vibration.
- More power-saving: SSD consumes less power than HDD, which helps extend the battery life of the laptop.

How to Perform the Panasonic Toughbook SSD Upgrade?
How to upgrade Panasonic Toughbook SSD? I will divide the Panasonic Toughbook SSD replacement into 5 parts. Choose the right SSD for your computer; prepare some tools to remove the SSD; initialize the new SSD; clone the SSD data; replace the old hard drive with the new SSD.
Here are the detailed steps for Panasonic Toughbook SSD replacement:
Part One: Choose the Right SSD for Your PC
You need to find an SSD that matches the disk slot of your Panasonic Toughbook laptop. You should also consider the brand, storage capacity, and price. Some models of Panasonic Toughbook computers support M.2/NVMe SSDs, while others support SATA SSD. If you want more information, you can refer to this guide on: How to Pick an SSD of the Right Form Factor for Your Device.
Part Two: Prepare the Necessary Tools
Removing/replacing the SSD in a Panasonic Toughbook is a relatively complex process that requires some specific tools:
- The right screwdriver: The back of the Panasonic Toughbook is secured by a set of small screws that can usually be removed with a common screwdriver.
- Anti-static gloves: These are used to prevent static electricity from damaging internal components, and are recommended especially when working in a dry environment.
- Plastic spudger or pick: If the computer’s hard drive tray is tight, this tool can be used to open the component without damaging the case.
Part Three: Initialize the New SSD
New hard drives are usually uninitialized when they leave the factory, and Windows will show the disk as unallocated. Therefore, you need to initialize it to MBR or GPT so that the system can partition and format it to store files. You can initialize the SSD in Windows Disk Management.
Part Four: Migrate Data
To do the Panasonic Toughbook hard drive upgrade, the most important step is to migrate the original data to the new SSD.
So, how to migrate the old data? If you need to use third-party cloning software to help you, MiniTool Partition Wizard is a good choice.
This software can not only help you clone disks but also clone partitions. In addition, this software can also help you create/delete/extend/resize partitions, rebuild MBR, format FAT32, change cluster size, recover hard drive data, etc.
Do you know how to clone a hard drive to a new SSD? Below, I will introduce the steps to clone data using MiniTool Partition Wizard.
#1. Use Migrate OS to SSD/HD Feature
Migrating OS to SSD/HD means migrating the operating system from the original hard drive to the new hard drive. This method is more suitable for migrating the operating system to a faster storage device (such as SSD) to improve system performance without migrating all files and applications.
Step 1: Connect your SSD to your computer.
Step 2: Press the download button below to get the MiniTool Partition Wizard installation file. Open the .exe file and follow the prompts to install it on your computer. Once installed, open the software to access the main interface.
MiniTool Partition Wizard DemoClick to Download100%Clean & Safe
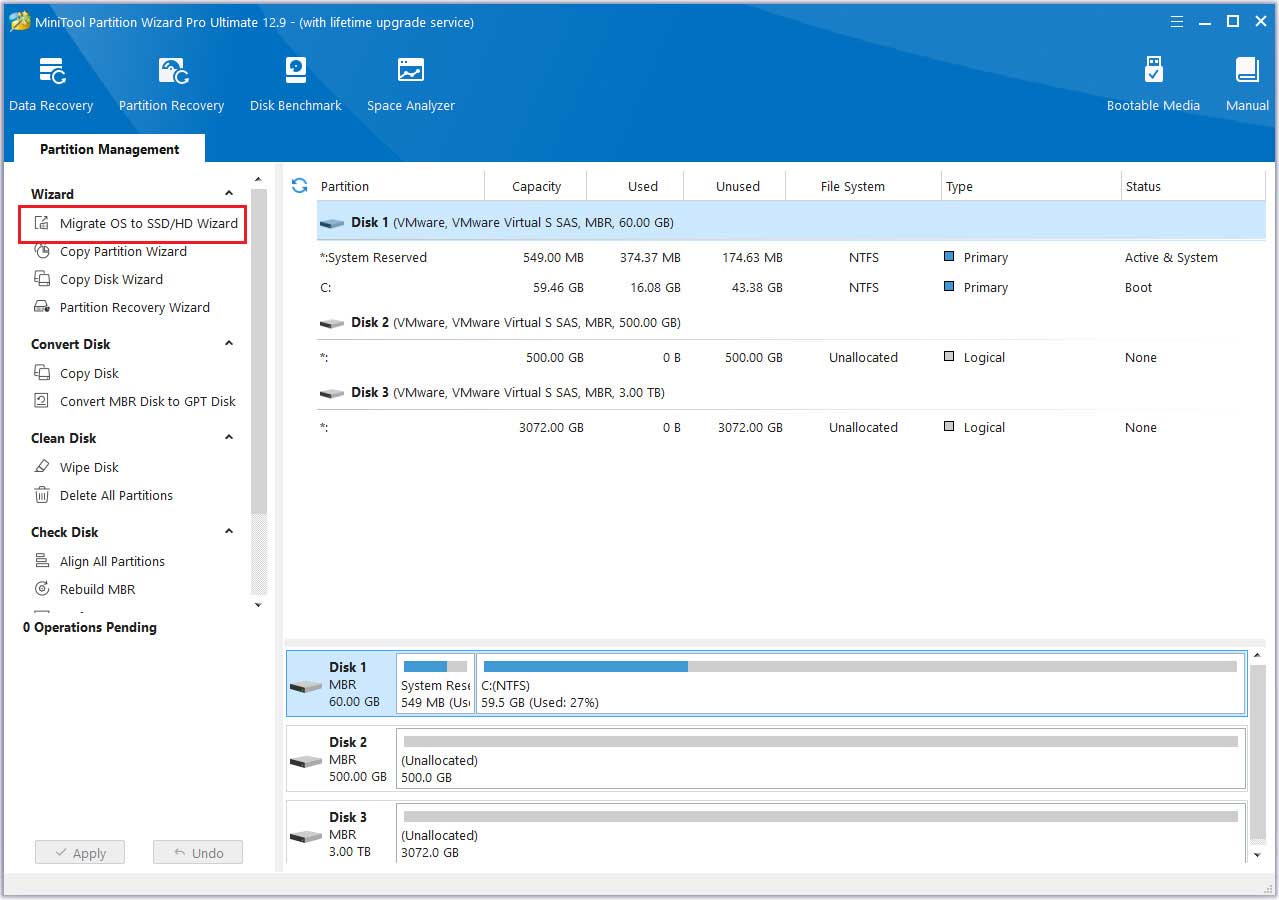
Step 3: Click on the Migrate OS to SSD/HD Wizard feature from the left action panel.
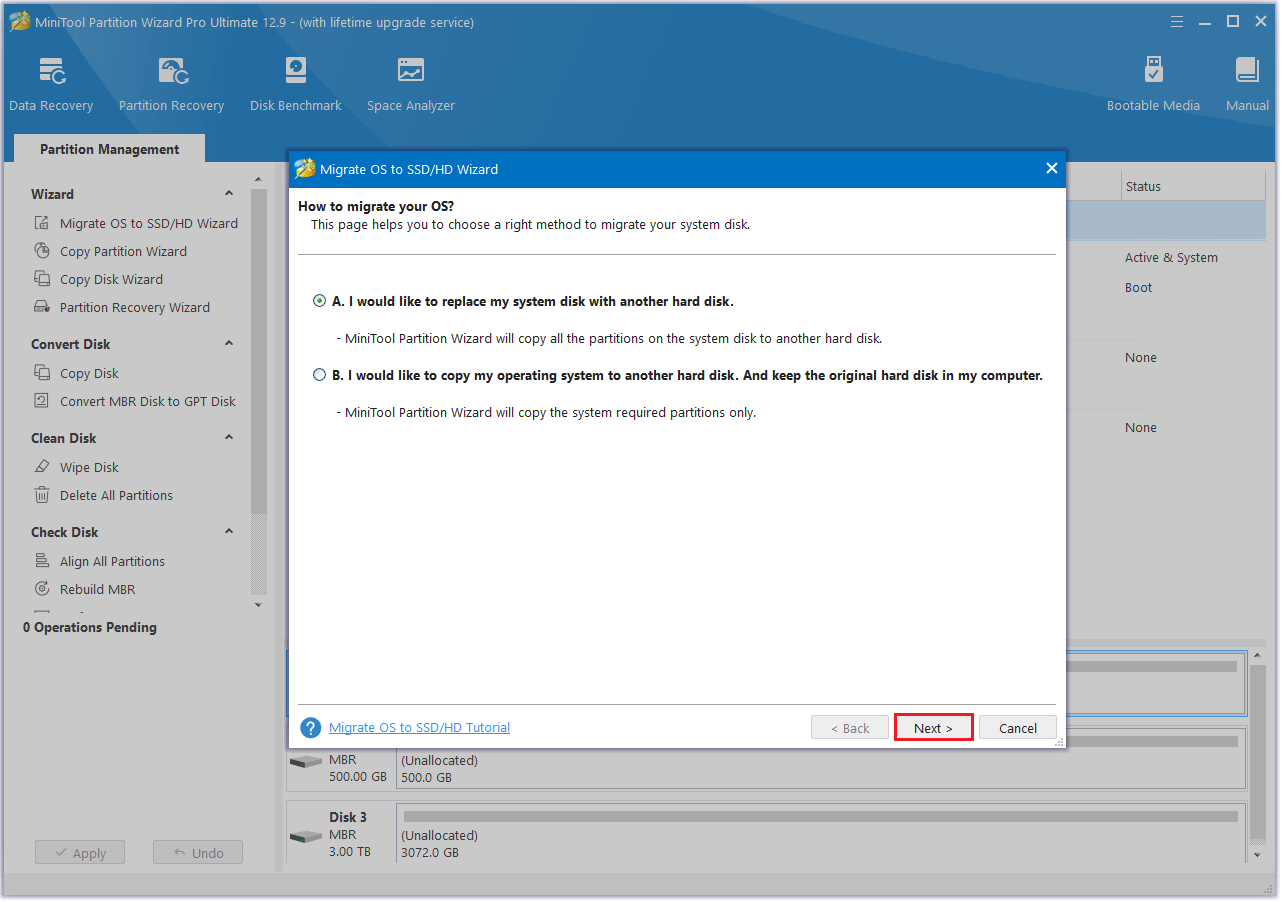
Step 4: In the new pop-up window, select option B to copy the operating system to another disk. Then, click Next.
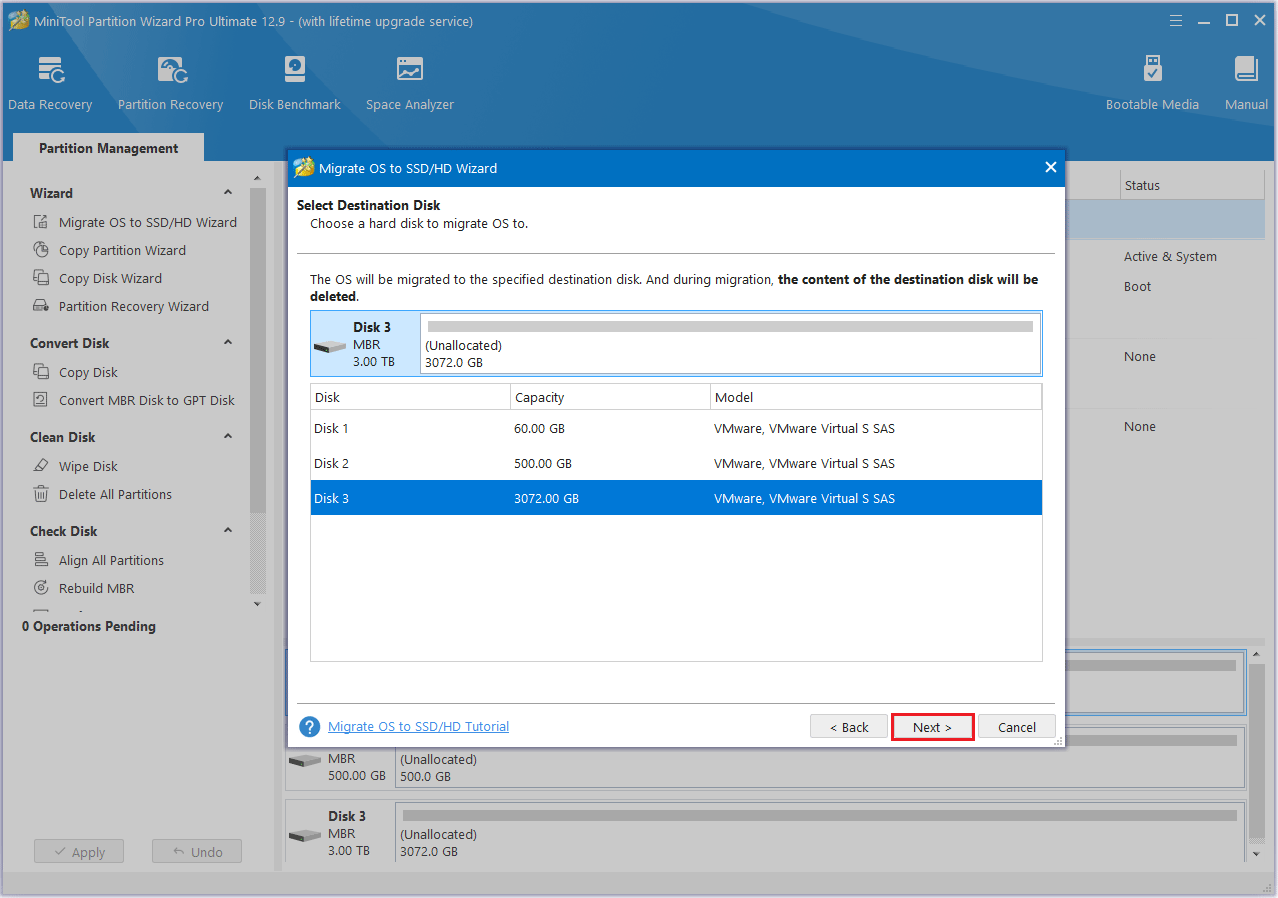
Step 5: Select the new SSD as the destination disk and click Next. If a warning message pops up, review it carefully and click Yes to continue.
Step 6: Select your preferred copy options and adjust the disk layout settings to suit your requirements. Click Next.
- Fit partitions to entire disk: The partitions on the source disk will be extended by an equal proportion to fill the entire new SSD.
- Copy partitions without resizing: All the partitions on the source disk are copied into the new SSD without changes in size or location.
- Align partitions to 1 MB: The Align partitions to 1 MB option will apply 4K alignment on the SSD.
- Use GUID partition table for the target disk: The Use GUID partition table for the target disk option will apply GPT on the SSD, but it only appears when the source disk is an MBR disk.
- Change Selected Partition: You can resize or move the partition according to your needs.
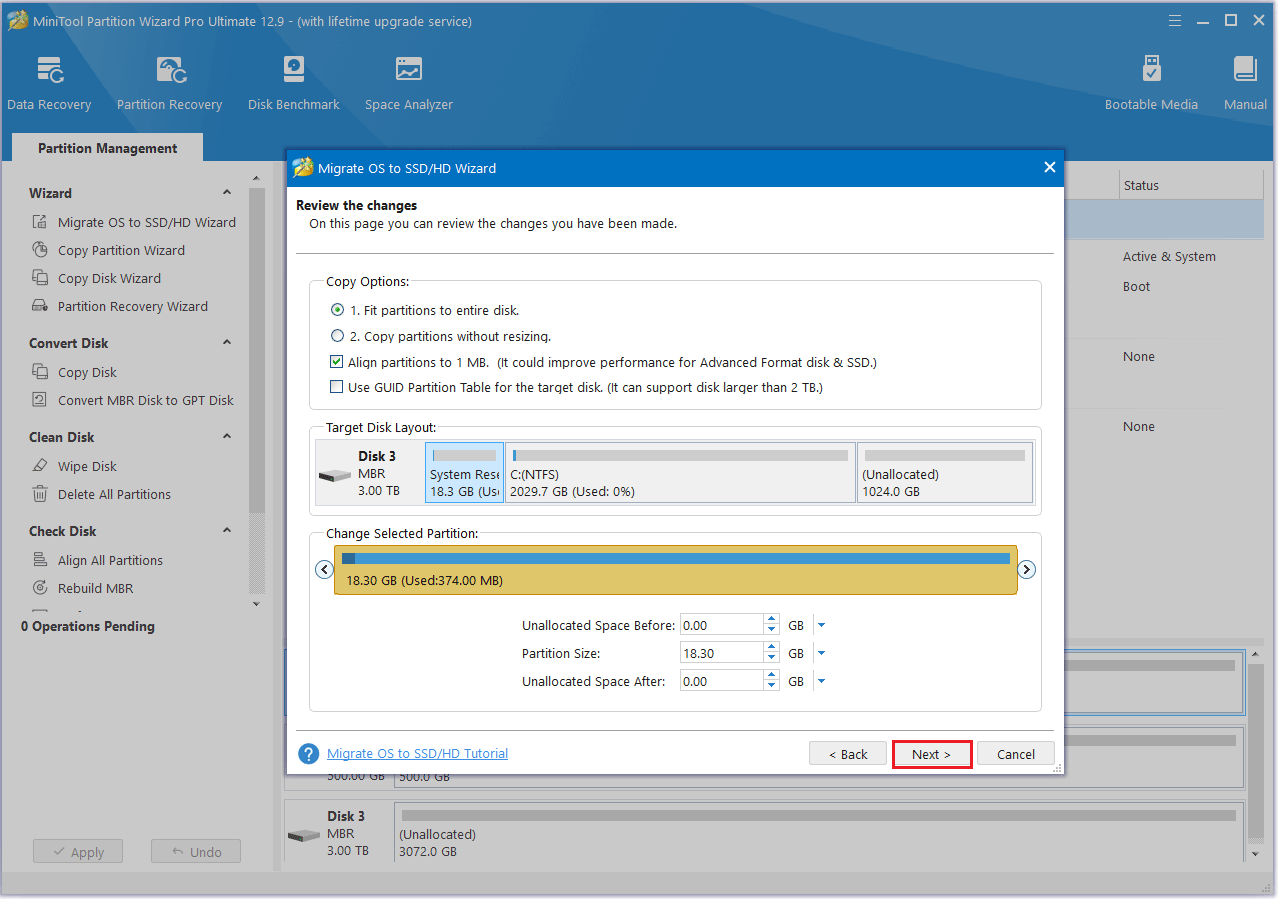
Step 7: Read the note about how to boot from the new SSD and press the Finish button.

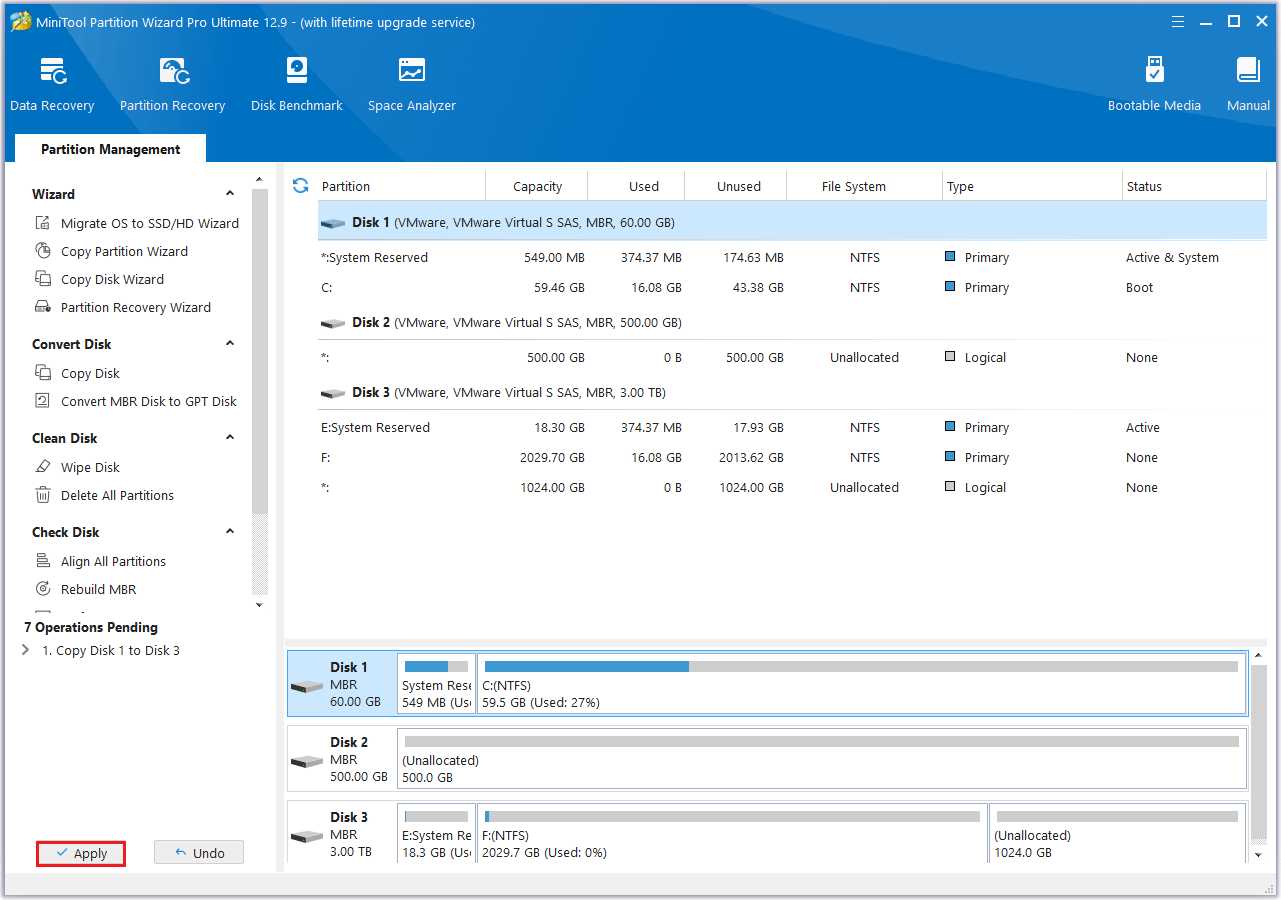
Step 8: When you go back to the main interface, click Apply to start the cloning process.

#2. Use the Copy Disk Feature
To clone data from the original SSD to the new, larger SSD, you can use the Copy Disk feature of MiniTool Partition Wizard. This feature can help you copy the entire disk (including all partitions, systems, data, etc.) to another disk one by one.
Step 1: Open MiniTool Partition Wizard to access its main interface. Then, right-click on the desired disk and choose Copy from the context menu. Alternatively, you can select the Copy Disk option from the action panel on the left.

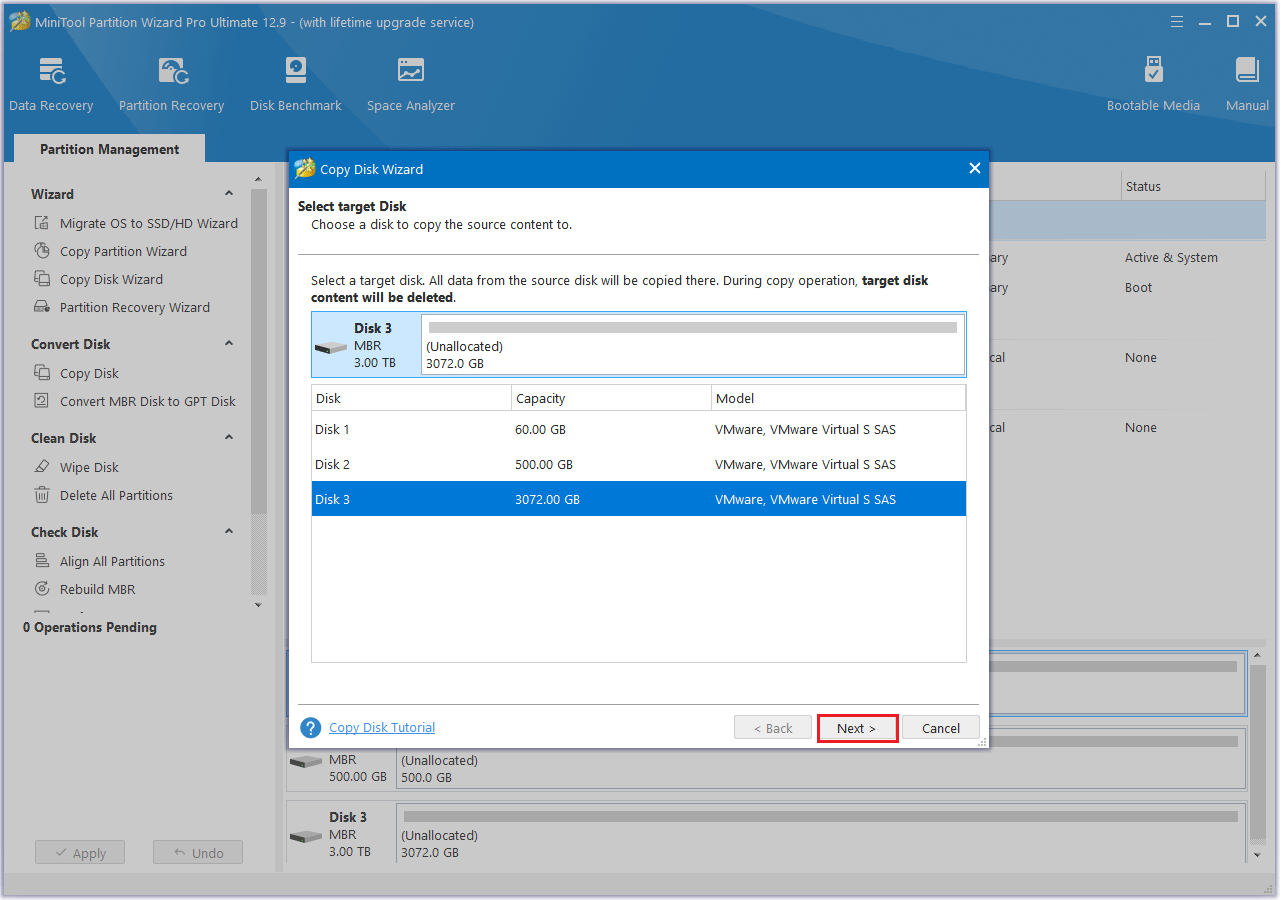
Step 2: In the Copy Disk Wizard window that appears, choose the new SSD as the destination disk and click Next to proceed.
Step 3: Configure the copy settings and adjust the disk layout as needed. After that, click Next to move forward.
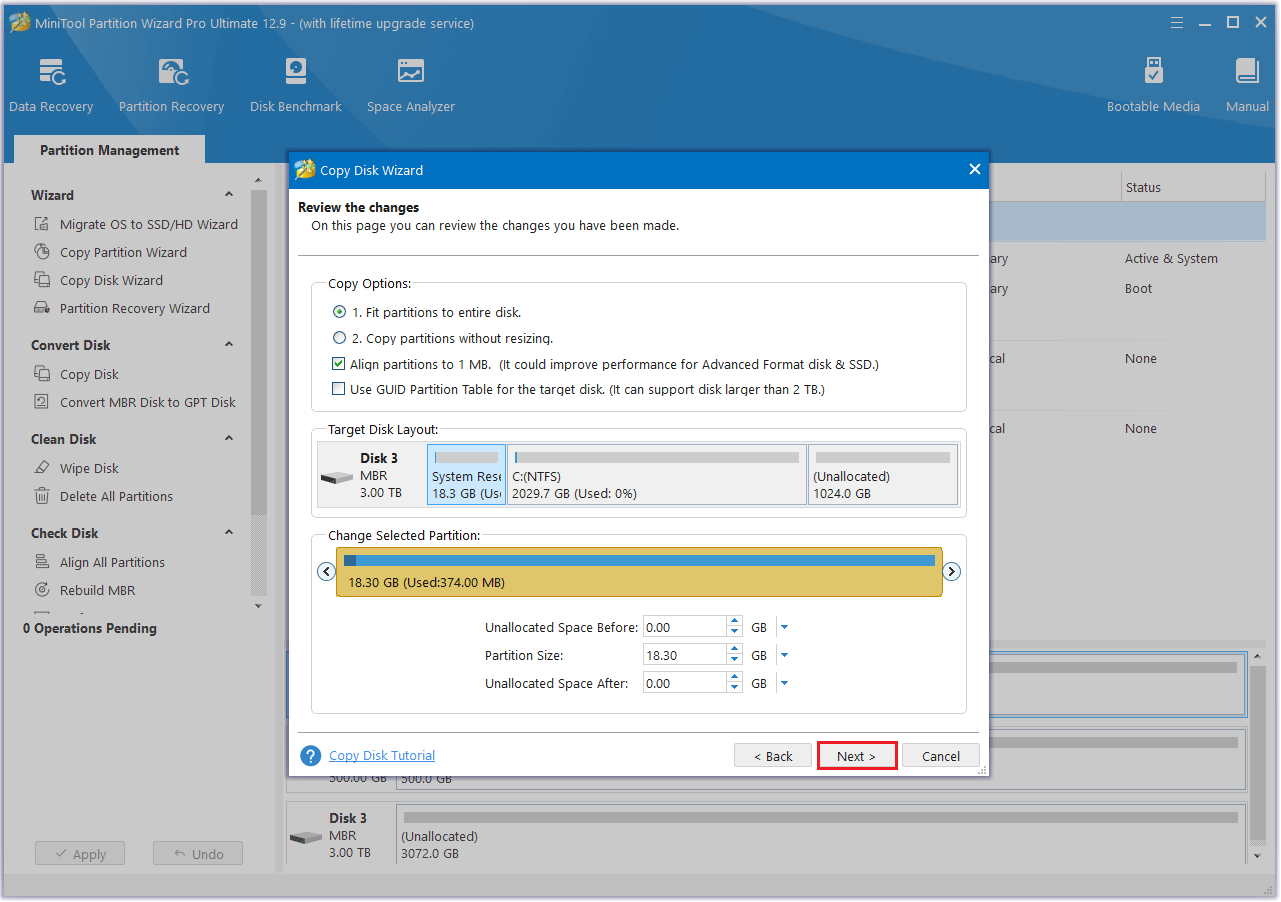
Step 4: Review the note for guidance on how to boot from the target disk, then click Finish to return to the main interface.
Step 5: Click the Apply button to initiate the pending task and wait for the cloning process to finish.
Part Five: Replace the Old Disk with the New SSD
After the data is cloned, you will then need to replace the old disk. The process of replacing the disk is a more complicated process, and problems may occur if you are not careful. So, you need to be patient when doing it.
You can refer to the following steps to perform the Panasonic Toughbook SSD replacement.
- Turn off the laptop and disconnect all the power cables. Press and hold the power button for 5 seconds to discharge the remaining power on the motherboard.
- Use a screwdriver to remove all the screws on the back of the laptop. Put these screws together in a small box to avoid losing them.
- You need to put on anti-static gloves, then remove the entire back cover of the laptop and find the old SSD or HDD.
- Remove the screws that fix the hard drive bracket to the hard drive and remove the hard drive from the bracket.
- Now, install the new hard drive into the hard drive bracket and secure it with the screws.
- After reassembling all the parts, secure it in place with the screws that you removed earlier.
- Reconnect all the cables and turn on the computer to see if the computer can recognize the new SSD.
Bonus Tip: What to Do with the Old SSD
What to do with the old hard drive? To reuse the old hard drive, you can consider deleting the old partitions and re-creating them. If you want to sell the old hard drive, you should erase all the data to prevent others from stealing your data.
For this, you can try MiniTool Partition Wizard. It can help you re-create the partitions and erase the data on the old hard drive. Before that, you should connect the old hard drive to your computer.
MiniTool Partition Wizard FreeClick to Download100%Clean & Safe
Repartition of the Old Hard Drive
- Go to the MiniTool Partition Wizard’s main interface. Right-click on the old hard drive, and choose Delete All Partitions. Then click on Yes to confirm the operation.
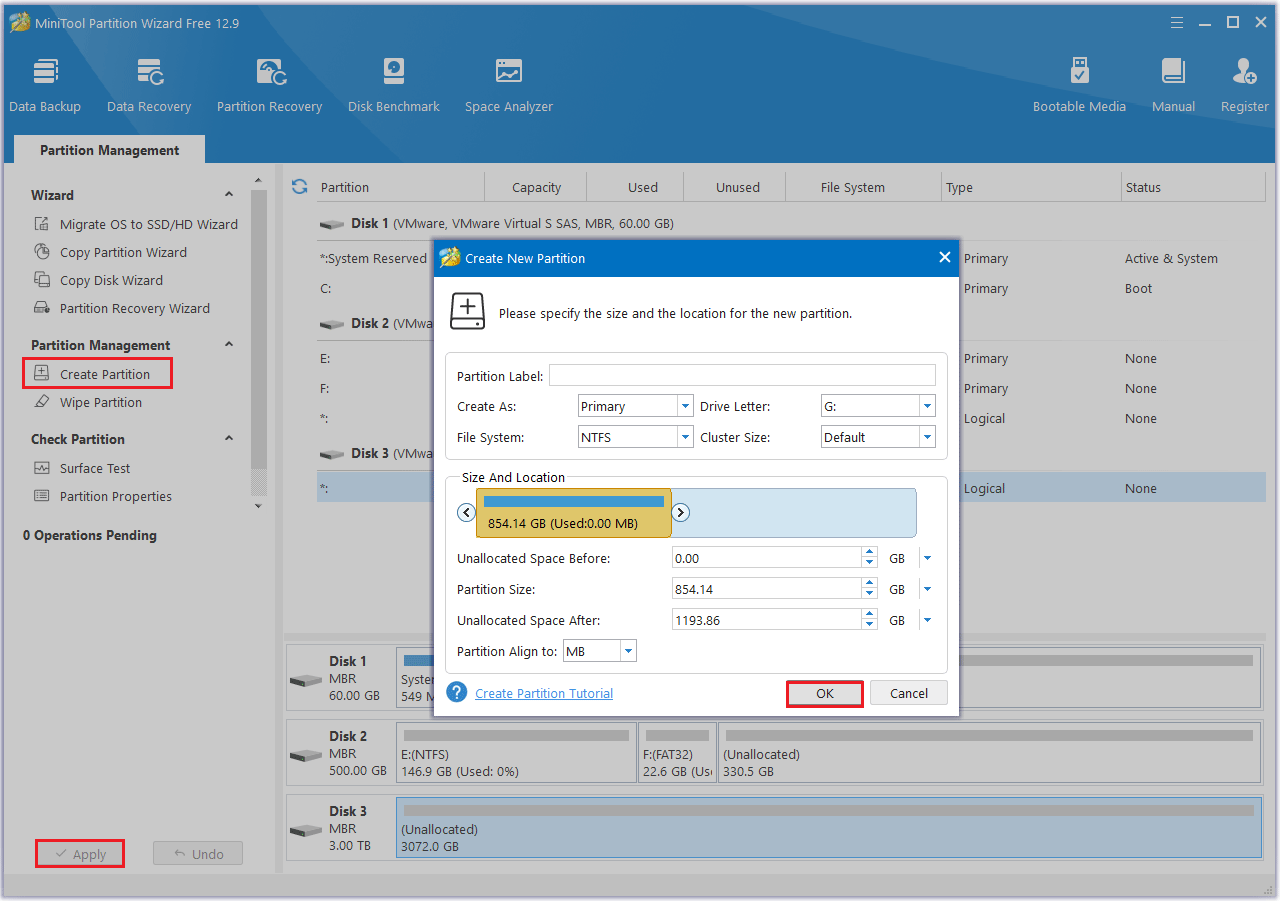
- Now, you can right-click on the unallocated space and choose Create.
- Adjust the partition settings according to the on-screen instructions, then click OK to proceed.
- Finally, click on Apply to execute all the pending operations.
Wipe the Old Hard Drive
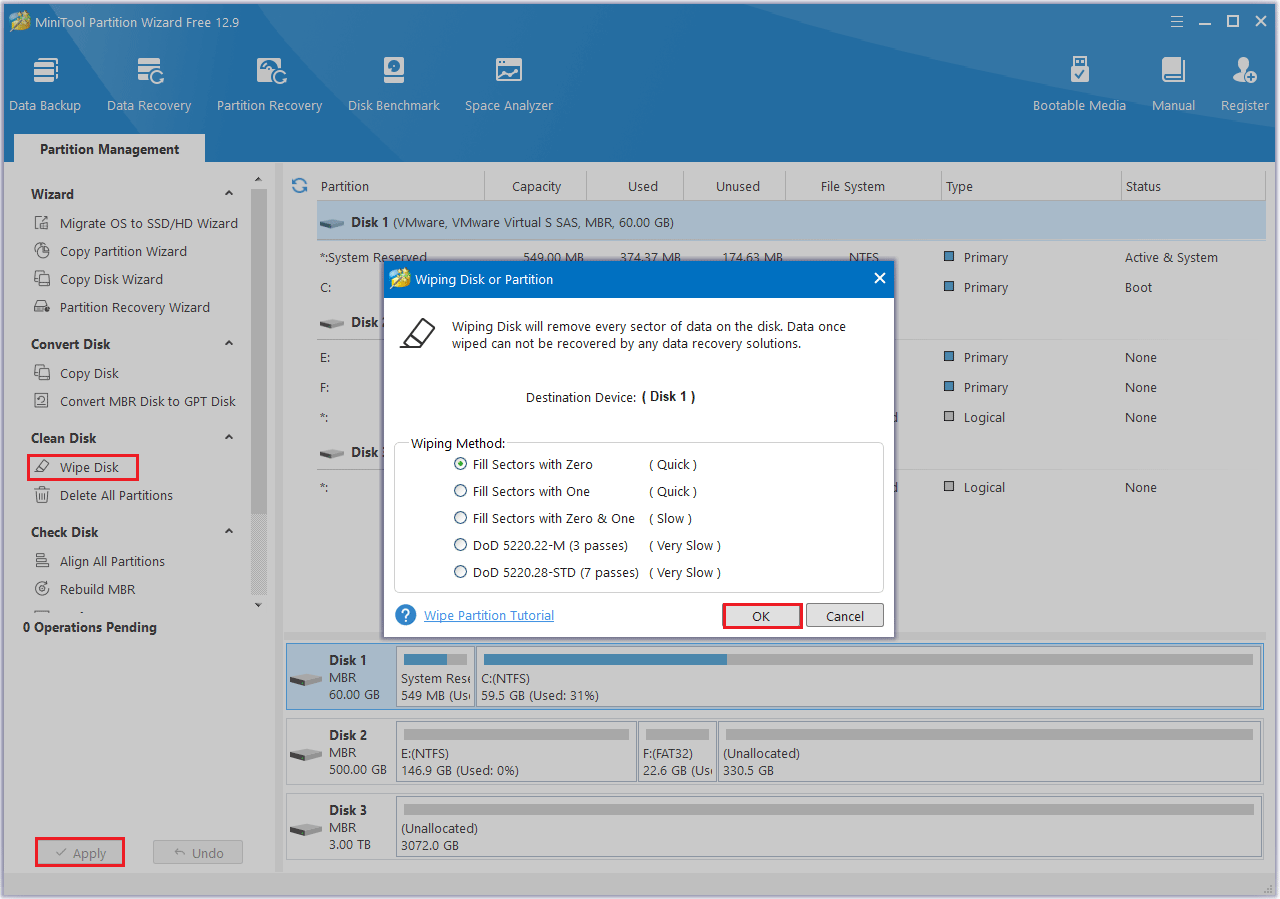
- Select the old drive and choose Wipe Disk from the action panel.
- Choose one of five wiping methods listed on the pop-up window and click on OK.
- Click Apply to execute the operation. The wiping process will begin automatically, and you simply need to wait patiently for it to complete.
Bottom Line
After reading this article, you should know how to do the Panasonic Toughbook SSD upgrade. During the upgrade process, you can use the MiniTool Partition Wizard to migrate the operating system and data from the old drive to the new SSD.
If you have any questions or suggestions while using MiniTool Partition Wizard, you can contact us via [email protected] to get a quick reply.
About The Author

Position: Columnist
Cecilia has been an editor at MiniTool for two years. She primarily focuses on disk and partition-related content, with particular expertise in disk cloning, partition recovery, and PDF document conversion. She is dedicated to providing users with clear and accurate solutions to help them efficiently resolve common computer problems.
User Comments :