Some problems have been reported with the GTA 5 game, and GTA 5 stuttering issue is one of them. In this article, you will get detailed information about the GTA 5 stuttering issue and learn about some effective solutions from MiniTool Partition Wizard.
About GTA 5 Stuttering Issue
GTA 5 or GTA V stands for the game Grand Theft Auto V. It was developed by Rockstar North and published by Rockstar Games. GTA 5 has gained great popularities since its release and it is considered as one of the best video games ever made.
If you want to play Grand Theft Auto V on your computer, the following recommended system requirements to run the game should be satisfied:
- OS: Windows 8.1 64 Bit, Windows 8 64 Bit, Windows 7 64 Bit Service Pack 1
- Processor: Intel Core i5 3470 @ 3.2GHZ (4 CPUs) / AMD X8 FX-8350 @ 4GHZ (8 CPUs)
- Memory: 8GB
- Video Card: NVIDIA GTX 660 2GB / AMD HD7870 2GB
- Sound Card: 100% DirectX 10 compatible
- HDD Space: 65GB
Many game lovers are in favor of this action-adventure game, but the gaming experience is not always fantastic in GTA 5. According to the reports from players, GTA V often gets stuttering or lagging in the middle of the game. This problem can be caused by hardware issues, improper in-game settings, corrupted graphics driver, and so on.
Well, it might be hard for you to figure out where the problem lies. But you don’t need to worry if you are struggling with the GTA 5 stuttering issue. Just check your computer specs and upgrade your hardware to satisfy Grand Theft Auto V PC system requirements at first.
If you still get stuttering or lagging issue during gameplay, then try the following effective methods.
7 Methods to Fix GTA V Stuttering Issue
- Launch GTA 5 as administrator
- Disable fullscreen optimization
- Close unnecessary processes running in the background
- Configure GTA 5 game settings
- Enlarge the drive where GTA 5 is installed
- Update graphics driver
- Upgrade the original HDD to SSD
Fix 1: Launch GTA 5 As Administrator
You should know that most installed programs require administrator privileges for proper functioning on your computer. Similarly, GTA 5 needs the administrator access to its related game files on the system. If it doesn’t have the permission, certain necessary files can’t be read and loaded. As a result, you might encounter GTA 5 stuttering issue.
So, you can try granting the game with administrator privileges. Just right-click the shortcut or executable of the game and choose Run as administrator. If GTA V stuttering issue persists, you can move on to the next solution. If the issue disappears, follow the steps below to set to launch the game as administrator every time.
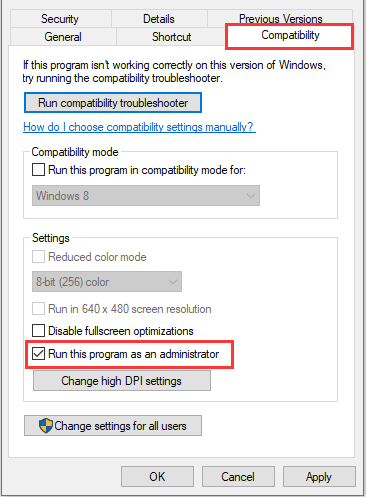
Step 1: Right-click the shortcut or executable of GTA 5 and choose Properties.
Step 2: Go to Compatibility tab and check Run this program as an administrator option.
Step 3: Click Apply and OK to save changes.
Fix 2: Disable Fullscreen Optimization
The fullscreen mode gives the game complete ownership of the display and allocation of resources of your graphics card. And most players would like to play the game on such a borderless fullscreen for better visual experience and immersive feeling.
But unfortunately, it has been proven that the GTA 5 stuttering PC issue is associated with fullscreen in some cases. So, if you are playing the game in fullscreen mode when you get GTA 5 lagging or stuttering issue, go to disable it. Just open the Properties of GTA 5, check Disable fullscreen optimizations under Compatibility tab, and apply the change.
Fix 3: Close Unnecessary Processes Running in the Background
Sometimes, you may have some other processes running in the background when you are playing the game. But actually, these processes might consume lots of resources and thus lead to GTA 5 stuttering PC issue.
Therefore, you’d better close all the unnecessary processes that are running in the background to free up more resources for your GTA 5. Here’s how to do it:
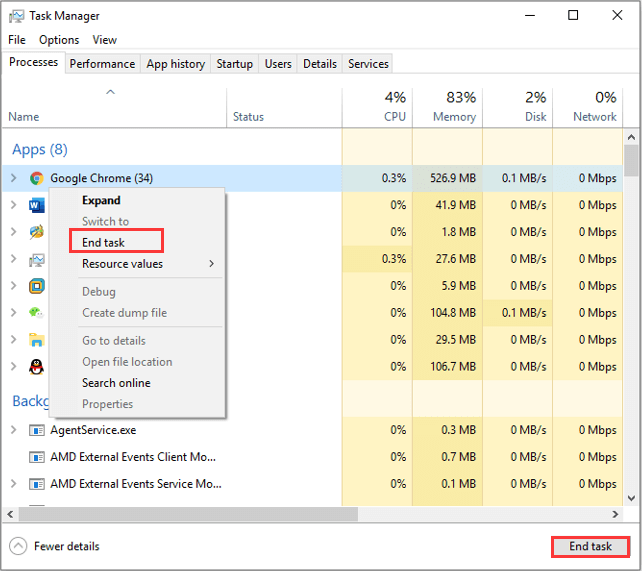
Step 1: Right-click the Start button and choose Task Manager.
Step 2: Under Processes tab, right-click the process you want to close and choose End task. You can also click the End task button at the bottom right corner of the window after selecting the process.
Step 3: Repeat the operation for any other unnecessary processes to close all of them.
Fix 4: Configure GTA 5 Game Settings
The GTA V stuttering issue might also be caused by the in-game settings. If you have configured GTA 5 settings improperly, you are very likely to encounter the problem. Here is something you can do with the in-game settings.
Turn Off VSync
Vsync is feature that synchronize the frame rate with the monitor refresh rate to reduce screen tearing in some 3D PC games. In some cases, this feature will lead to stuttering issue in gameplay. So, you can try disabling this feature.
Just go to GTA V SETTINGS > Graphics and turn the VSync option off. If this feature is already disabled, then turn it on, restart your game and turn it off again.
Reduce FPS
Many players blindly pursue high FPS which is thought to be always better for the game experience. However, not all the games are suitable for high FPS and GTA 5 is one of them. Actually, the FPS of 60 Hz is fine for GTA 5 and higher FPS might cause GTA 5 lagging or stuttering issue.
Thus, you should reduce FPS in the game if you are using higher FPS. To do that, you need to navigate to GTA 5 SETTINGS > Graphics > Refresh Rate and set it to 60 Hz or lower. After saving the changes, restart the game and check if the stuttering issue is fixed.
![Frames Per Second: 10 Ways to Boost FPS Windows 10 [New Update]](https://images.minitool.com/partitionwizard.com/images/uploads/2020/04/how-to-increase-fps-thumbnail.jpg)
Set Graphics Settings to Normal
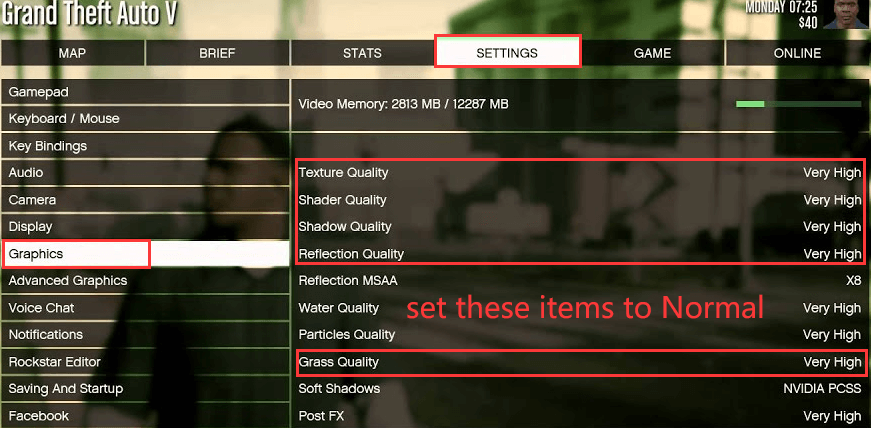
Apart from the above settings, you also need to pay attention to the following items which are often set to higher than Normal:
- Texture Quality
- Shader Quality
- Shadow Quality
- Reflection Quality
- Grass Quality
According to the reports, these in-game graphics settings could also trigger GTA 5 lagging or stuttering issue. To get rid of the issue in this case, you should lower down the mentioned graphics settings and make sure they are Normal.
Fix 5: Enlarge the Drive Where GTA 5 Is Installed
As mentioned at the very beginning, the Grand Theft Auto V requires 65 GB to run on the computer. It doesn’t mean that you can play the game smoothly when there are exactly 65 GB available on the drive where the game is installed.
In practice, GTA 5 requires far more free space to store cumulative updates, patches, and other necessary data. And the game might get stuttering if the free space is not enough. Therefore, you might need to take actions to enlarge the storage drive of the game. Here are 2 options for you.
Option 1: Move the Game to Another Drive
If there is another drive that has adequate free space, the easiest way for you is to move your GTA 5 to this drive. To achieve this goal, you can use the embedded feature of Steam client. You can refer to the simple guide displayed below:
Step 1: Open Steam, go to Settings > Downloads > Steam Library Folders, and click ADD LIBRARY FOLDER in the pop-up window.
Step 2: Choose the drive with enough free space, input a folder name you want and click OK to create a new folder that will be used to store the game.
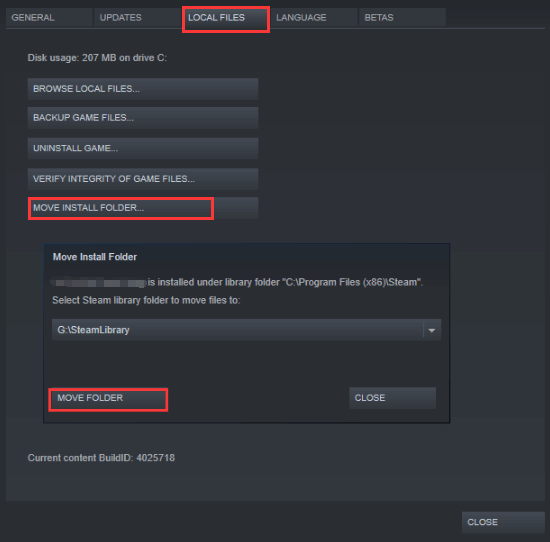
Step 3: Go back to the main interface of Steam and choose LIBRARY. Right-click GTA 5 and select Properties.
Step 4: Under LOCAL FILES tab, click MOVE INSTALL FOLDER. Then, choose the library folder create just now and hit MOVE FOLDER to transfer the game data to the desired drive.
See also: 3 Methods to Help You Move Steam Games to Another Drive
Option 2: Extend the Drive with MiniTool Partition Wizard
If no single drive has enough free space, you can alternatively choose to extend the original drive by taking space from another drive. This is a risky operation and you need to use a reliable third-party program. MiniTool Partition Wizard is recommended here for you, and you can extend the drive with the utility by following the steps below.
Step 1: Download and install MiniTool Partition Wizard on your computer.
MiniTool Partition Wizard FreeClick to Download100%Clean & Safe
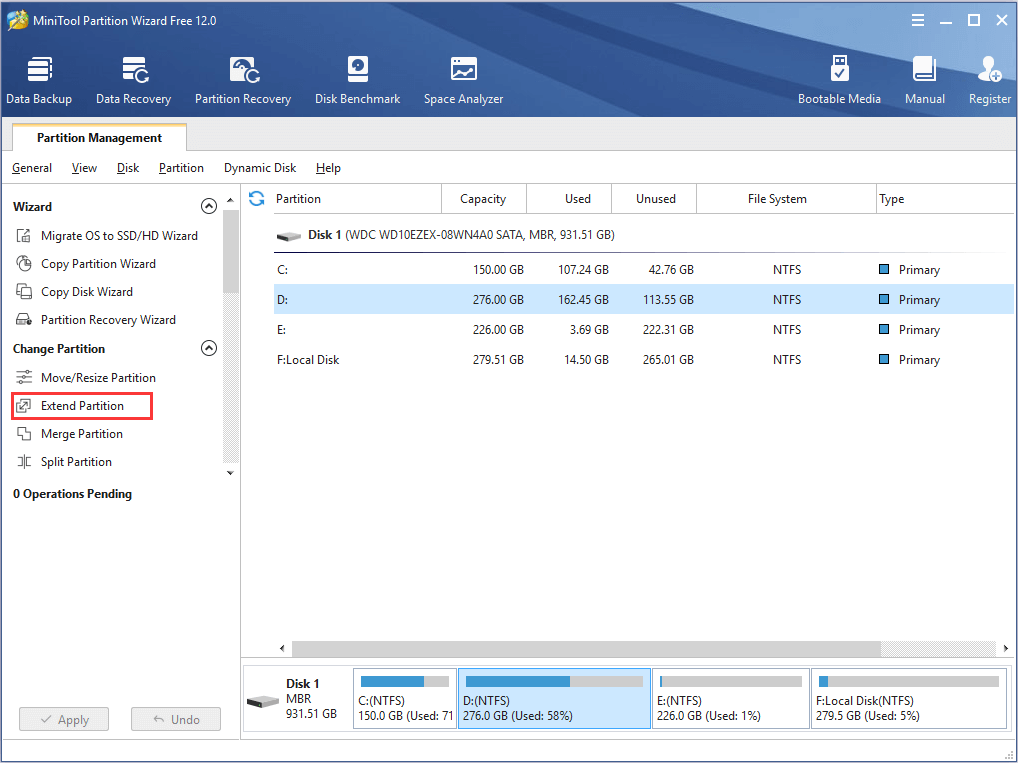
Step 2: Select the target drive and choose Extend Partition feature.
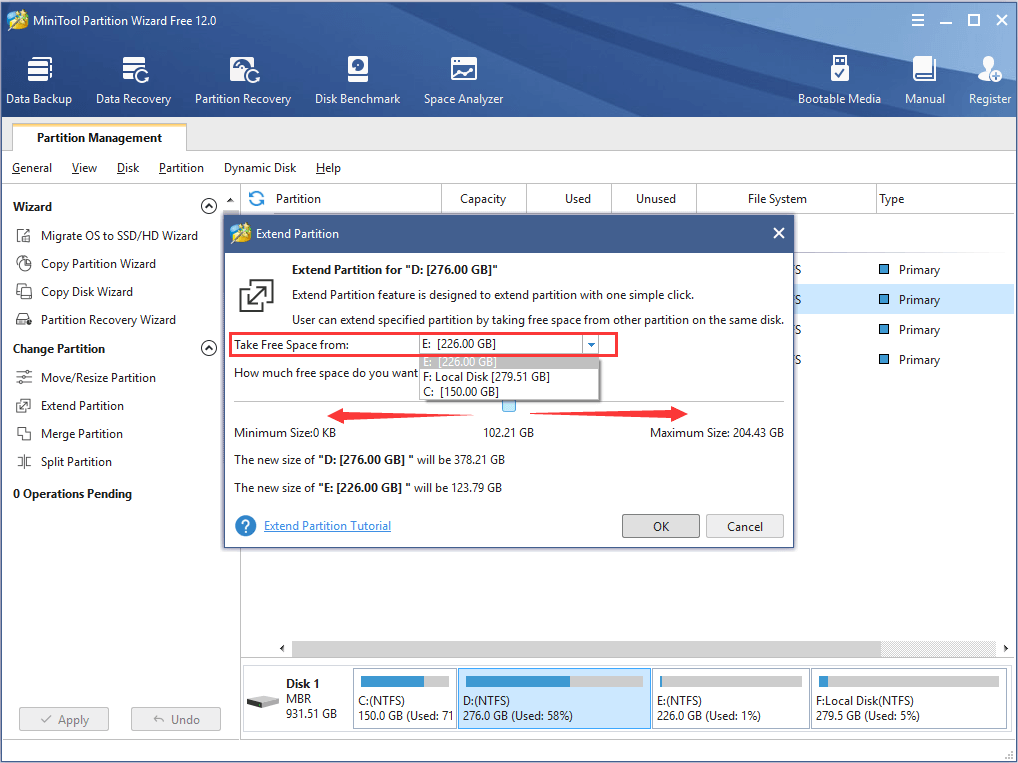
Step 3: Select a partition from the list of Take Free Space from and move the slider to decide how much free space you want to take. Click OK to continue.
Step 4: Click Apply button to execute the operation.
Fix 6: Update Graphics Driver
The graphics driver is very important for video games and it can enhance your PC gaming experience. The outdated or corrupted graphics driver could also lead to GTA V stuttering issue on your computer.
If you haven’t updated your driver for a long time, updating graphics driver might be helpful to fix the problem. For the methods to update graphics driver, you can refer to this post: How to Update Graphics Card Drivers (NVIDIA/AMD/Intel)?
Fix 7: Upgrade the Original HDD to SSD
Attributing to the high performance, SSD can ensure better gaming experience and it is always a preferred choice over HDD for game lovers (See more information about SSD and HDD). So, when you are facing stuttering or lagging issue in gameplay, upgrading your HDD to SSD is also a feasible and effective solution.
If you fail to fix GTA 5 stuttering with the above methods, don’t hesitate to upgrade to SSD. Before you replace the original HDD, you need to transfer your data to the new SSD. You can register to MiniTool Partition Wizard Pro Ultimate edition to achieve that.
Step 1: Prepare a nice SSD for gaming and connect it to your computer. Launch MiniTool Partition Wizard.
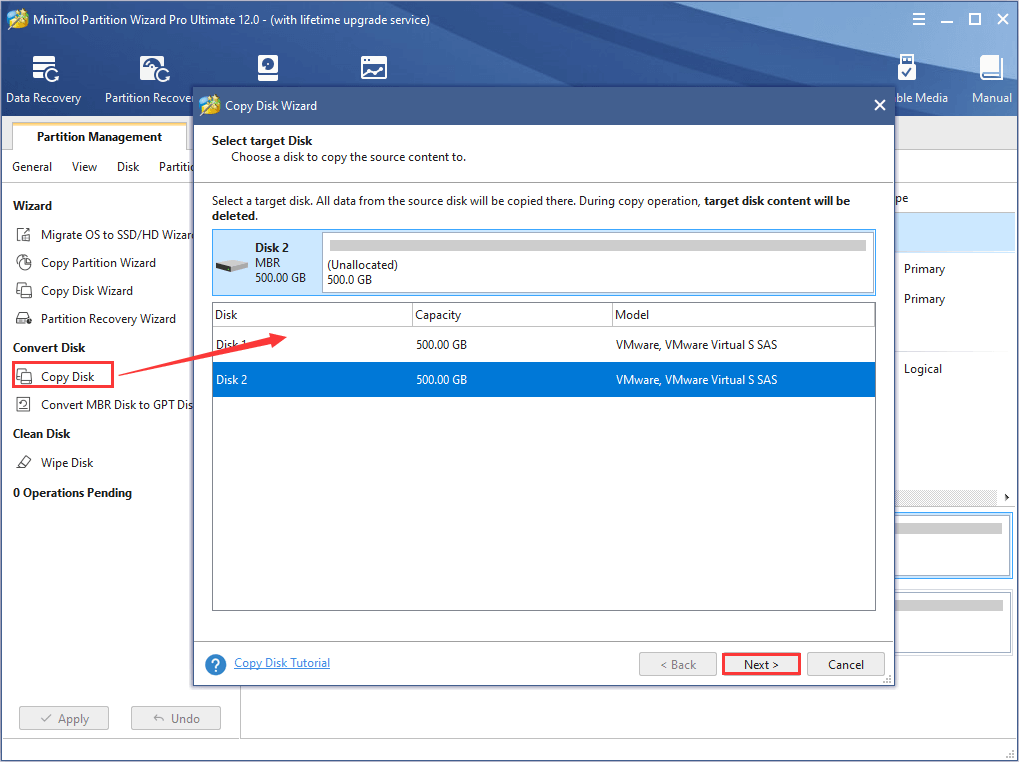
Step 2: Select the original disk and choose Copy Disk from the left pane. Select the new SSD as the target disk and click Next button to continue.
Step 3: Make certain configurations as your needs and click Next button to confirm the changes.
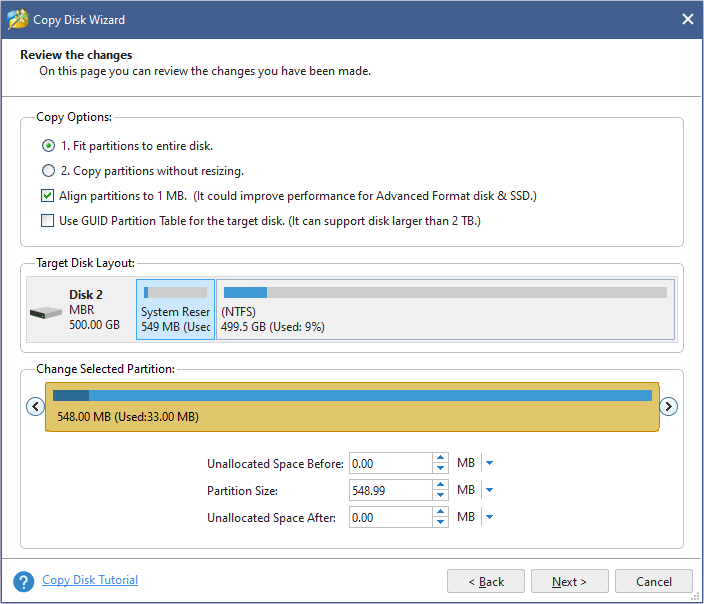
Step 4: Read the information on how to boot from the new disk and click Finish. Then, hit Apply button to execute operations.
After transferring the data, you can remove the original disk and install the SSD on your computer.
Bottom Line
This article has introduced 7 methods to get rid of GTA 5 stuttering PC issue. Have you fixed the problem with these fixes? Please feel free to share your experience and ideas in the following comment zone.
If you have any problems using MiniTool Partition Wizard program, you can ask for technical support by sending a message to [email protected].
GTA 5 Stuttering FAQ
- Launch GTA 5 as administrator
- Disable fullscreen optimization
- Close unnecessary processes
- Change GTA 5 graphics settings
- Enlarge the storage drive of GTA 5
- Update graphics driver
- Upgrade HDD to SSD
User Comments :