Steam is the world’s largest digital distribution platform for PC games. By default, the Steam games are installed to the C drive.
As modern games grow in size, like Cyberpunk 2077 and Red Dead Redemption 2, they consume 100GB+ of storage. It’s no surprise that game drives quickly run out of space.
Fortunately, moving Steam games to another drive can resolve this problem, which doesn’t require redownloading hundreds of gigabytes of data.
This guide covers information about causes and methods of moving Steam games to another drive and troubleshooting common issues.
Why Do You Move Steam Games to Another Drive?
There are some benefits of moving Steam games to another drive. For example:
#1. Free up space on the main drive
Moving large games off the primary system hard drive prevents it from filling up. This is crucial for keeping your computer running smoothly and ensuring sufficient space for important operating system updates and other software installations.
#2. Improve load times and performance
You might have installed Steam games on an HDD because of its larger capacity and lower price. Then, moving games with large open worlds or frequent loading screens from an HDD to a faster SSD can significantly reduce load times and improve overall gameplay smoothness.
#3. Organize game libraries
Steam allows you to create multiple game library folders on different hard drives. For example, you can place frequently played, performance-intensive games on a fast SSD, while less frequently played or less performance-intensive games on a large-capacity HDD.
#4. Portability
Moving games to an external hard drive allows users to carry their game library with them and play games on different computers without having to re-download them each time, saving time.
Prerequisites Before Moving Steam Games
Before moving Steam games to another drive, there are a few important prerequisites to follow to ensure a smooth transfer:
#1. Check destination drive compatibility and space
First, check the destination drive’ file system. Steam’s default and most compatible file system on Windows is NTFS because it supports large game files.
If the target drive uses a non-NTFS file system, reformat it to NTFS to avoid incompatibility.
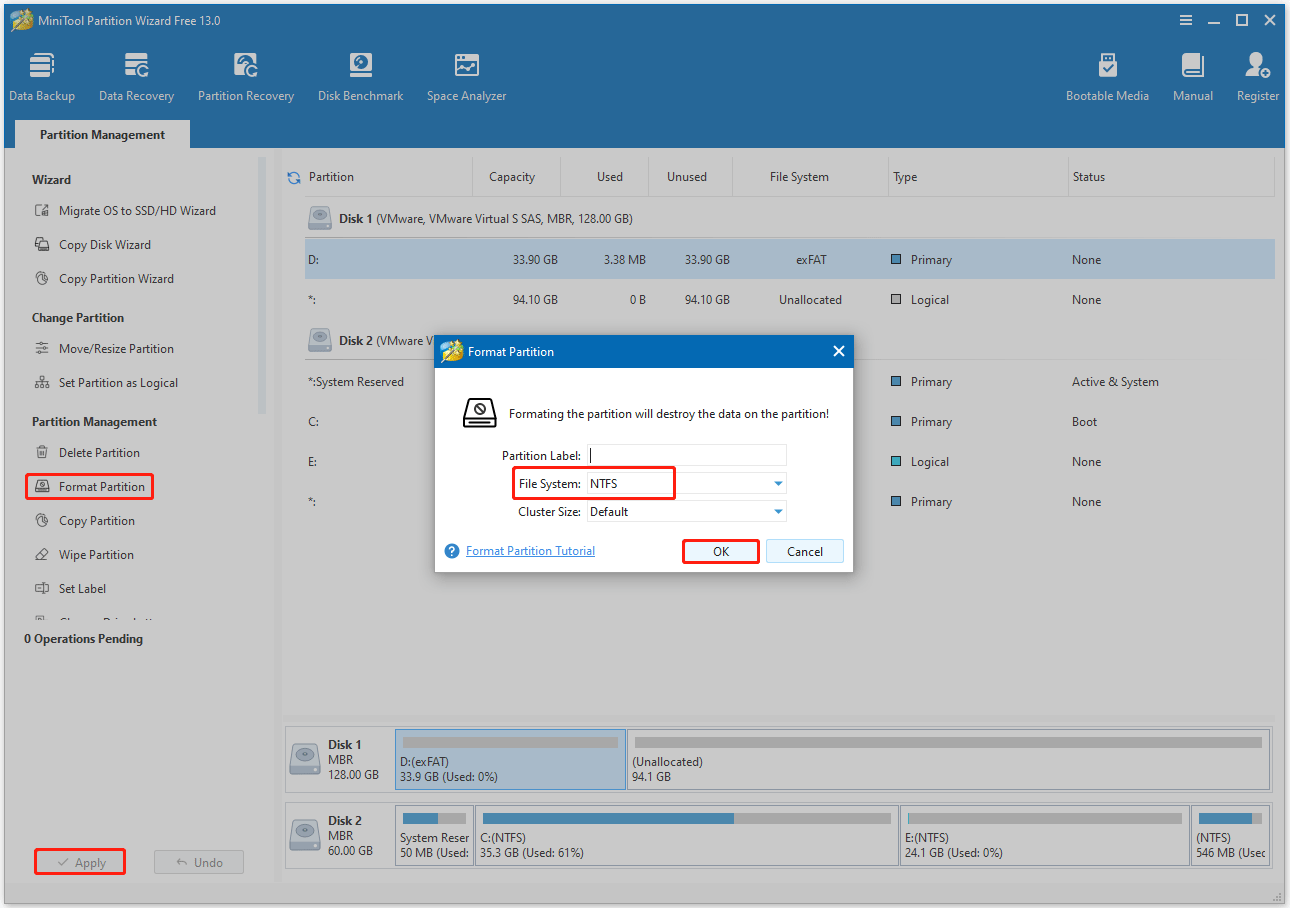
To format the drive to NTFS, you can try MiniTool Partition Wizard. It is a free partition manager that can help you format different storage devices like internal/external HDDs, SSDs, SD cards, and USB flash drives.
Now, follow the steps below to format the drive to NTFS:
- Download and install this software on your computer.
- In its main interface, highlight the target drive and select Format Partition from the left action panel.
- In the Format Partition window, choose NTFS for the File System and click OK.
- Click Apply to execute the formatting operation.
Then, ensure the target drive has at least 10–15% more free space than the total size of the games you’re moving to account for temporary files and future updates.
#2. Update Steam
Outdated Steam clients can cause bugs during transfers. To update:
- Open Steam and click Steam in the top-left corner.
- Select Check for Steam Client Updates and install any available updates.
- Restart Steam once the update is complete.
How to Move Steam Games to Another Drive?
In this section, we offer several methods to move Steam games to another drive.
Method 1. Use Steam’s Move Feature
To move a game installation folder to a different location on the computer, you can use Steam’s embedded “Move” feature. It is the simplest and most reliable way to move individual games.
Step 1. Add a new Steam library folder.
You should create a new Steam library folder on the target drive before you move games to it. This is done through Steam’s settings:
- Go to your Steam client Settings menu.
- Select the Storage tab (formerly Downloads > Steam Library Folders in the old versions).
- From here, you can view your default installation drive, as well as create a new path by clicking the “+” button (or Add Library Folder in the old version).
- Navigate to your target drive (e.g., D:). Create a new folder (e.g., D:\SteamLibrary) and select it. Steam will now recognize this location as a valid library folder.
- Confirm the new library appears in the storage list. You can even set it as the default library (right-click > Set as Default) for future installation.
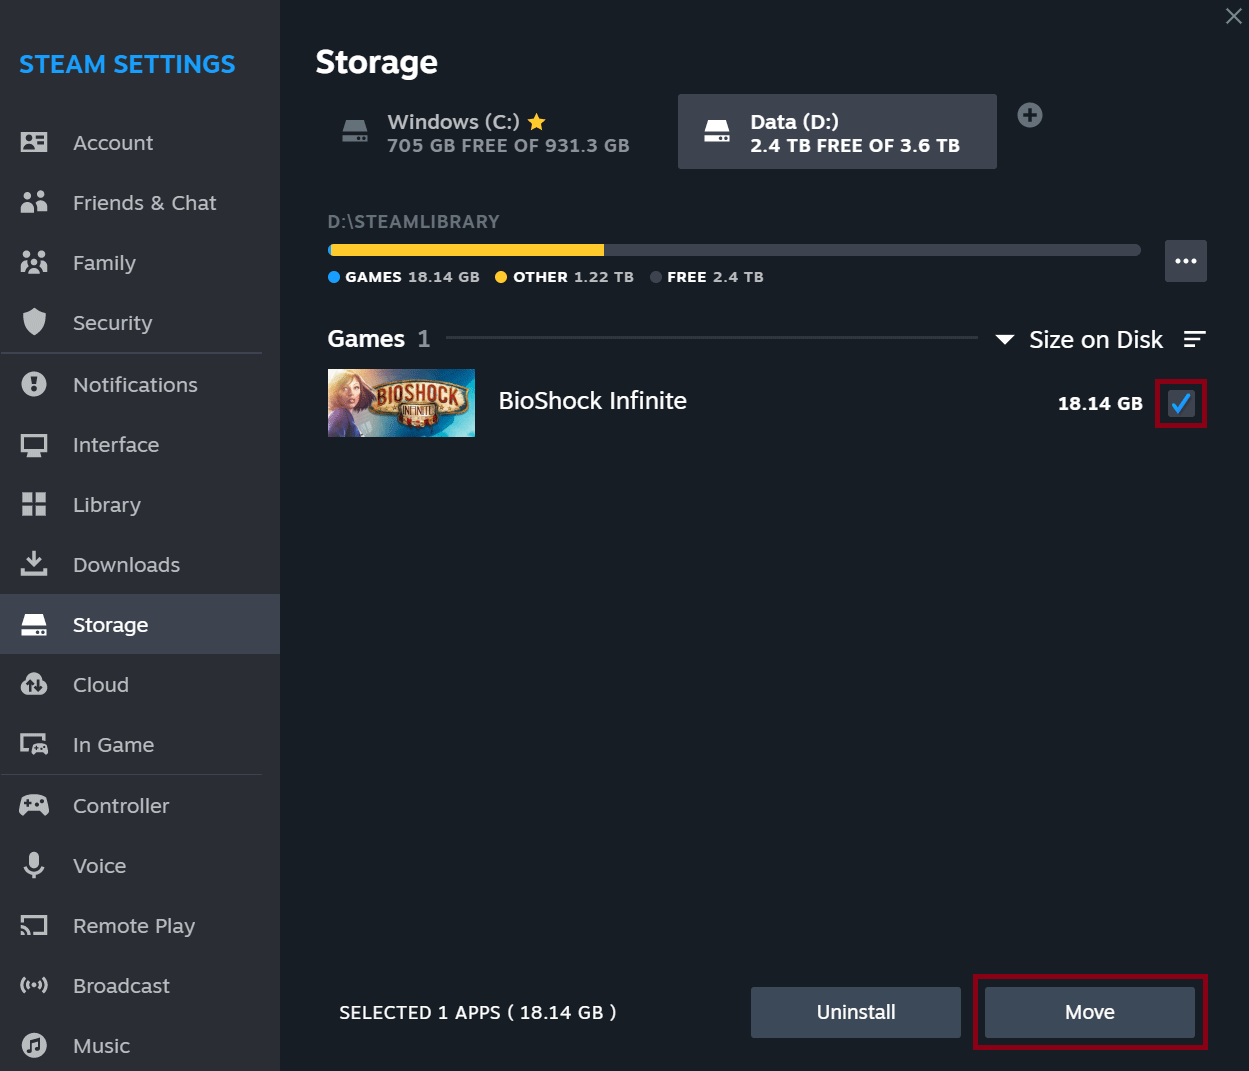
Step 2. Move games to another drive.
- Navigate to your Storage page in Steam.
- Find the drive where the game to be moved is currently installed (e.g., your C drive).
- Check the checkbox beside the game you want to move from the list. You can check off multiple games to move.
- Click Move in the bottom-right corner of the window.
- A dialog box will appear asking you to choose a new location. Click the drop-down menu to select the drive with your new Steam folder and click Move.
–Image from https://help.steampowered.com/
Then, Steam will begin moving your games. The transfer time varies based on the game’s size and the speed of your drives.
After the transfer, always verify the integrity of game files. Here are the steps:
- Right-click the game in Library and select Properties > Local Files.
- Click Verify integrity of game files.
- Steam will scan the files and redownload any missing or corrupted components (usually small updates, not the entire game).
Method 2. Manual Transfer
If you need to move the entire Steam installation (including all your Steam games) to another drive, manually copying game files is a reliable alternative.
Here are the steps on how to move all Steam games to another drive. Before that, completely close the Steam application.
Step 1. Open File Explorer and locate your Steam installation folder. The Steam installation folder is by default C:\Program Files (x86)\Steam.
Step 2. Delete all of the files and folders except the steamapps and userdata folders and steam.exe.
Step 3. Right-click the whole Steam folder and select Cut.
Step 4. Go to your desired drive (e.g., D: GamesSteam) to paste the entire Steam folder.
Step 5. Double-click the Steam.exe from the new location to launch it.
Method 3. Use Steam Library Manager
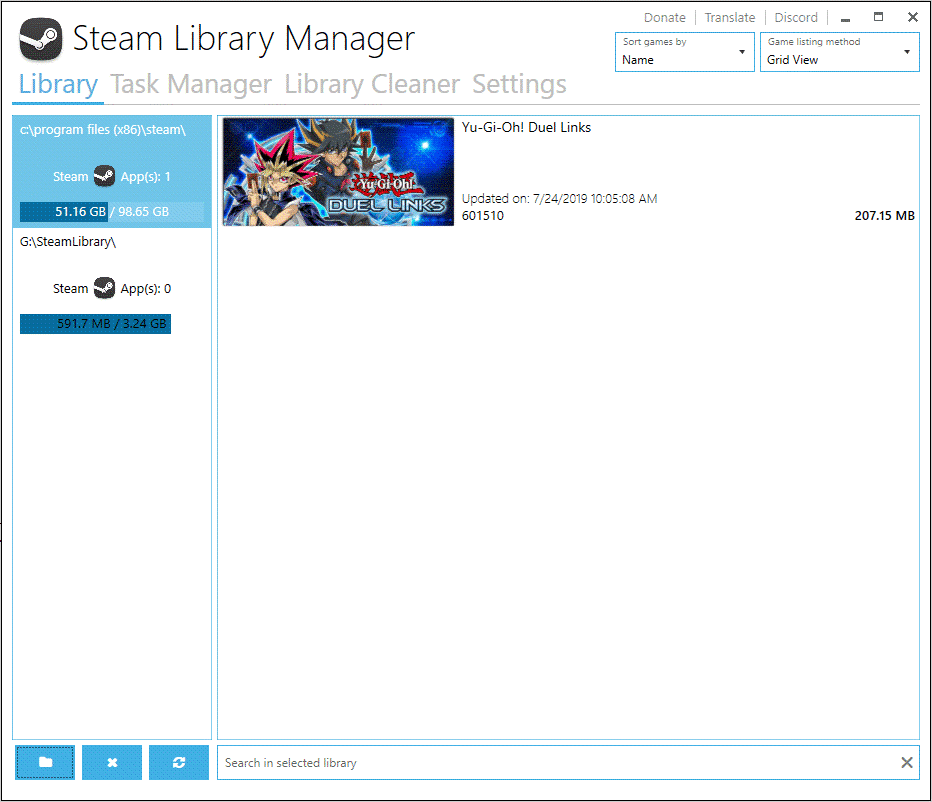
You can use the third-party software, Steam Library Manager (SLM), to move Steam games to another drive. Here is the guide:
- Download and install SLM from a reliable source such as GitHub.
- Run the Steam client and log in.
- Launch the SLM application.
- The first time you run SLM, it will automatically detect your existing Steam libraries. If needed, you can add new library folders located on different drives within the SLM interface.
- The interface displays your games and available game libraries. You can drag and drop game entries from one column to another to begin the move process.
- SLM will prompt you to confirm the move. The tool will move the game folder and its associated appmanifest_<AppID>.acf file, which tells Steam the location of the games.
After the migration is complete, please restart the Steam client. It is recommended that you verify the integrity of the game files to ensure everything works correctly.
Method 4. Extend the Game Drive
If you want to move your Steam game due to insufficient game drive space, extending the game drive can also solve the issue.
To extend a partition, you can use MiniTool Partition Wizard, a free partition manager that provides the Extend Partition feature, which can enlarge a partition by taking free space from an existing partition or unallocated space on the same disk.
MiniTool Partition Wizard FreeClick to Download100%Clean & Safe
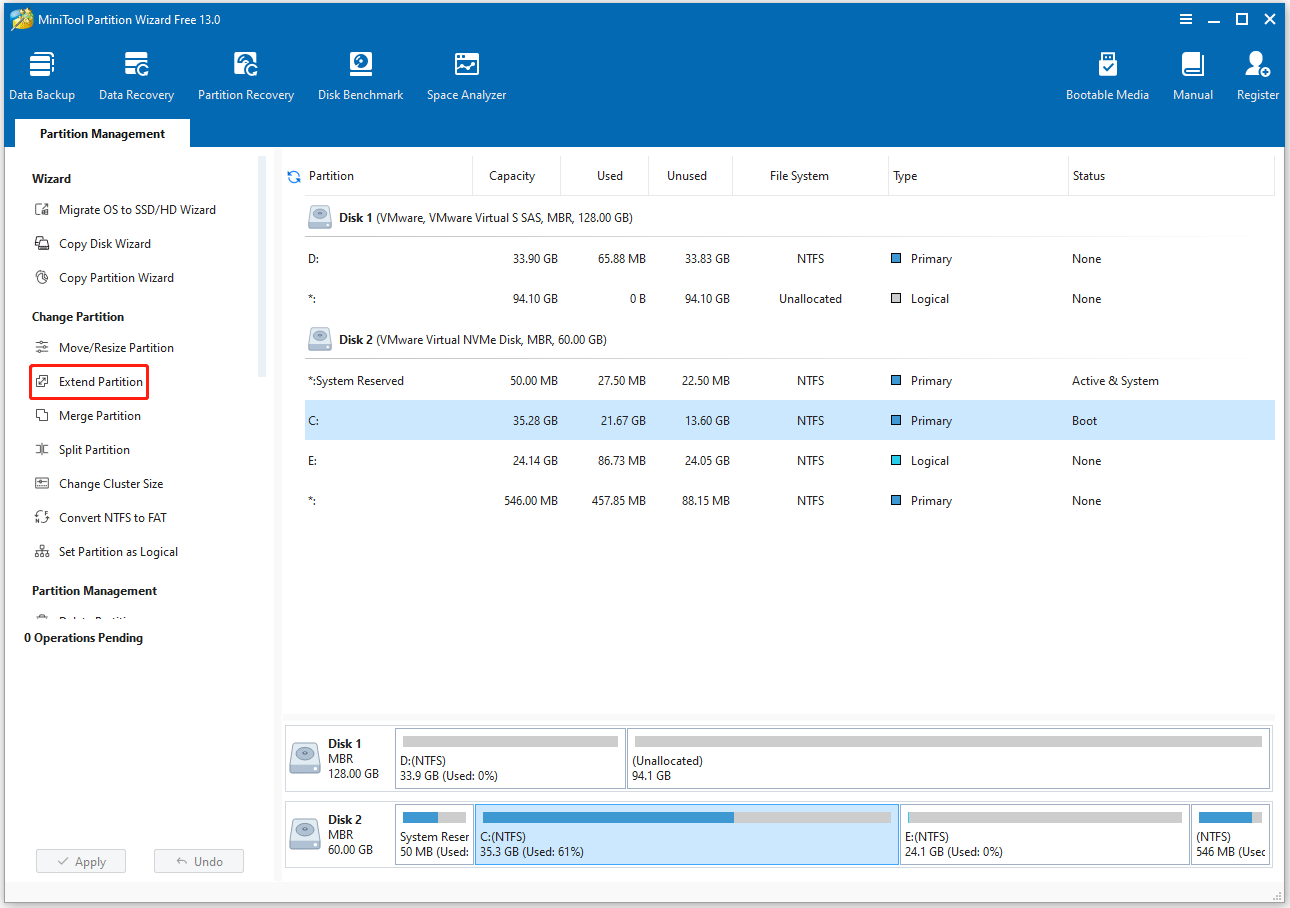
Step 1. On the main interface of MiniTool Partition Wizard, highlight the Steam partition and select Extend Partition from the left action panel.
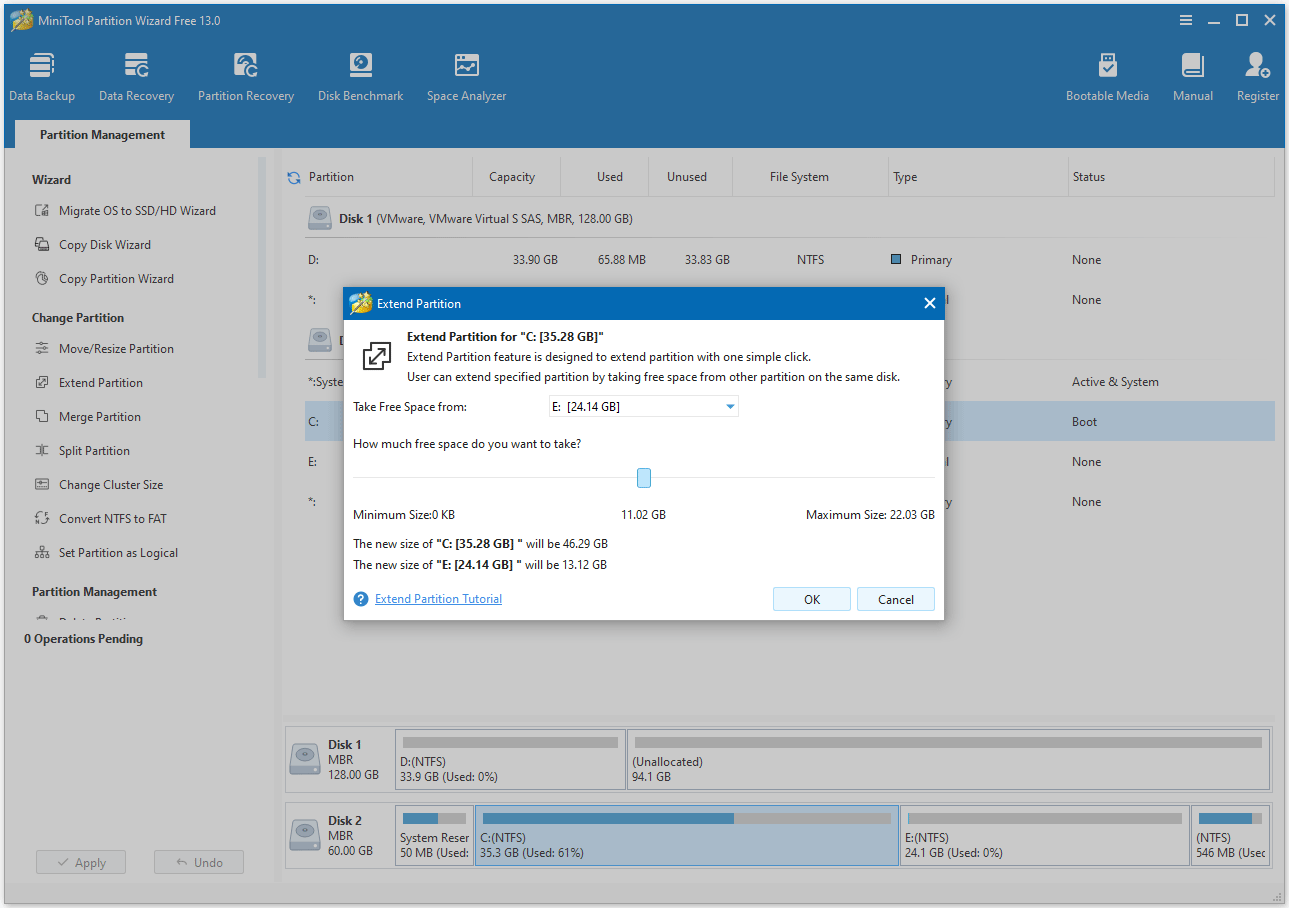
Step 2. In the pop-up window, open the Take Free Space from drop-down list and select the partition or unallocated space to take space. Then, drag the blue block to determine the amount of space to occupy. After that, click OK.
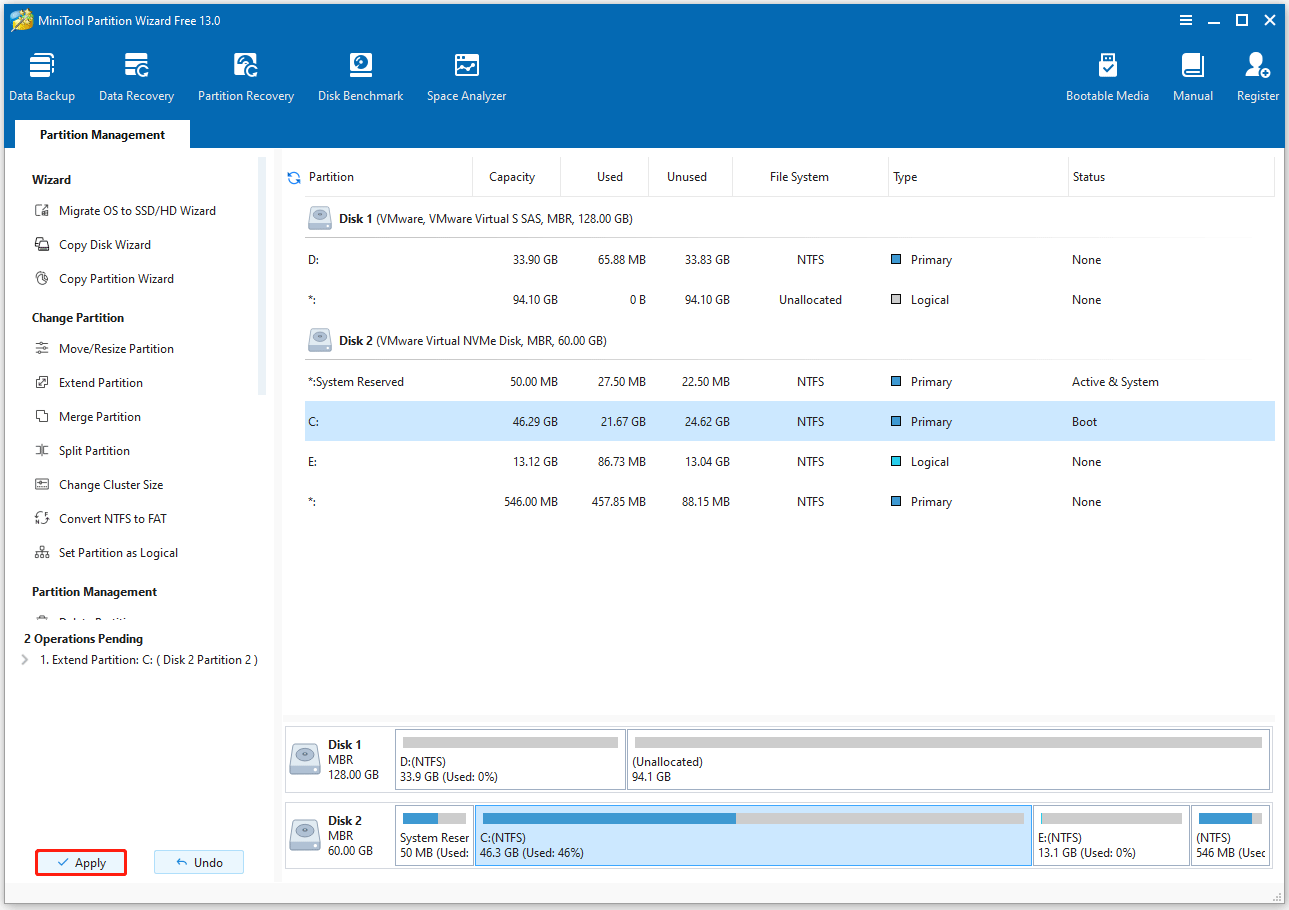
Step 3. After returning to the main interface, you can preview the extended drive. Then, click the Apply button to execute the pending operation.
Issues After Moving Steam Games to Another Drive
Here are some issues players may encounter.
#1. Moved Steam games not launching
This usually happens if Steam can’t track the game’s new location, or if files are corrupted during the move. You can try:
- Verify the integrity of the game files: This is the most common solution.
- Restart Steam and your computer: A simple restart usually resolves temporary issues.
- Check your antivirus/firewall: Sometimes, security software may prevent the game executable from running in a new location. Temporarily disable your antivirus software or add the Steam and game folders to the exceptions list.
- Run as administrator: Navigate to the game’s installation folder and try running the game’s executable as administrator.
#2. Disk write error
This “disk write error” often happens when you try to run or update games. To solve this issue, you can try verifying the integrity of the game files, clearing the Steam download cache, and restarting Steam and your computer.
#3. Save files or progress is missing
Most modern games use Steam Cloud saves, but some older or indie games store saves locally in the “Documents” or “AppData” folder. Steam’s built-in “Move” function cannot move these external files.
You can check the Steam Cloud save status. On the game’s store page, look for the “Steam Cloud Save” icon. If displayed, your save files should sync automatically. If not, you may need to manually transfer your save files to the new drive.
Steam How to Move Games to Another Drive FAQ
Bottom Line
Moving Steam games to another drive is a simple and impactful way to free up your PC’s space and smooth your gaming experience. With the methods described in this post, you should perform it easily. Regardless of the method, always verify the integrity of game files.
If you have any problems or suggestions when using MiniTool Partition Wizard, you can contact us by sending an email to [email protected]. We’ll get back to you as soon as possible.
About The Author

Position: Columnist
Vega enjoys helping people with computer problems, including disk management, data recovery, data backup, and more. She is constantly expanding her knowledge in related fields. And she will continue to bring more easy-to-understand professional articles to help people solve various problems on the PC.
User Comments :