Nowadays, digital data is an essential part of our daily lives. With the increasing data security importance, a question you may ask is can you protect your digital data saved on your hard drive. This article will display 5 ways to protect your data effectively. MiniTool Partition Wizard is a useful tool in this situation.
Importance of Data Security
In the information age, data security is a hot topic with many aspects to consider. There is always some important data saved on your computer whether you are a student, businessman, or researcher.
Here are three main reasons why data security is so important:
- To ensure your work continuity (In today’s data-driven environments, most kinds of jobs cannot function without data.)
- To avoid data breaches.
- To prevent unauthorized access(Nowadays, hackers have become increasingly savvy as they develop advanced techniques to evade security measures.)
How to achieve data security management? Or what are the data security solutions?
It may be confusing to know where to start to protect your data. With this in mind, the following will directly show you how to secure data from 5 aspects in detail.
Preparation Work: Know What You Have and Where You Store It
The first thing you need to do you should know exactly what data you have on your computer and where it is. How can you do that? Here I recommend you to use the Space Analyzer feature of MiniTool Partition Wizard.
This feature can help you scan your hard drive and give you a better view of the hard drive space usage. Furthermore, it is useful for disk cleanup when your hard drive is full.
MiniTool Partition Wizard FreeClick to Download100%Clean & Safe
The operation is so simple that you just need to complete the following steps:
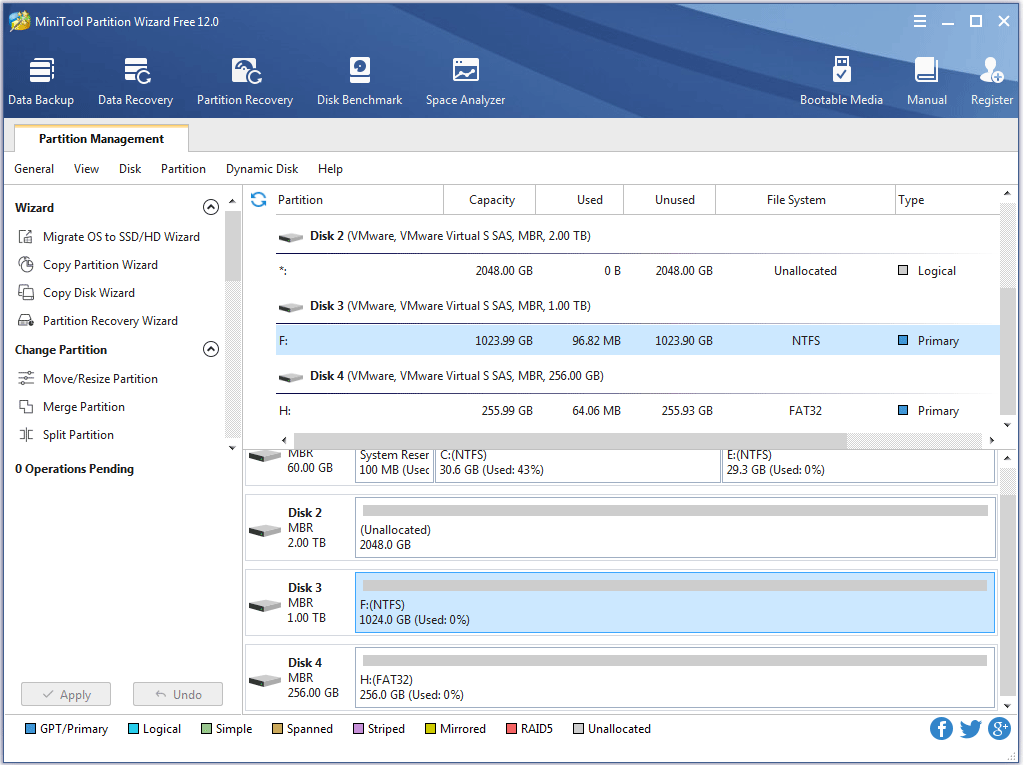
Step 1: Download MiniTool Partition Wizard and launch it to get its main interface.
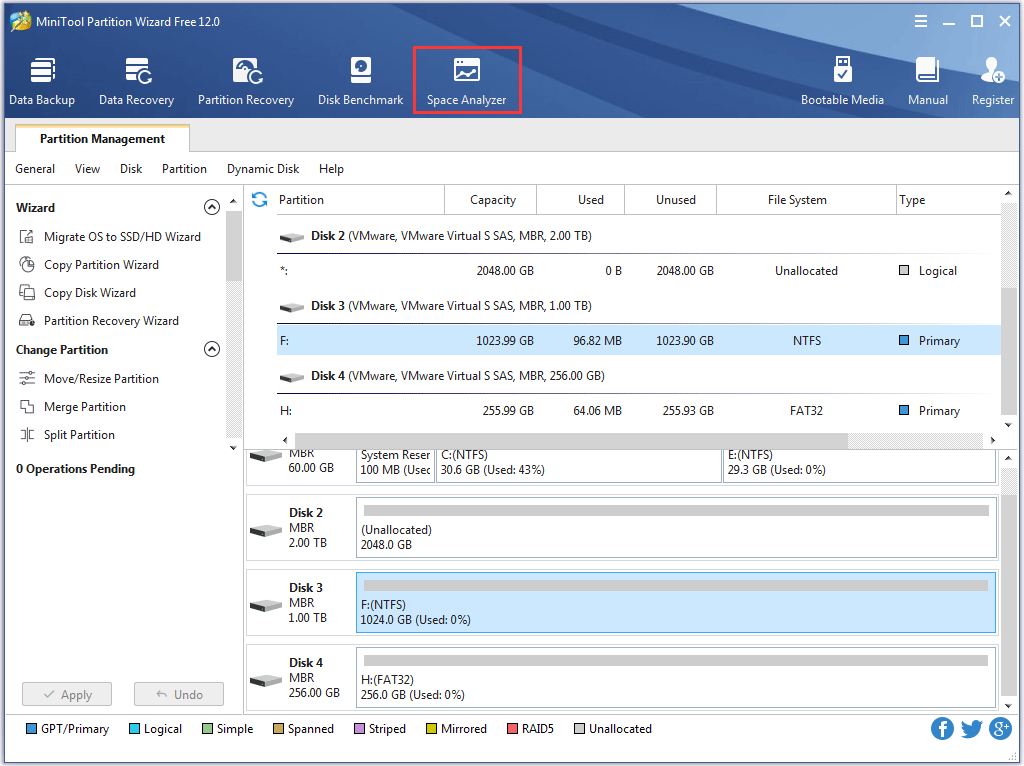
Step 2: Click the Space Analyzer feature from the toolbar.
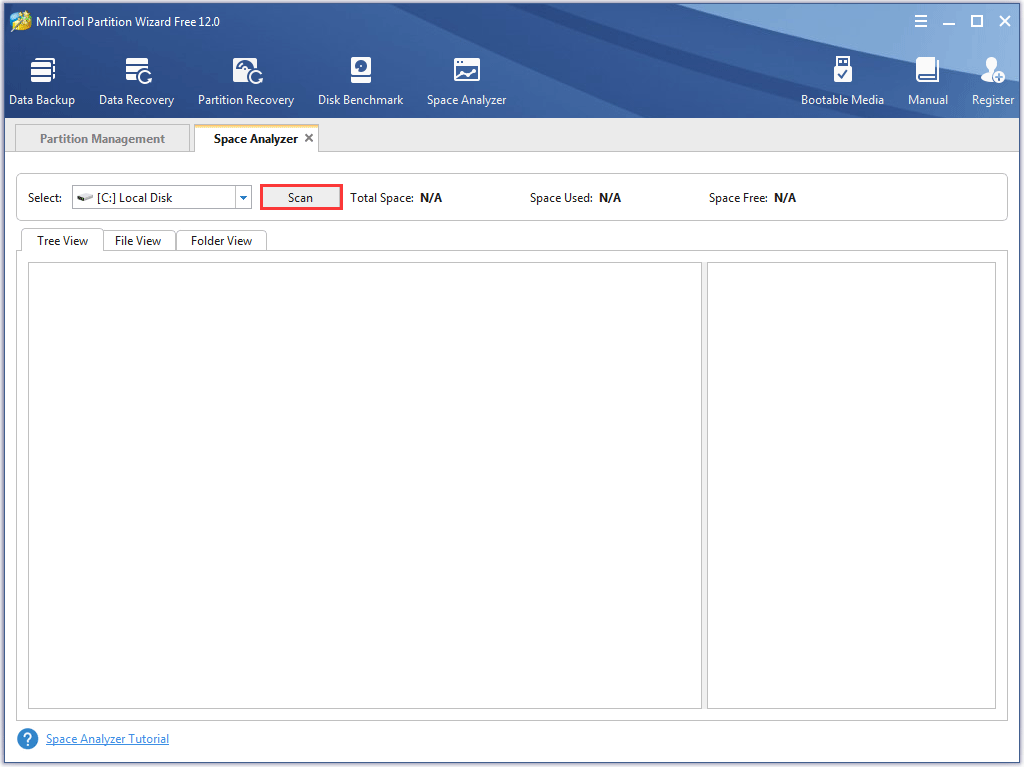
Step 3: Select the partition you want to analyze and click the Scan button to start analyzing.
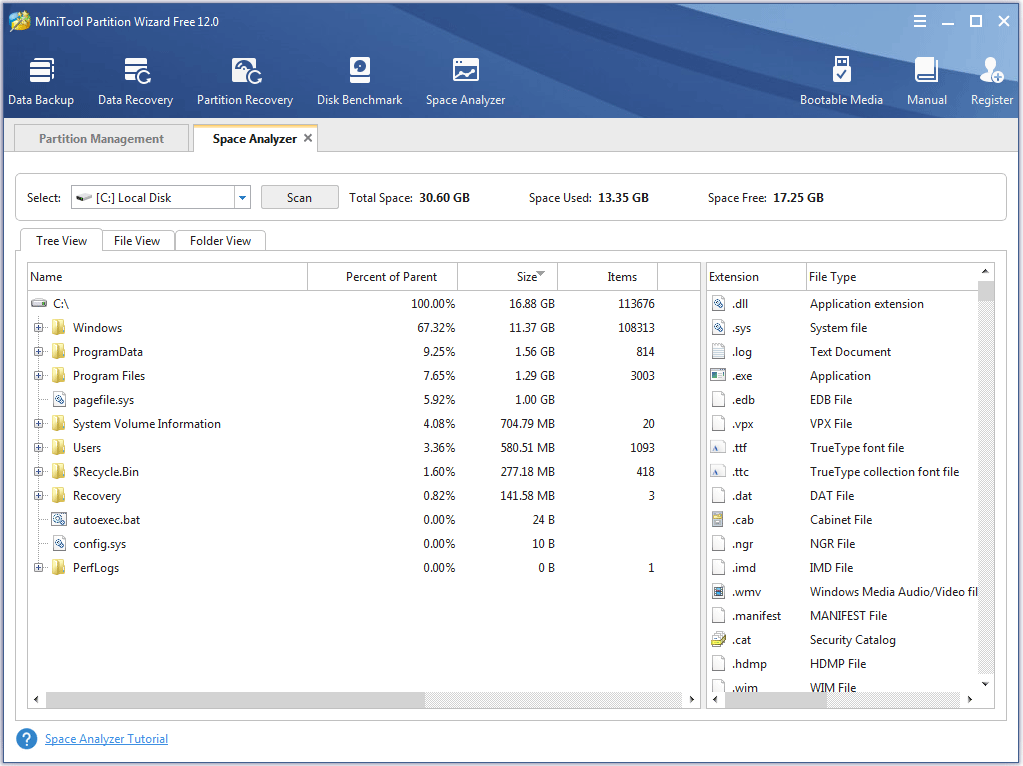
Step 4: Wait for this feature to complete scanning, and view the scanning result.
The following content will show you how to protect your data privacy from two aspects, namely hiding a partition and wiping a disk.
# 1: Hide Partition for Protection Data Privacy via MiniTool Partition Wizard
Sometimes, someone may borrow your computer, or there is something wrong with your computer and you need to send it for repair. You need to think about protecting private and important files or folders.
This section will show how to protect your private data via MiniTool Partition Wizard.
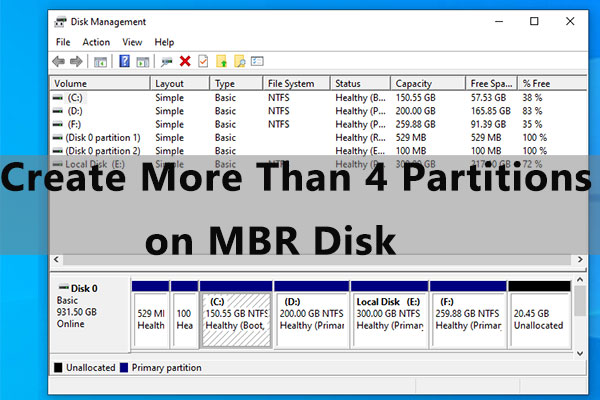
Please note that I suggest you create a new partition on your hard drive at first and then put all your private files in this partition. If there are no more slots on your MBR disk, please read the following recommended article.
Once you get a new partition, you can hide it via MiniTool Partition Wizard to protect your private data. Here is the tutorial:
Step 1: Launch MiniTool Partition Wizard again to gets its main interface if you have closed this software.
Step 2: Select the partition you want to hide and then click the Hide Partition feature from the left panel. (Here I take partition E for example)
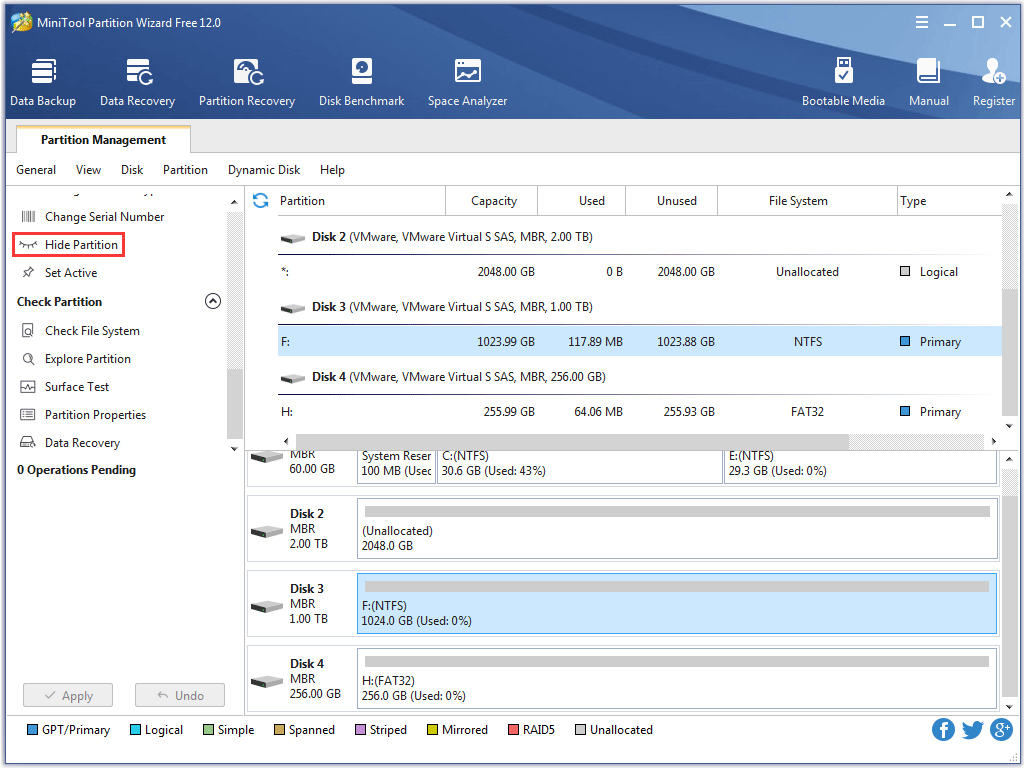
Step 3: You can see that the drive letter of the selected partition has disappeared. Click the Apply button to execute all changes.
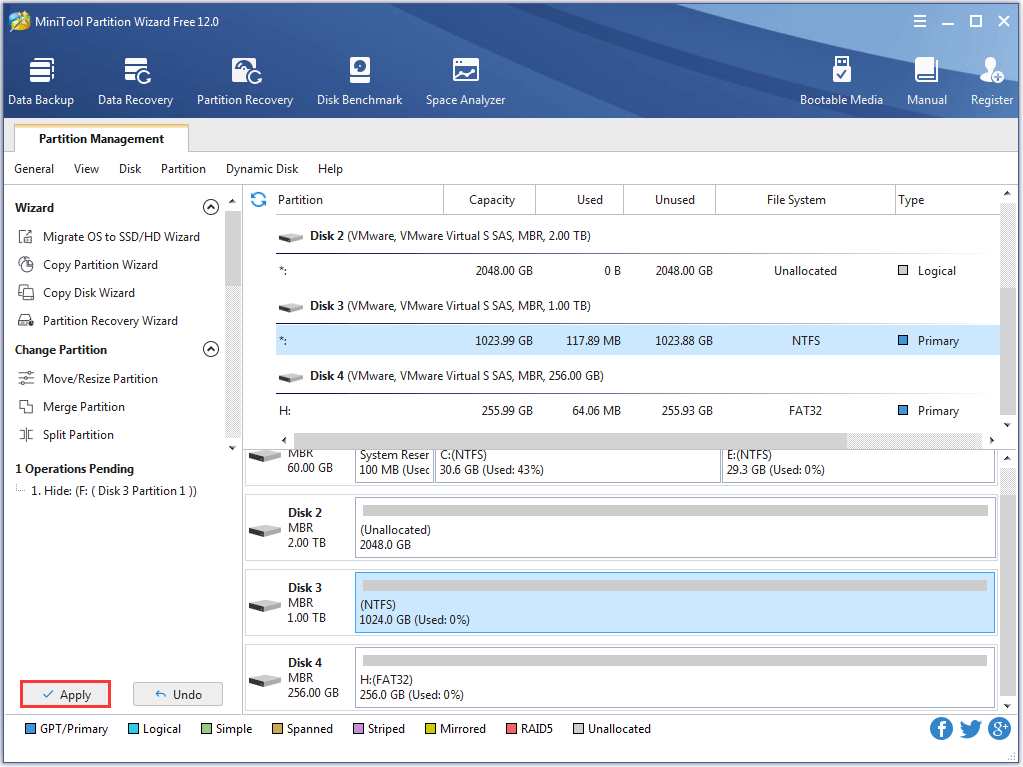
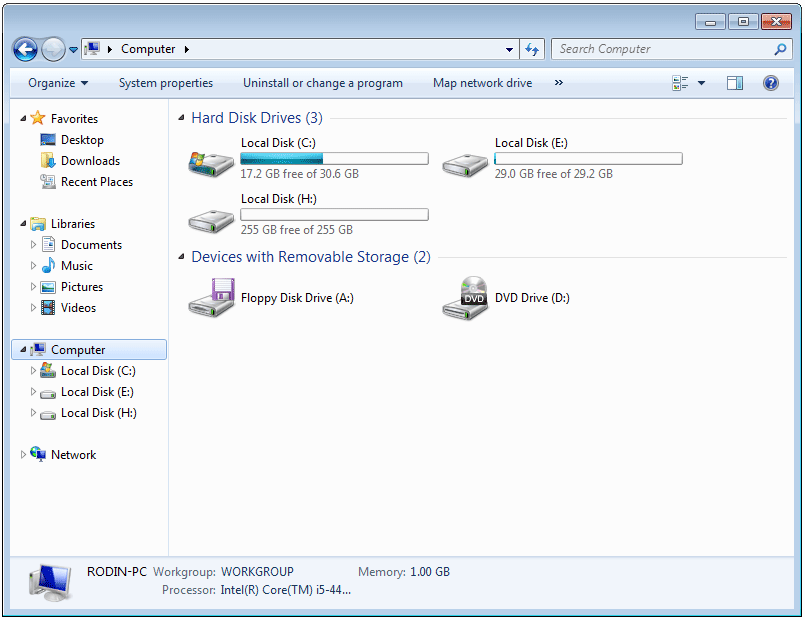
Step 4: The partition storing your private data has been hidden successfully. You should uninstall MiniTool Partition Wizard, hence no one except you knows you have a hidden partition.
If you want to see this partition on This PC window, you just need to reinstall MiniTool Partition Wizard, select the partition, and click the Unhide Partition from the left panel.
# 2: Wipe Your Disk to Protect Personal Data
In order to destroy the data saved on your hard disk, you may plan to format this disk. But, please note that someone can take advantage of data recovery software like MiniTool Partition Wizard to recover the data from the formatted disk.
Therefore, it is highly recommended to use MiniTool Partition Wizard Free Edition to wipe the disk.
How can that be done? Here is the tutorial:
Step 1: Launch MiniTool Partition Wizard to get its main interface.
Step 2: Select the disk in the Disk Map and activate the Wipe Disk feature from the left panel.
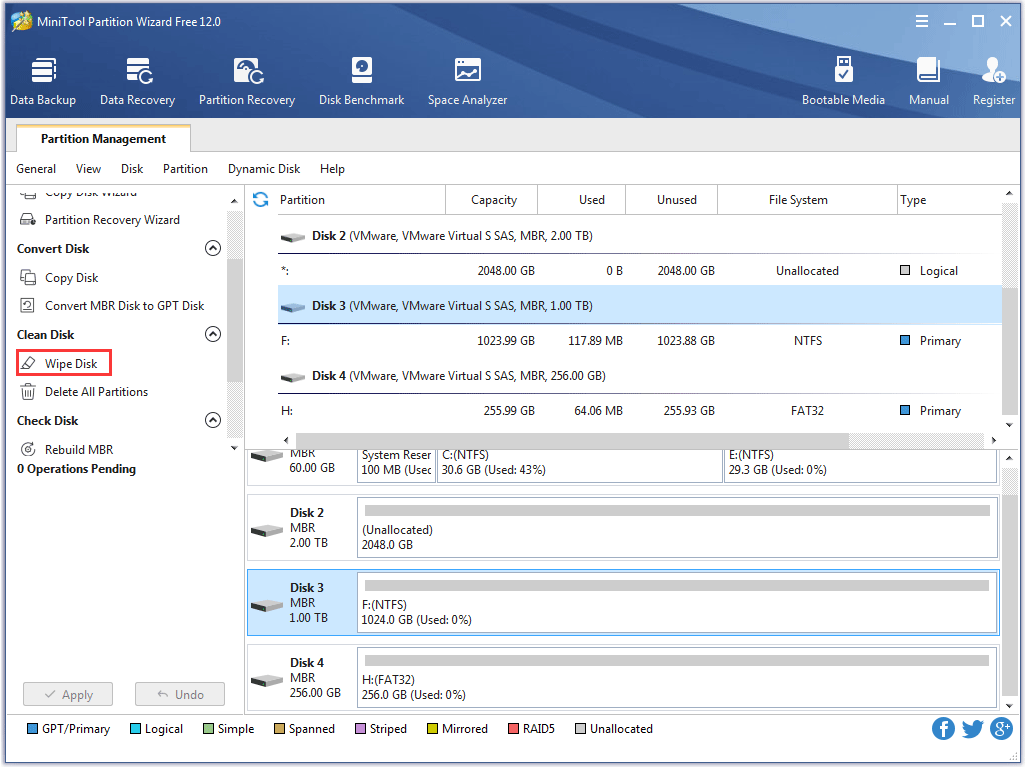
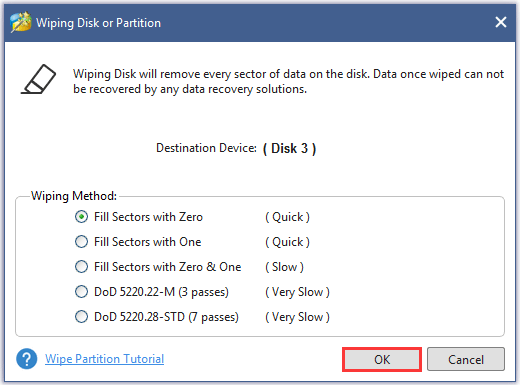
Step 3: Choose one of the five wiping methods listed on the pop-up window and click the OK button.
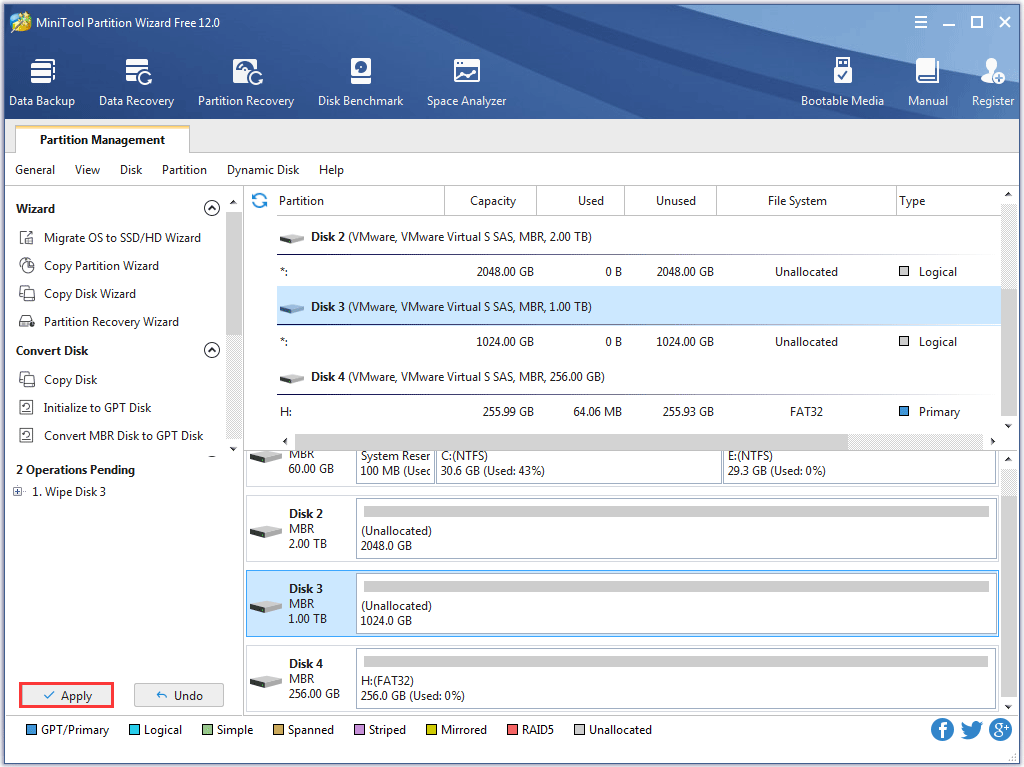
Step 4: After going back to the main interface of the software, you can see the selected disk becomes unallocated. Now, please click the Apply button to execute all changes.
Related article: Take These 6 Preparations to Sell Your Laptop or PC without Worries
After learning how to protect your privacy, you may want to know how to protect your data saved on your hard drive safely. Let’s read on to learn about the methods.
# 3: Install Trustworthy Malware Protection Software
Virus attack is one of the common reasons for data loss. To minimize the threat of a data leakage through hackers or malicious malware, it is necessary to install some trustworthy malware protection software.
Please note that there is no single software that is flawless in keeping out cybercriminals, but good security software will go a long way to keep your data secure.
# 4: Back up Data Saved on Hard Drives Regularly
Although installing a trusted antivirus can decrease the data loss risk, it is also necessary to back up data saved on your hard drive in case of data loss caused by various reasons.
It is important to take backups at a frequency you can accept. You may consider how much time and cost might be required to manage a backup. Here I also recommend the free and convenient software MiniTool Partition Wizard to complete data backup.
Here is the tutorial on how to back up data via MiniTool Partition Wizard:
Step 1: Prepare a hard drive or USB and connect it to your computer. Please note that your prepared storage device should be large enough to hold all your data on the source disk.
Step 2: Launch MiniTool Partition Wizard to get its main interface.
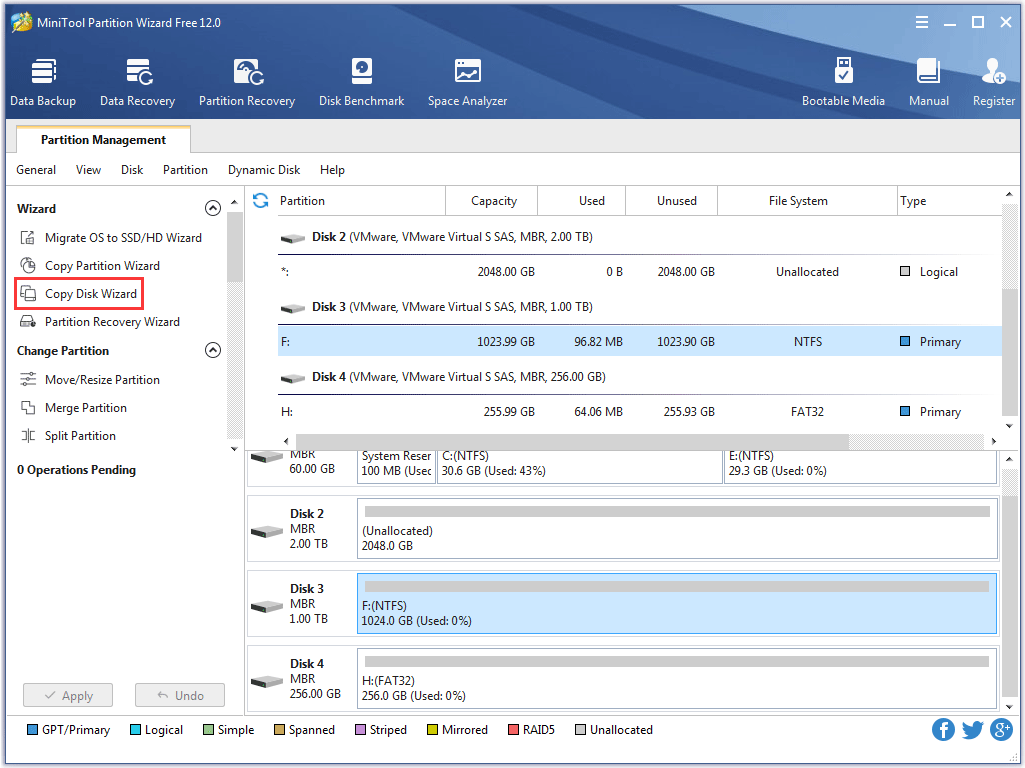
Step 3: Choose the Copy Disk Wizard feature from the left panel.
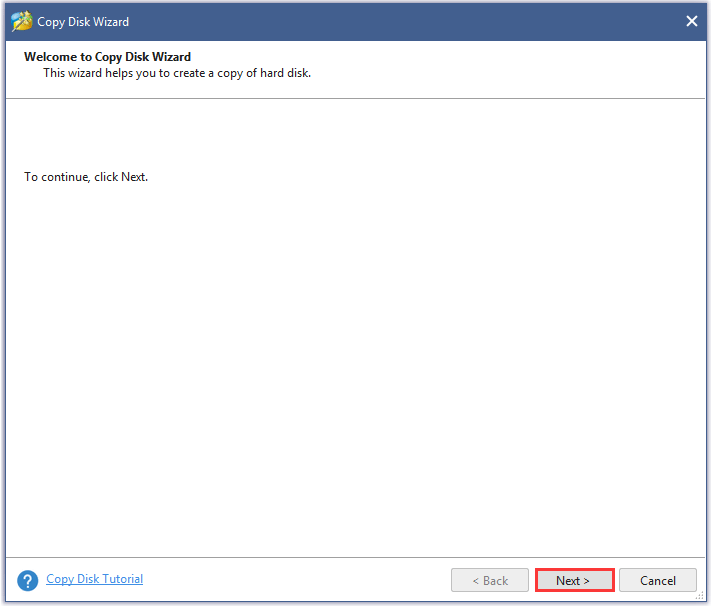
Step 4: Click the Next button on the pop-up window.
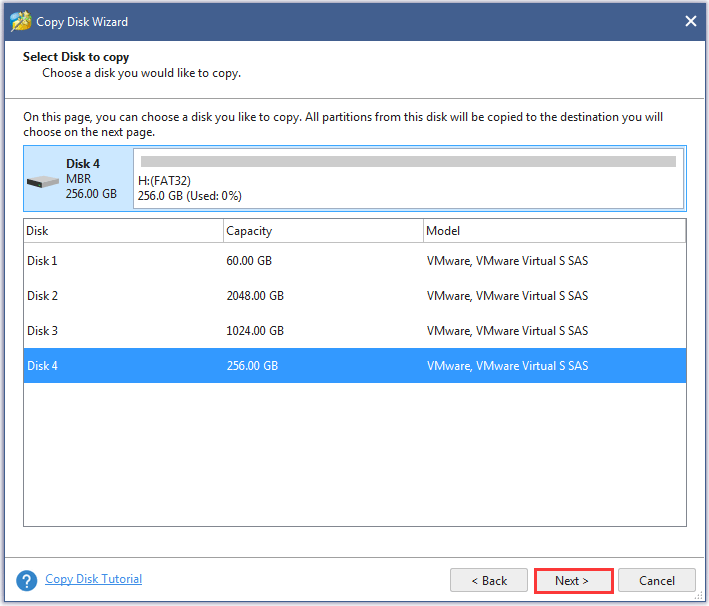
Step 5: Select the disk you would like to copy and then click the Next button to continue.
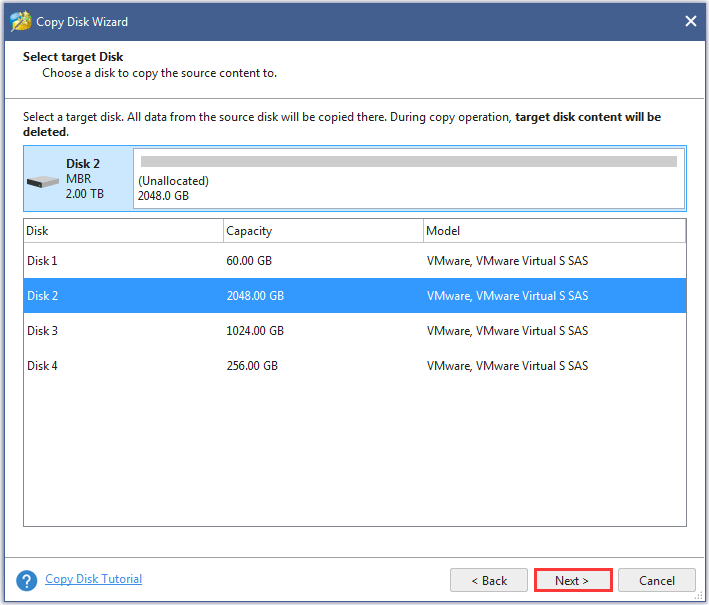
Step 6: Choose the disk you would like to save the copies on the source disk and then click the Next button to continue. (Here I take Disk 2 for example.)
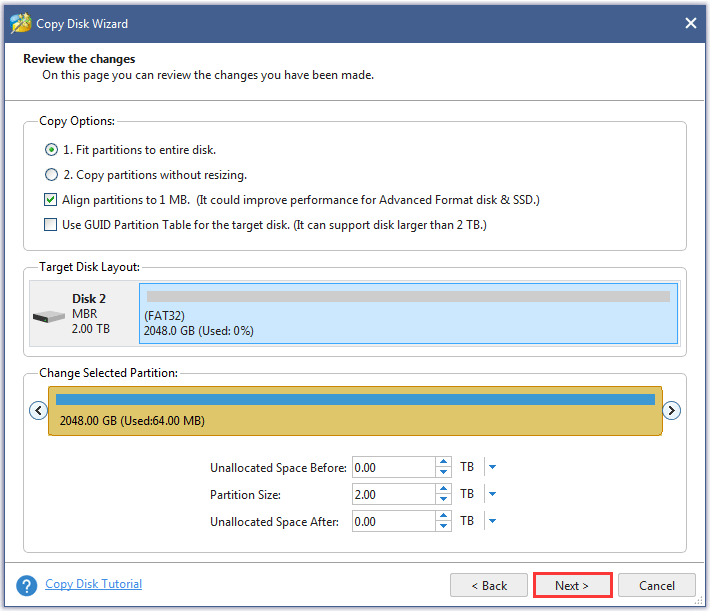
Step 7: You will get a pop-up window on which you can see two copy methods and other options.
- Choose a copy method. (Fit partitions to entire disk:this method will resize the partitions to fie the entire target disk; Copy partitions without resizing: this method will just copy partitions without resizing to the target disk.)
- Additional options. (For SSD users, it is suggested to check Align partitions to 1MBoption to improve disk performance; for GPT disk users, you can check Use GUID Partition Table for the target disk option, but this option is available on the Professional Edition and an advanced)
- Click the Nextbutton to continue.
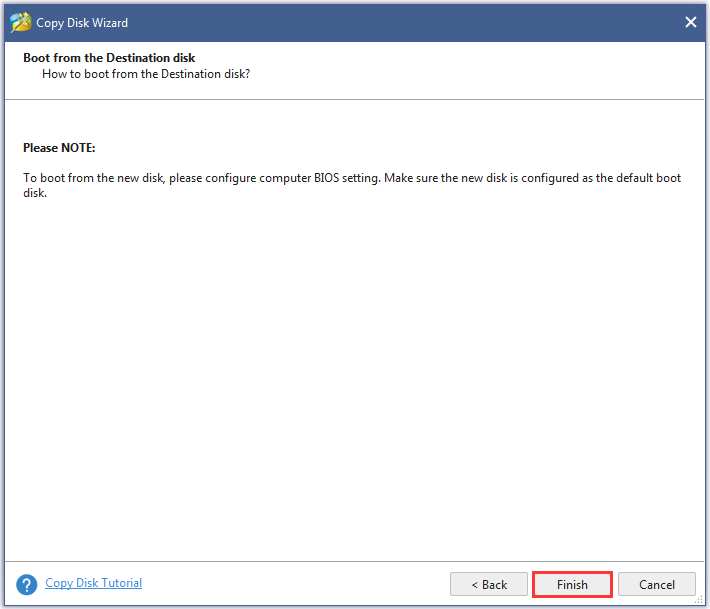
Step 8: Read the note carefully which shows how to boot from the target disk and click the Finish button to go back to the main interface.
Step 9: After going back to the main interface, you can see that the partitions on the source disk are shown on the target disk. Please click the Apply button on the main interface to execute all changes.
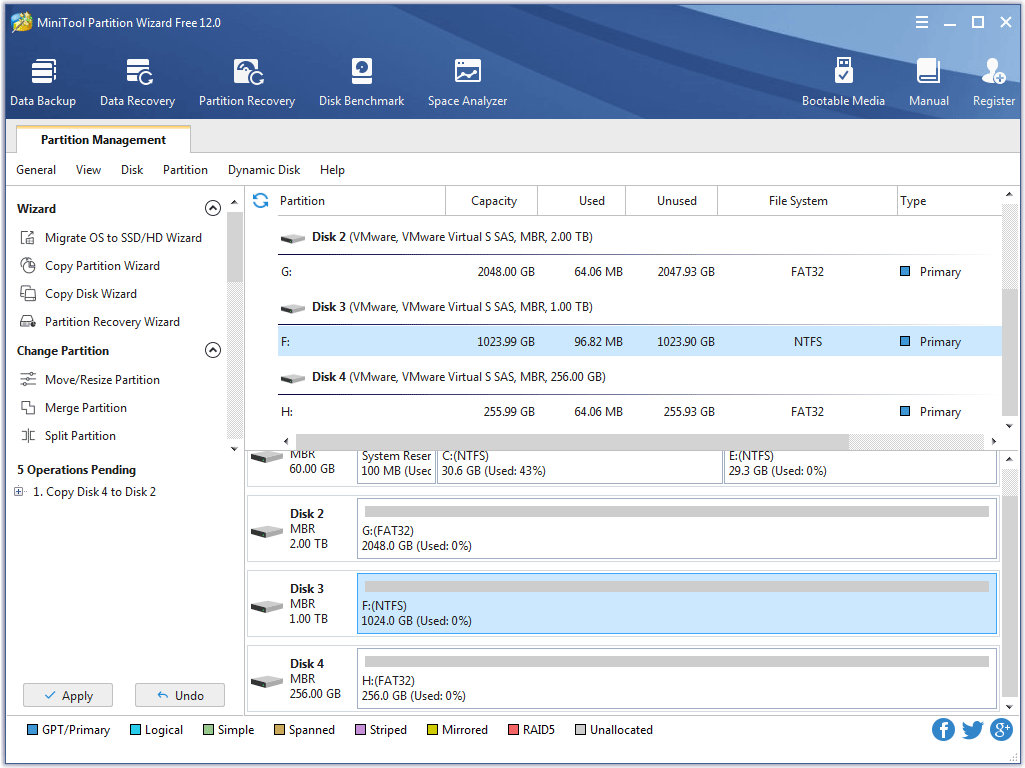
Now, all the data saved on your source target disk has been backed up to the target disk. Please back up your data regularly and keep your data backup safe.
# 5: Data Recovery via MiniTool Partition Wizard
Following the 4 processes, to a large extent, can protect your data saved on your hard drive. However, some horrible accidents may happen, such as losing the previous data backup, and so on.
But, please don’t worry, MiniTool Partition Wizard also can help you restore your lost data to your computer.
Do note that the Free Edition only can restore 1GB lost data to your computer. If you want to recover more lost data, you should buy the Pro Ultimate Edition or an advanced one.
Here is the tutorial on recovering the lost data via MiniTool Partition Wizard Pro Ultimate Edition:
Step 1: Buy MiniTool Partition Wizard Pro Ultimate Edition.
- Install the software on your computer.
- Launch it to get its main interface.
Step 2: Click the Data Recovery feature at the top of the main interface.
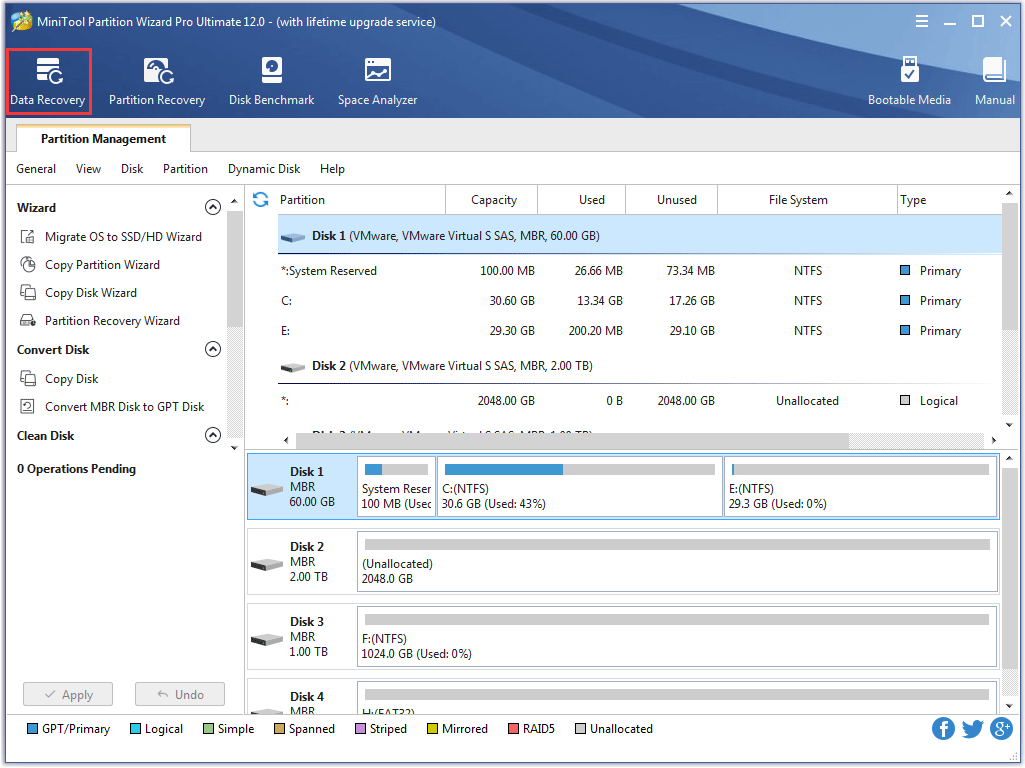
Step 3: You can see many of your disk partitions are listed on the Data Recovery interface. Please select the partition you would like to recover lost data from, and then click the Scan button. (Here I take partition E for example.)
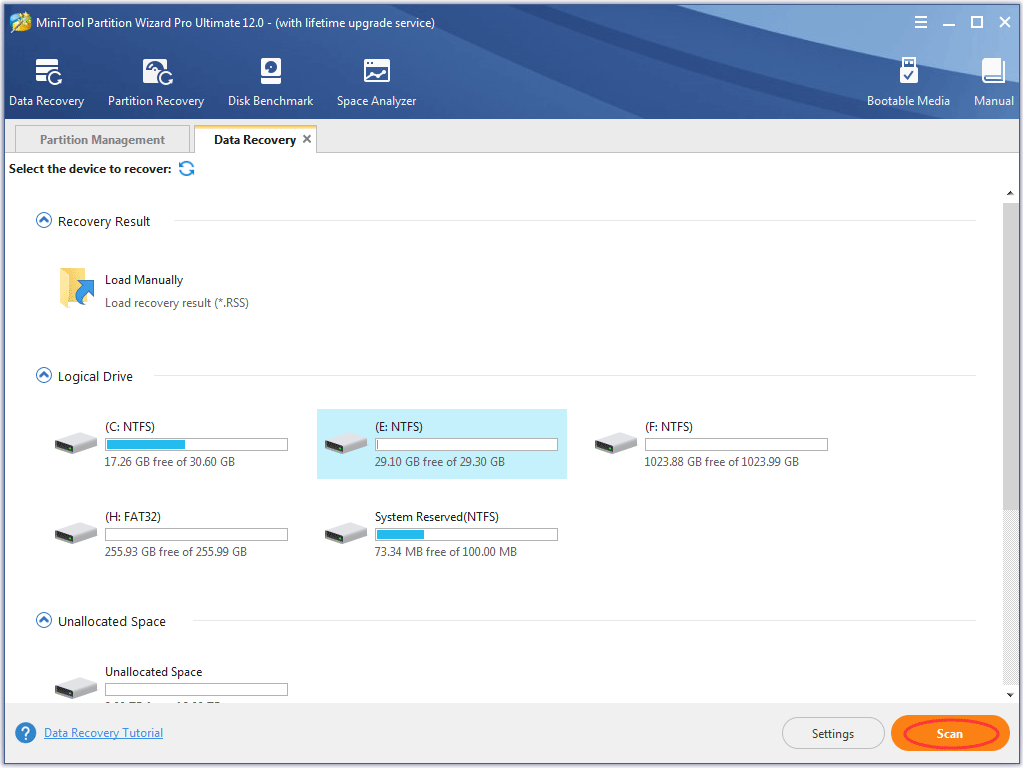
Step 4: Wait for the feature to complete scanning the lost data from your selected partition.
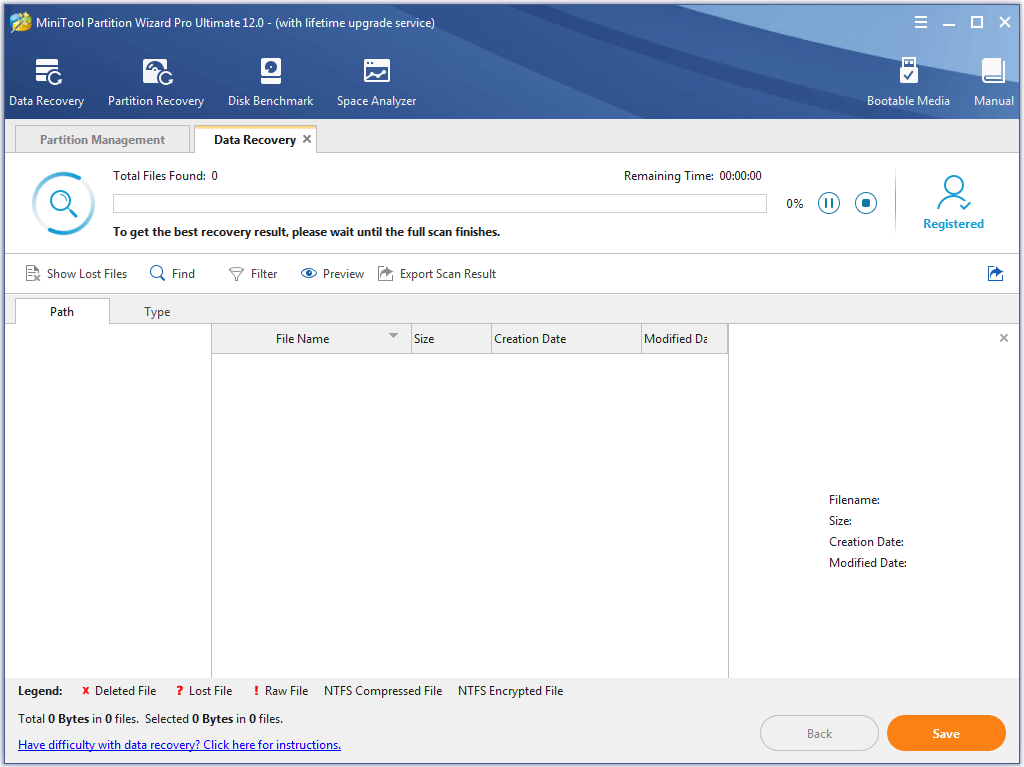
Step 5: After completing scanning, please select the data you want to restore to your computer and click the Save button.
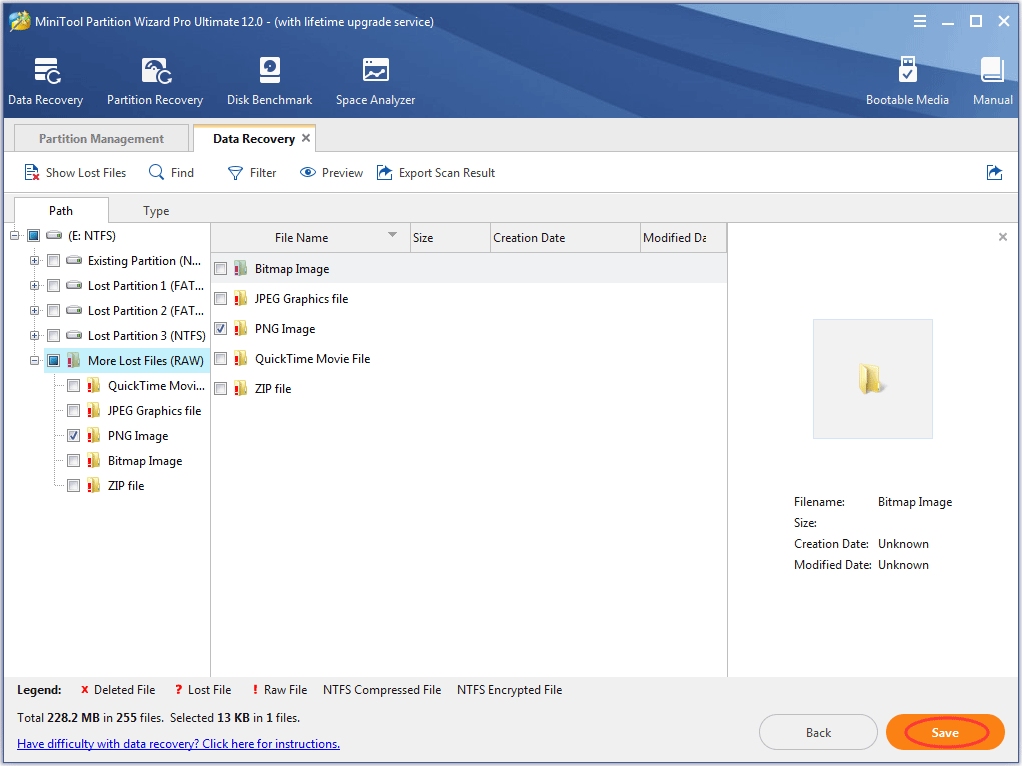
As you can see you just need to complete the several steps to restore your lost data to your computer.
Bottom Line
To help you protect your personal data saved on your computer, this article has display the 5 data security solutions, and shown you how to recover the lost data caused by some accidents via MiniTool Partition Wizard Pro Ultimate Edition.
I hope you can secure data on your hard drive better by carrying out 5 processes above. If you have any doubts about the topic of data security, please do not hesitate to leave it in the comment zone or contact us via [email protected].



User Comments :