
A PowerPoint presentation will be attractive and intuitive if it is media-rich with images, videos, etc. However, these media would enlarge the file size. If you need to reduce PowerPoint file size, this post from MiniTool Partition Wizard might be helpful for you.
Quick Answer
The easiest way to reduce PowerPoint file size is to compress pictures and embedded media.
Why Is My PowerPoint File So Large?
Here is a table showing the reasons why the PPT file size increased, and the corresponding solutions.
| Cause | What to Do |
| High-resolution images | Compress pictures |
| Cropped images | Delete cropped areas when compressing pictures |
| Embedded videos | Compress media |
| Embedded audio | Compress or remove unnecessary audio |
| Embedded fonts | Embed only used characters |
| Image editing data | Discard editing data |
| Old PPT format | Save as .pptx |
In addition to the above methods, other measures can also reduce PowerPoint file. Keep reading to get them.
How to Reduce PowerPoint File Size
Before reducing PowerPoint file, create a copy of the PPT file and then performing the following operations to the copy file. This can avoid various problems caused by improper operation.
Method 1. Compress Pictures and Delete Cropped Image Areas
Images are one of the most common reasons a PowerPoint presentation becomes too large. High-resolution photos, screenshots, and graphics can add hundreds of megabytes to a file.
Compressing pictures reduces image resolution and removes unnecessary image data, helping you reduce PowerPoint file size without deleting slides or content.
Here is how to compress pictures in PowerPoint.
Step 1: Open your PowerPoint presentation. Select any picture on a slide. Go to the Picture Format tab. Click Compress Pictures. In the dialog box:
- Uncheck Apply only to this picture if you want to compress all images in the presentation.
- Check Delete cropped areas of pictures to remove hidden image data.
- Choose an appropriate Resolution. The listed options, from top to bottom, show an increasing level of image compression but a decreasing level of image quality. Choose according to your situation.
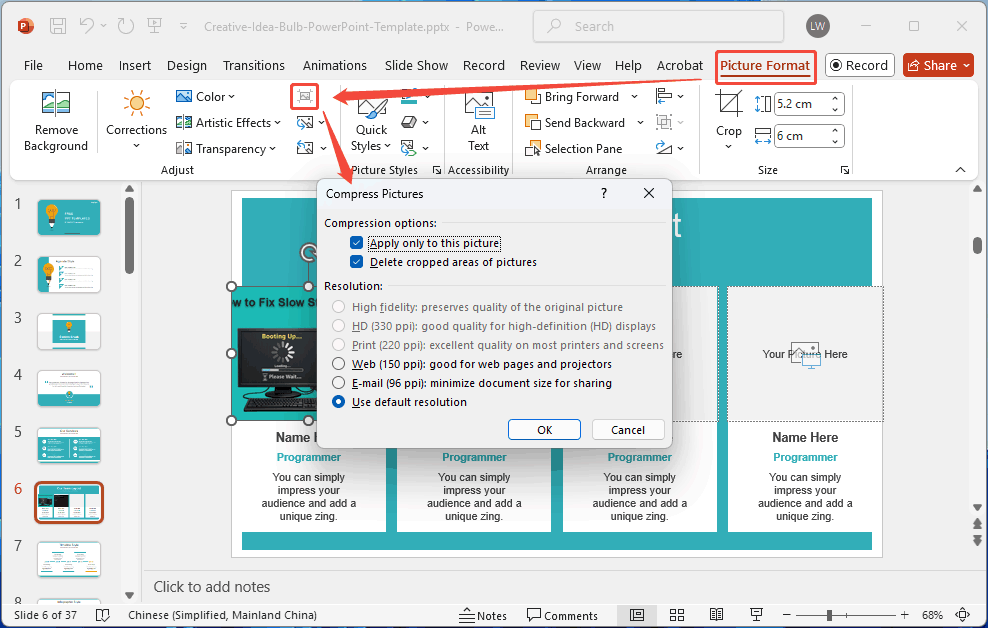
Step 2: Click OK and save the presentation. Then, check the new file size.
Method 2. Compress Videos and Audio
Embedded videos and audio files are often the largest parts of a PowerPoint presentation. A single high-definition video can add hundreds of megabytes to a PPTX file. Compressing media can significantly reduce PowerPoint file size while keeping the presentation functional.
Here is how to compress videos and audio in PowerPoint.
Step 1: Open your PowerPoint presentation. Click File > Info. Click Compress Media. Choose a compression quality.
- Full HD (1080p): Best quality with moderate size reduction.
- HD (720p): Good balance between quality and file size.
- Standard (480p): Smallest file size for basic viewing.
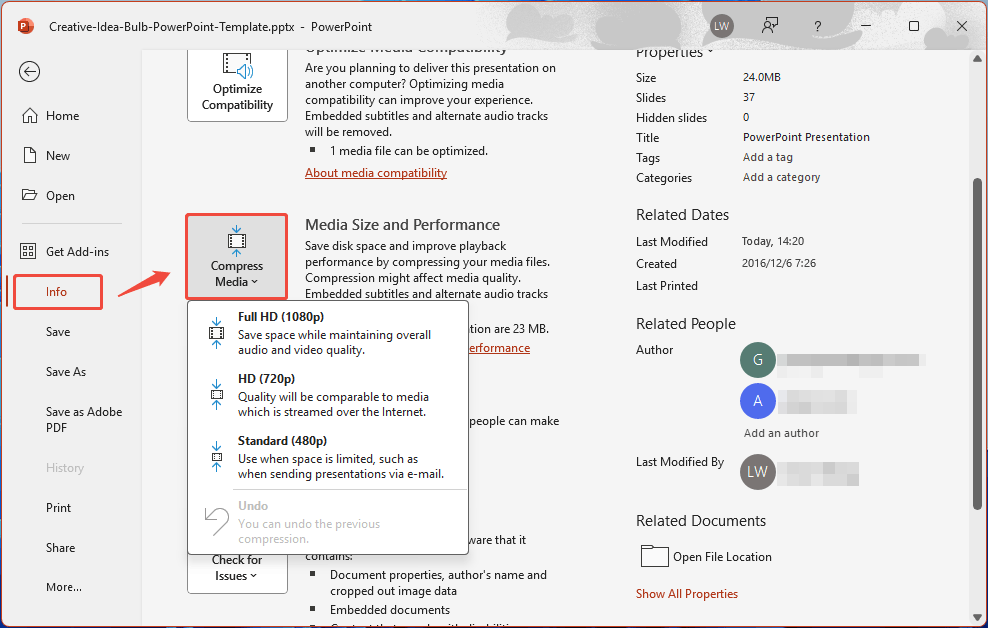
Step 2: Wait for PowerPoint to finish compressing the media. Then, click Close and save the presentation.
Method 3: Use PPTX Format for Your PowerPoint File
PPTX format was released by Microsoft in Office 2007. It has replaced the PPT format which was used by Microsoft PowerPoint previously, and it becomes the default format when users create a file with modern versions of PowerPoint. PPTX format compresses all the content within the PowerPoint file and it makes the file smaller than that using the PPT file type.
If your PowerPoint file is of PPT format, you should convert it to PPTX format to reduce PowerPoint file size. You just need to:
- Open the target file and click File from the top menu.
- Select Save as and select a location.
- In the pop-up window, select PowerPoint Presentationfor Save as type Then your PowerPoint file will be saved in PPTX format.
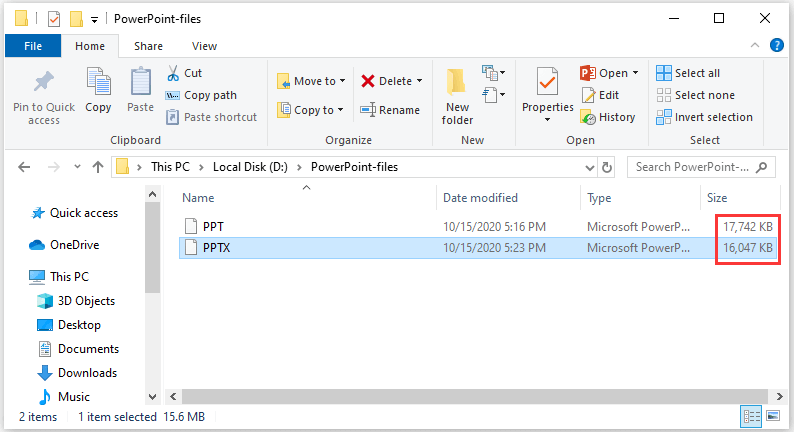
In my example, I convert my file to PPTX format and the file size is reduced by 1695KB. This should be an easy way to reduce PowerPoint file size, but the file size is depended on the contents inside the file eventually. If the PPTX file is still too large or your file has been created with PPTX format already, here are more tips that you might need in the following parts.
Method 4: Insert Your Pictures Instead of Copying and Pasting
The JPG (Joint Photographic Experts Group) format is a lossy compressed file format for pictures. Usually, a picture of JPG takes less storage space than that of BMP (Bitmap) and PNG (Portable Network Graphic).
When you copy a picture and paste it to a PowerPoint file, the picture might be reformatted to BMP or PNG, which makes your PowerPoint file larger finally. So, you’d better add the picture to PowerPoint with the insert function which maintains the original format of the involved pictures.
Method 5: Do Not Edit Images in PowerPoint
Before inserting a picture in PowerPoint, you’d better make sure you don’t need to make any further edits for it. Any edits for the picture within the PowerPoint file will be saved as a part of the file, which means that a lot of extra stuff would be stored.
For example, when you change a colorful picture to black and white, PowerPoint retains the full-color image at the same time.
Therefore, if you need to edit a picture, please use an image editor and then insert it in PowerPoint. This could help you to reduce PowerPoint file size.
Method 6: Remove Personal Information
Microsoft Office stores your personal information and hidden properties of your PowerPoint file, such as the author name, document properties, etc. Remove them could also help you to reduce file size in PowerPoint. Here are the detailed steps.
Step 1: Click File and select Info.
Step 2: Click Check for Issues. In the pop-up menu, select Inspect Document.
Step 3: The Document Inspector window will pop up, and you should make sure the “Document Properties and Personal Information” option in the list has been checked. Then click Inspect.
Step 4: In the following window, click Remove all for “Document Properties and Personal Information”.
Then save the file and it should be smaller. This could also help you when you need to prevent others from viewing your personal information for confidentiality.
If you find this doesn’t reduce the file size, please move on to the next tip.
Method 7: Do Not Store a Thumbnail
PowerPoint allows you to save the thumbnail image so that you can preview the file when you search it in File Explorer. It is a useful feature to help you find the PowerPoint file you want quickly when there are many files with similar names, but this could increase the PowerPoint file size.
To disable the feature, you can:
Step 1: Click File > Info.
Step 2: On the right-hand side, click Properties and select Advanced Properties.
Step 3: In the pop-up window, switch to Summary tab. Then uncheck the option Save preview picture.
Step 4: Click OK to save the changes. Then save the PowerPoint file.
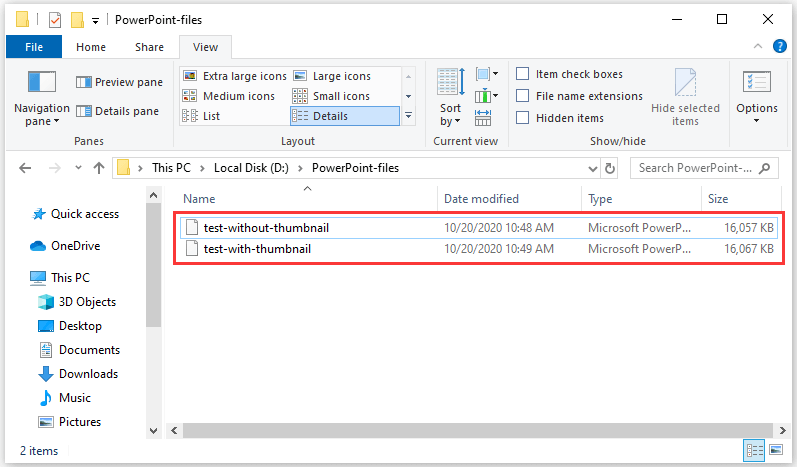
In my case, the file size is reduced by 10KB for me after I disable the thumbnail preview feature. It’s a pretty small save and might not help you. But if you have tried all the other tips and you are still unsatisfied with the PowerPoint file size, you can try this method.
How to reduce PowerPoint file size? Here are some tips. Click to Tweet
Method 8: Upgrade Your Storage Device
If it is hard for you to reduce PowerPoint file size and your disk is running out of space, which makes you unable to store more data on the disk, you might need to upgrade your disk to a larger SSD or HDD.
To replace your old disk with a larger one, you’d better transfer all the data. MiniTool Partition Wizard should be a helpful assistant. Here is how to migrate all the data on the old disk to the larger one with it. Please connect the larger disk to your PC and follow the steps below.
Step 1: Download MiniTool Partition Wizard by clicking the button below. Then install and launch it. To copy the system disk, you need to pay for the Pro Ultimate edition.
MiniTool Partition Wizard DemoClick to Download100%Clean & Safe
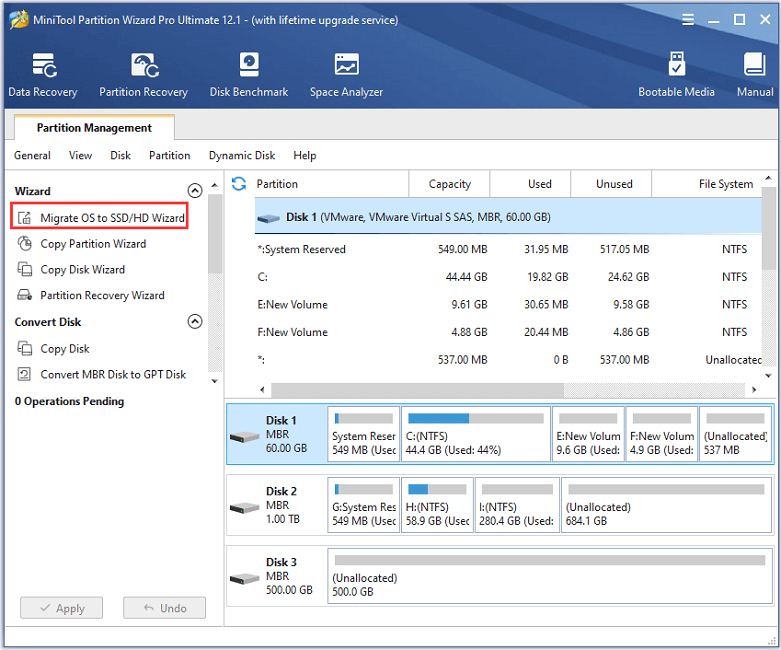
Step 2: When you get the main interface, click Migrate OS to SSD/HD Wizard under Wizard section in the left action panel.
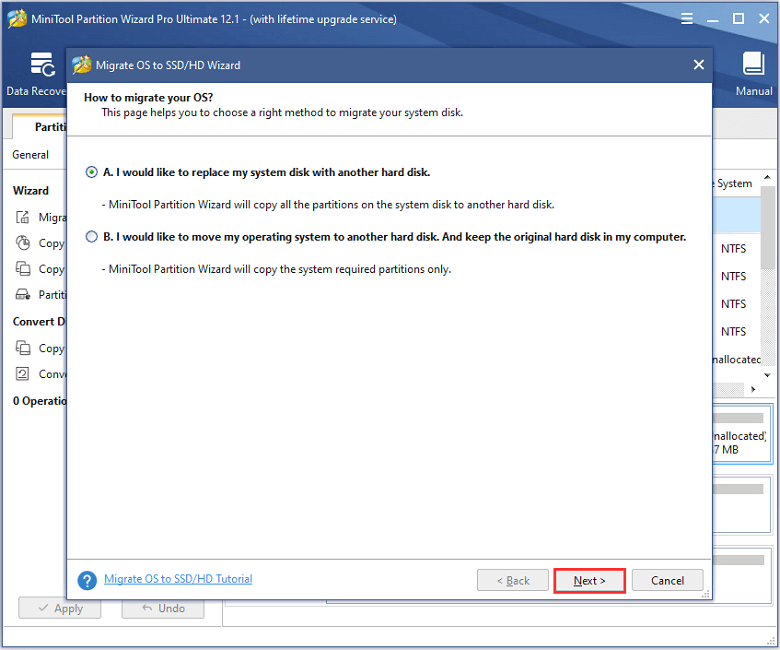
Step 3: In the pop-up window, select Option A and click Next.
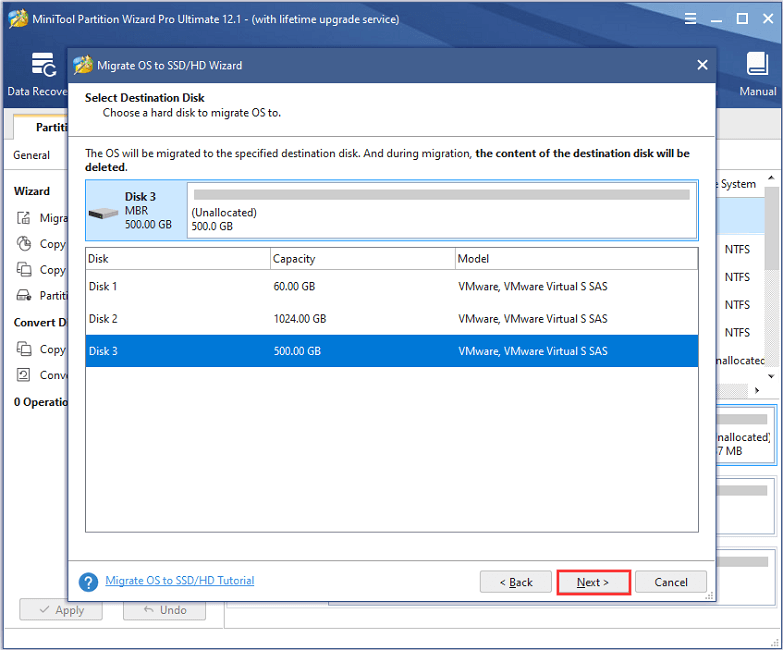
Step 4: In the following window, select the larger disk you prepared as the destination disk to store the copied data and click Next to continue.
Step 5: After selecting the destination disk, you can modify the Copy Options and Target Disk Layout. For an SSD, you’d better check Align partitions to 1MB. Then click Next.
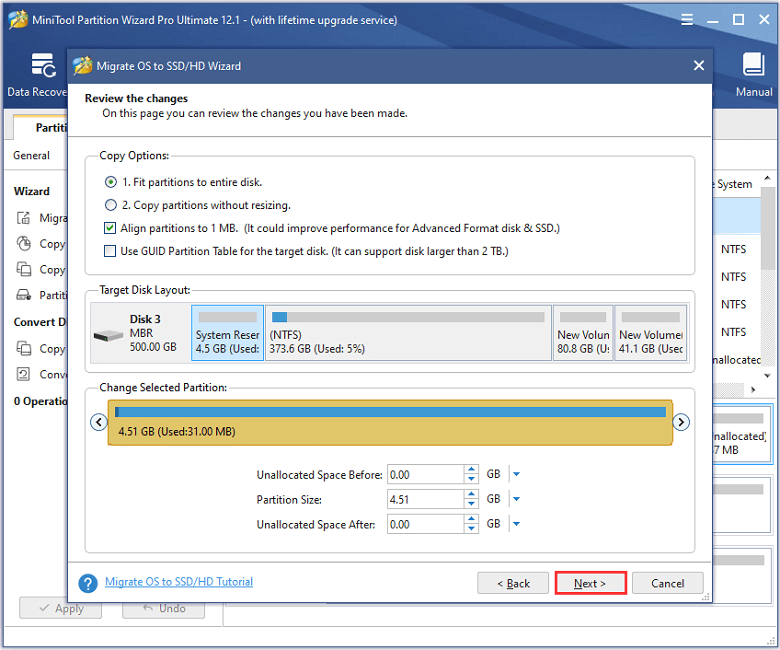
Step 6: Read the pop-up note carefully which reminds you how to boot from the larger disk. Then click Finish. When you go back to the main interface, click Apply to execute the pending operations.
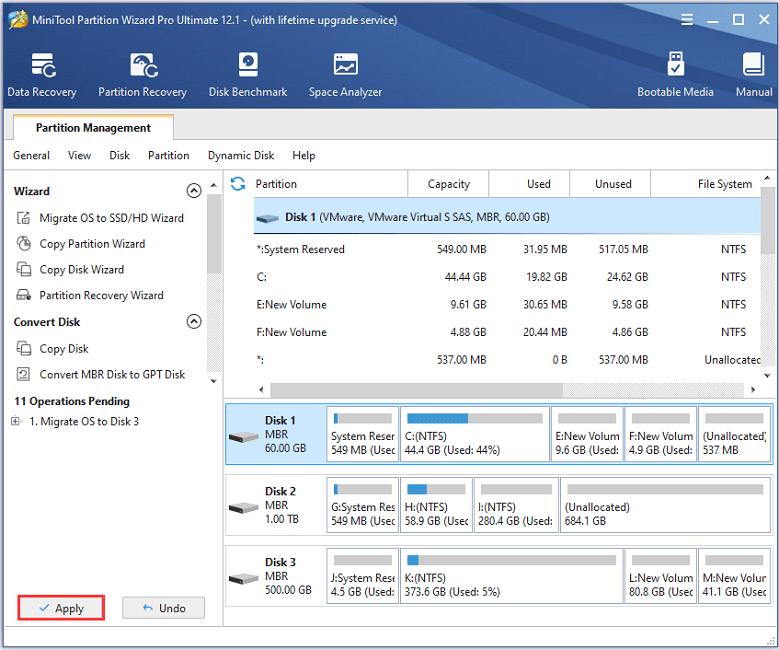
After copying the data, you can install the larger SSD or HDD to your PC and boot from it. You should get a lot of free space and you don’t need to reduce PowerPoint file size to save storage space now.
Further Tip: Extend the Drive Where the PowerPoint File Is Stored
If you prefer to store your PowerPoint files in a specific drive, it might be annoying when the drive is running out of space and you can’t save your PowerPoint files. Fortunately, you are able to extend the drive to get more free space if there is free space on other drives of your disk.
You can also use MiniTool Partition Wizard to achieve the goal and it’s totally free.
MiniTool Partition Wizard FreeClick to Download100%Clean & Safe
Step 1: Launch MiniTool Partition Wizard and get its main interface.
Step 2: Right-click the involved drive and select Extend.
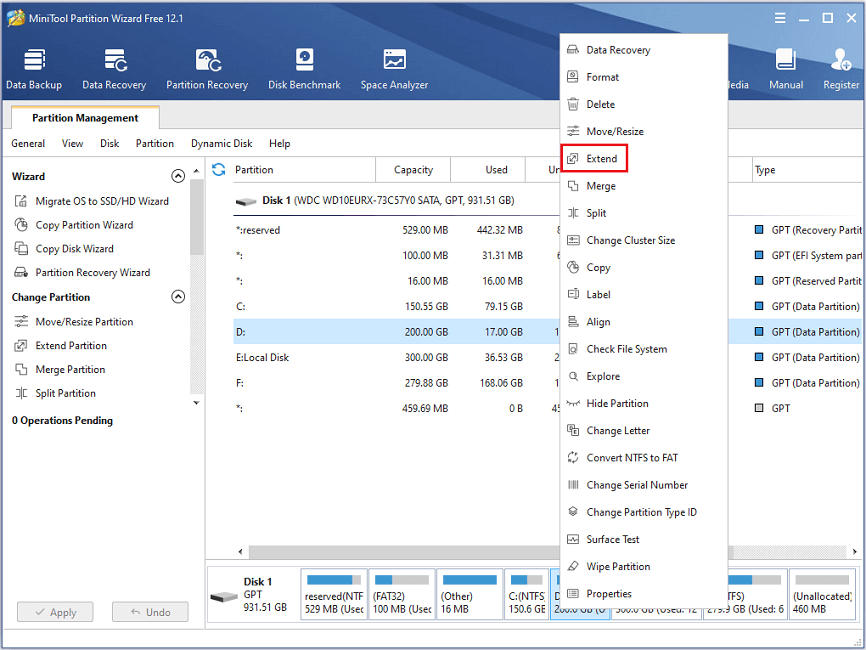
Step 3: Follow the pop-up wizard to finish the operation. Remember to click Apply to make the changes to take effect.
Bottom Line
Here are some sweet tips if you need to reduce PowerPoint file size. Some of them might not help a lot. If you need more storage space to store your PowerPoint files, you can consider extending the involved drive or upgrading your disk.
If you have better ideas or suggestions, you can leave a message in the following comment zone. For any problems with MiniTool software, you can ask help via [email protected]
About The Author

Position: Columnist
Linda has been an editor at MiniTool for seven years. She continuously learns about computers and puts her knowledge into practice. Moreover, she is particularly knowledgeable in disk management, data recovery, system installation, and PDF editing. Her articles typically reference multiple examples or are based on her own experience, providing users with the most suitable solutions.
User Comments :