VPN Says Unsuccessful Domain Name
“The VPN connection failed due to unsuccessful domain name” error message sometimes appears when Windows 10 users use Cisco AnyConnect Secure Mobility Client.

And a netizen reported the issue on community.cisco.com:
I have a customer who is trying to connect to their SSL VPN via AnyConnect client. They have a Cisco ASA 5515x running ASA 8.6(1)2, using AnyConnect for windows 3.1.03103. They are on a laptop that is running Windows 7. When they attempt to connect they get the following error message: The VPN connection failed due to unsuccessful domain name resolution. They never get to a login prompt. They have attempted to connect using the IP address of the Cisco ASA, as well as the Domain name pointing to the ASA. They have other devices coming from the same location running win7 that have no problems connecting. I believe this is a client side, or client PC issue. Any advice would be appreciated.https://community.cisco.com/t5/vpn/the-vpn-connection-failed-due-to-unsuccessful-domain-name/td-p/2461599
Why VPN says unsuccessful domain name? Something likely goes wrong with your DNS (Domain Name System) settings. So, to get rid of the “The VPN connection failed due to unsuccessful domain name resolution”, please try modifying your DNS settings.
How to Resolve the Issue
Modifying the DNS settings can be an effective solution. You need to enable the Obtain DNS server address automatically via Control Panel. For that, follow the tutorial:
Step 1: Open Control Panel via Run dialog window.
Press Windows + R at the same time to launch the Run dialog box. Then, type control into the blank bar. Finally, hit the Enter key.

Step 2: Choose the Network and Internet option. To find it quickly, you can set the view mode to Category.

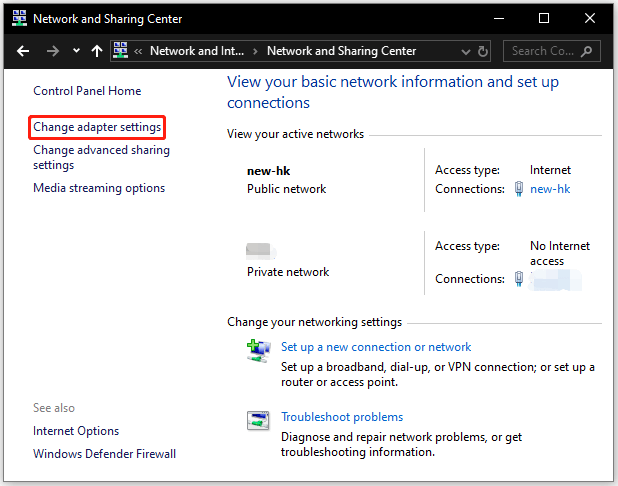
Step 3: Choose the Network and Sharing Center option and the Change adapter settings option.
Step 4: Right-click your network adapter and then choose the Properties option.
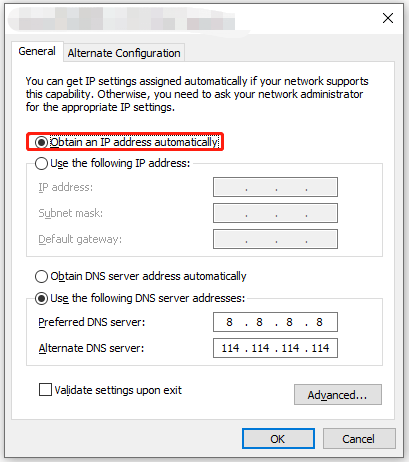
Step 5: Double-click the Internet Protocol Version (TCP/IPv4) option in the list. Then, select the Obtain DNS server address automatically option and click the OK button to save this change.
Now try using Cisco AnyConnect Secure Mobility Client to connect to the workplace again and see if your VPN says unsuccessful domain name again.
If you still receive the error message saying “The VPN connection failed due to unsuccessful domain name resolution”, there might be some unknown causes. In this case, you might need to try reinstalling your operating system.

Bottom Line
How to fix “The VPN connection failed due to unsuccessful domain name resolution”? You can try modifying your DNS settings — enable the Obtain DNS server address automatically option via Control Panel — or reinstalling your operating system to kill the unknown causes of the issue.
If you have any other useful solutions to this issue, please share them with us in the comment zone.
User Comments :