You may have ever heard about Skype for Business and found this feature sometimes becomes troublesome. This article shows you how to disable and uninstall this feature in Windows 10.
Skype for Business
Skype for Business, formerly known as Microsoft Lync Server, is a unified communications platform that integrates common channels of business communication and online meetings, including instant messaging, presence, video conferencing, and so on.
To put it more clearly, you can use this feature to proactively stay connected with your peers. With this feature, you can communicate with others conveniently in daily life. However, Skype for business sometimes brings you some troubles, like eating lots of disk space.
Therefore, you can choose to disable or uninstall Skype for Business from your PC. And this article shows some working methods to disable or uninstall Skype for Business.
It is important to note that if you are using Office 365 Skype for Business, it is impossible to uninstall it from your computer unless you remove the reset of the Microsoft Office site.
Method 1: Disable Skype for Business via Skype Settings
To disable this feature to prevent it from starting up, please following the instruction below.
Step 1: Open the Settings of Skype for Business, navigate to the Tools tab and choose the Options option.
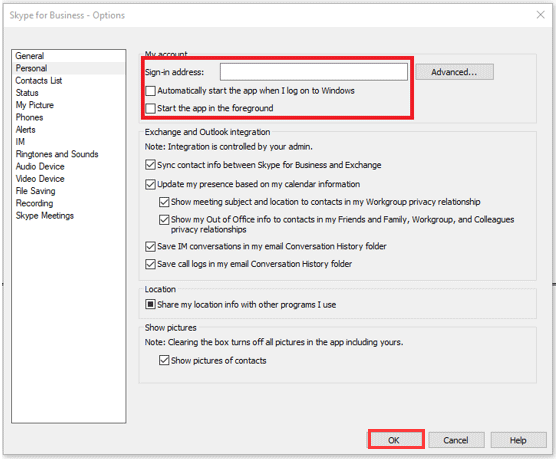
Step 2: Select the Personal option from the left side, and uncheck Automatically start the app when I log on to Windows 10 and Start the app in the foreground, and then click the OK button to confirm the changes.
Step 3: Click the Settings button again on the Skype for Business interface and choose File and Exit in order.
After the three steps, you have successfully disabled Skype for Business from your PC and you will no longer see it although it is still on your computer.
Method 2: Uninstall Skype for Business via Control Panel
This method requires you to clear all your profile cache for the Skype for Business account and then uninstall it from Windows 10 via Control Panel.
Here is the detailed tutorial on uninstalling Skype for Business.
Step 1: Open your Skype for business and then sign out of this application.
Step 2: In the Sign in interface, please click the Delete my sign-in info option.
Step 3: Close Skype for Business.
Step 4: You should uninstall Skype for Business like any other software on your computer. Therefore, please go to Control Panel > Programs > Programs and Features > Uninstall or change a program.
Step 5: Choose Skype for Business and click Uninstall.

Method 3: Uninstall Skype for Business via Registry Editor
If the above two methods don’t work, the third choice is to uninstall it in your registry.
Now, let’s see how to uninstall Skype for business from Windows 10 via Registry Editor.
Step 1: Press the Windows icon and R key simultaneously. After getting a Run box, please type regedit and click the OK button to access the Registry Editor window.
Step 2: In the Registry Editor window, please navigate to the Edit tab and then choose the Find option.
Step 3: Type Skype for Business into the Find box and click the Find Next button.
Step 4: Use right-click to delete all the search listings.

User Comments :