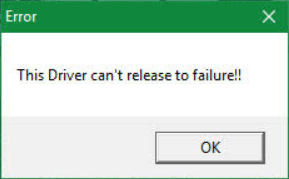
This driver can’t release to failure error is a common problem in computers with GIGABYTE motherboards. If you are bothered by this error, this guide is what you need. Here, MiniTool software provides 5 fixes for you.
If you are using GIGABYTE motherboard on your Windows 10 PC, you might receive an error message saying that this driver can’t release to failure when you start computer.
This error messages appears when your motherboard lacks onboard Wi-Fi. This onboard Wi-Fi is required by the components of GIGABYTE APP Center that comes along with GIGABYTE motherboards.
Here are some solutions that can help you resolve this error. You don’t need to perform them all. Just try them one by one until you fix the error that this driver can’t release to failure successfully.
Fix 1: Make Some Changes in APP Center
As mentioned before, GIGABYTE APP Center components require the onboard Wi-Fi. These components include Cloud Station (Server), GIGABYTE Remote, and Remote OC. You can try fixing this error by disabling them.
Step 1: Open GIGABYTE APP Center from your Windows System Tray.
Step 2: Now, choose Cloud Station (Server).
Step 3: In the new window, turn off the switch of Always run on next reboot.
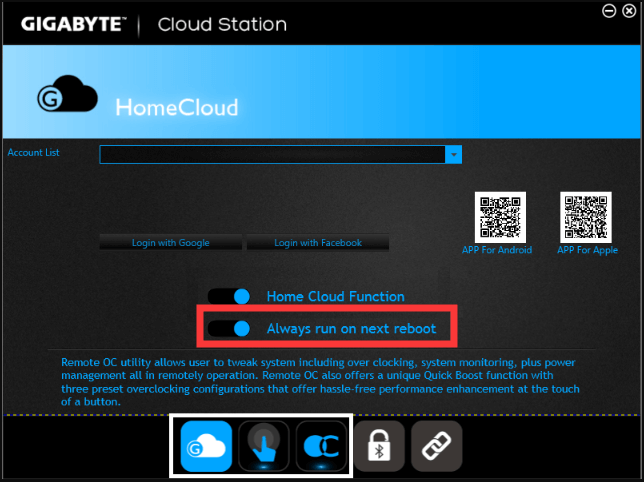
Step 4: Disable GIGABYTE Remote and Remote OC in the same way.
After that, restart your computer to check if the issue is fixed.
Fix 2: Update GIGABYTE APP Center
If you update your Windows 10 recently, you should update the GIGABYTE APP Center to make sure that it is compatible with the latest platform. Just go to the official website to download the latest version of APP Center and install it on your computer.
Fix 3: Uninstall GIGABYTE APP Center
You can try the 2 methods above when you want to keep the APP Center. But if you don’t want to use it any more, you can directly uninstall it to fix the error that this driver can’t release to failure.
Step 1: Press Windows + R to open Run window.
Step 2: Input APPwiz.cpl and click OK button.
Step 3: You will get a window where all your programs are listed. Just select your GIGABYTE APP Center and click Uninstall.
Step 4: In the further confirmation window, click Yes button.
After uninstall the program, you can restart your computer and the error message should not appear again. To get more ways to uninstall a program, check this post.
Fix 4: Reinstall GIGABYTE Services
According to the reports of some users, they resolved the error that this driver can’t release to failure by reinstalling their GIGABYTE services. This operation could be complete in Command Prompt and you can have a try.
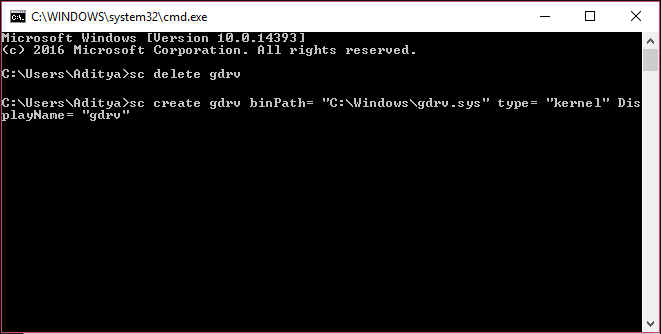
Step 1: After invoking Run window, input cmd and press Ctrl + Shift + Enter to open Command Prompt as administrator.
Step 2: Type the command sc delete gdrv and press Enter. This will uninstall the services of GIGABYTE.
Step 3: Now, type the command line sc create gdrv binPath= “C:Windowsgdrv.sys” type= “kernel” DisplayName= “gdrv” and press Enter key. By executing this command, the same services you have uninstalled just now will be reinstalled.
Again, reboot your Windows 10 PC and the error message that the driver can’t release to failure should disappear.
Fix 5: Update Your Motherboard Drivers
Finally, you can choose to update your GIGABYTE motherboard drivers. As there are many drivers for your motherboard, you can use a third-party program to complete the update. But note that you should download and install a safe program to avoid any virus attacks.

User Comments :