This second hard drive not showing up issue may be caused by connection problems, the drive not being initialized, or driver issues. To resolve this issue, you can try to check the connection, initialize and format the drive, or update/reinstall drivers.
Whether internal or external, a second hard drive is a great way to expand your storage space, back up files, or run a secondary operating system.
However, some users have discovered that after connecting or installing a second hard drive, it doesn’t appear in File Explorer.
If you’re experiencing this issue, don’t worry. This guide will walk you through common causes and solutions, from simple checks to more advanced repair methods.
Why Is My Second Hard Drive Not Showing up?
A second hard drive may fail to appear due to various reasons. Below are some of the most common causes:
Physical Connection Issues
A loose cable (for internal drives) or a faulty USB/Thunderbolt port (for external drives) can prevent your second hard drive from being recognized.
Drive Not Initialized
New drives often need to be initialized before Windows recognizes them. Otherwise, the drive cannot be shown.
Outdated or Corrupted Drivers
Faulty storage controller drivers can prevent Windows from recognizing drives.
Drive Letter Conflicts
The drive may lack an assigned letter, making it invisible in File Explorer.
Hardware Failure
Mechanical damage or electrical issues to your drive may cause it not to be detected.
How to Fix Second Hard Drive Not Showing Up?
When your second hard drive is not showing up in Windows, you can try checking physical connections, initializing/formatting the drive, assigning a drive letter, updating/reinstalling drivers, running the Hardware and Devices troubleshooter, and checking the BIOS settings.
To know more detailed steps, keep an eye on the following part.
Solution 1. Check Physical Connections
The first step is to rule out simple physical issues, as loose or faulty connections are frequent culprits.
For External Drives:
- Try a different port: USB ports can fail, so plug the drive into another port on your PC. Avoid USB hubs, as they can cause power or connectivity issues.
- Try another cable: USB or Thunderbolt cables can fray or malfunction. Swap in a working cable to see if the drive appears.
For Internal Drives:
- Check cables: For SATA drives, ensure both data and power cables are securely connected to the drive and motherboard. For NVMe drives, verify the drive is fully seated in its M.2 slot (some require screws to secure them).
- Inspect for damage: Look for bent pins on SATA connectors, frayed cables, or physical damage to the drive itself (e.g., dents, scratches).
Solution 2. Check the Drive in Disk Management
If physical connections seem fine, check if Windows detects the drive in Disk Management. This tool shows all storage devices, even those not visible in File Explorer.
To open Disk Management, right-click Start and select Disk Management. Once this tool opens, you can check the second hard drive status. Here we list some unusual statuses:
- Drive appears but is uninitialized: New drives often show up as “Unknown, Not Initialized”. This means Windows recognizes the hardware, but it hasn’t been set up for use.
- Drive has no drive letter: The drive may appear with a partition (e.g., “Healthy (Primary Partition)”) but no drive letter (like D: or E:). Without a letter, it won’t show in File Explorer.
- Drive is unallocated: The drive is detected but not partitioned.
- Drive is offline: It may be labeled “Offline”, indicating Windows has paused access.
- Drive not listed: If the drive doesn’t appear in Disk Management, it could be caused by hardware issues.
After learning the status of the second hard drive, you can refer to the following methods to solve the problem.
Solution 3. Initialize and Format the Partition
If your drive is new or was never set up on Windows, it will likely show as “Not Initialized” in Disk Management. Initialization prepares the drive for use. You can follow the steps below to do that.
Step 1. In Disk Management, right-click the uninitialized drive and select Initialize Disk.
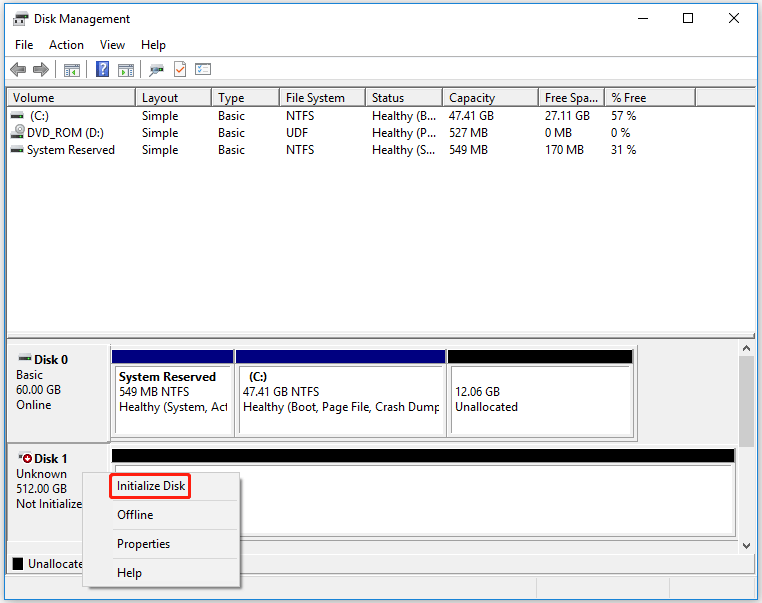
Step 2. Choose a partition style – MBR or GPT. Then, click OK to initialize.
- GPT (GUID Partition Table): Recommended for drives larger than 2TB and modern systems (supports UEFI).
- MBR (Master Boot Record): Older style, limited to 2TB drives and BIOS systems.

Step 3. After initialization, the drive will show as “Unallocated”, and you need to create a new volume to make it show in File Explorer. Right-click the unallocated space and select New Simple Volume.
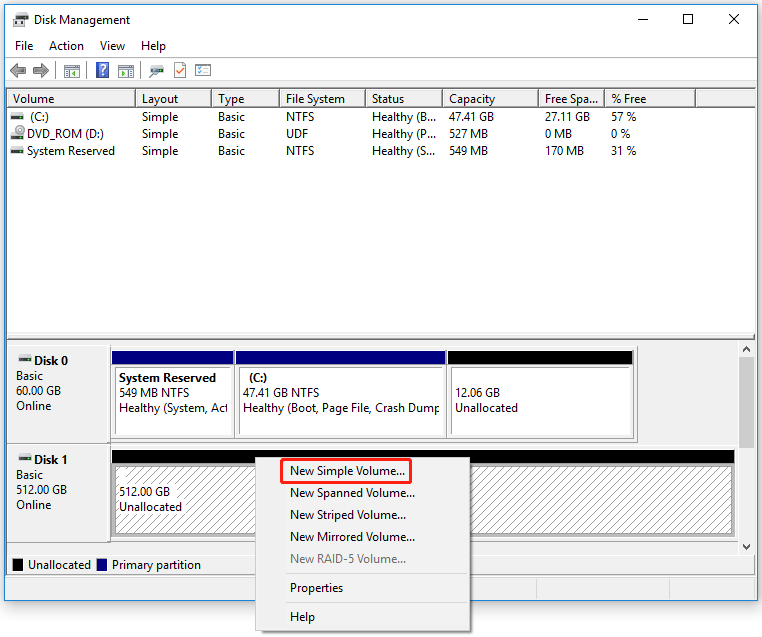
Step 4. Then follow the wizard.
4.1. Specify the volume size.
4.2. Assign a drive letter.
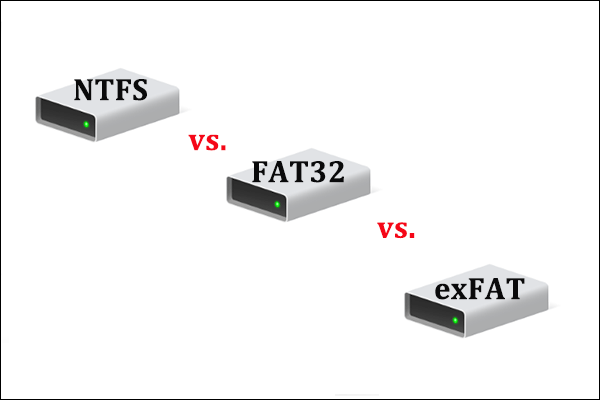
4.3. Choose a file system: NTFS (default for Windows, supports large files), exFAT (compatible with Windows and macOS), or FAT32 (older, limited to 4GB files)
4.4. Set the volume label for the drive (optional) and click Finish.
The drive should now appear in File Explorer.
Solution 4. Assign a Drive Letter
If the drive appears in Disk Management with a partition but no letter, Windows can’t display it in File Explorer. Assigning a letter may fix this problem.
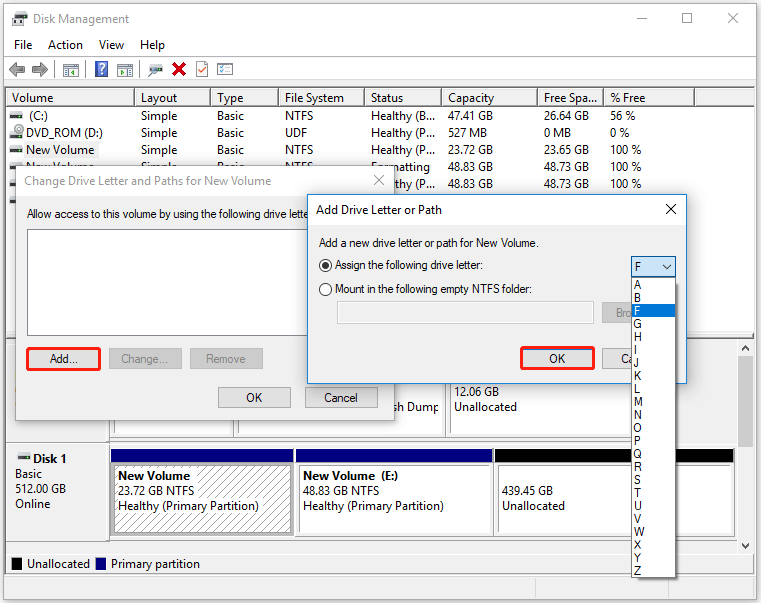
Step 1. In Disk Management, right-click the drive’s partition and select Change Drive Letter and Paths.
Step 2. Click Add.
Step 3. Choose a drive letter from the dropdown next to Assign the following drive letter and click OK. Then the drive should now appear in File Explorer.
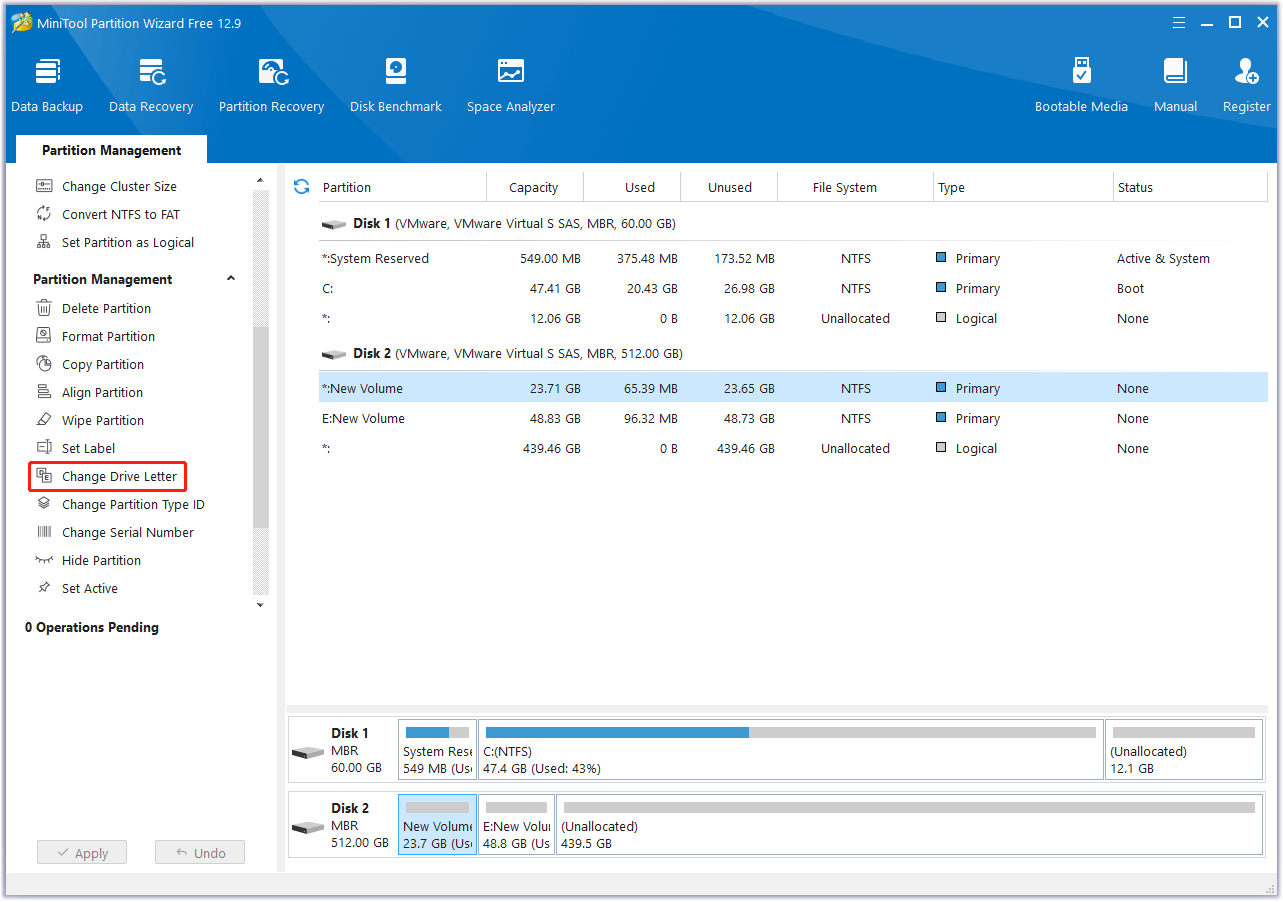
Alternatively, you can use a third-party tool, such as MiniTool Partition Wizard. This free partition manager can help you change the drive letter to reassign it to the drive, making it accessible in File Explorer.
What’s more, this program offers a wide range of features related to disk/partition management. It can help you clone a hard drive, resize/extend partitions, partition a hard drive, convert MBR to GPT without data loss, recover data from hard drives, etc.
MiniTool Partition Wizard FreeClick to Download100%Clean & Safe
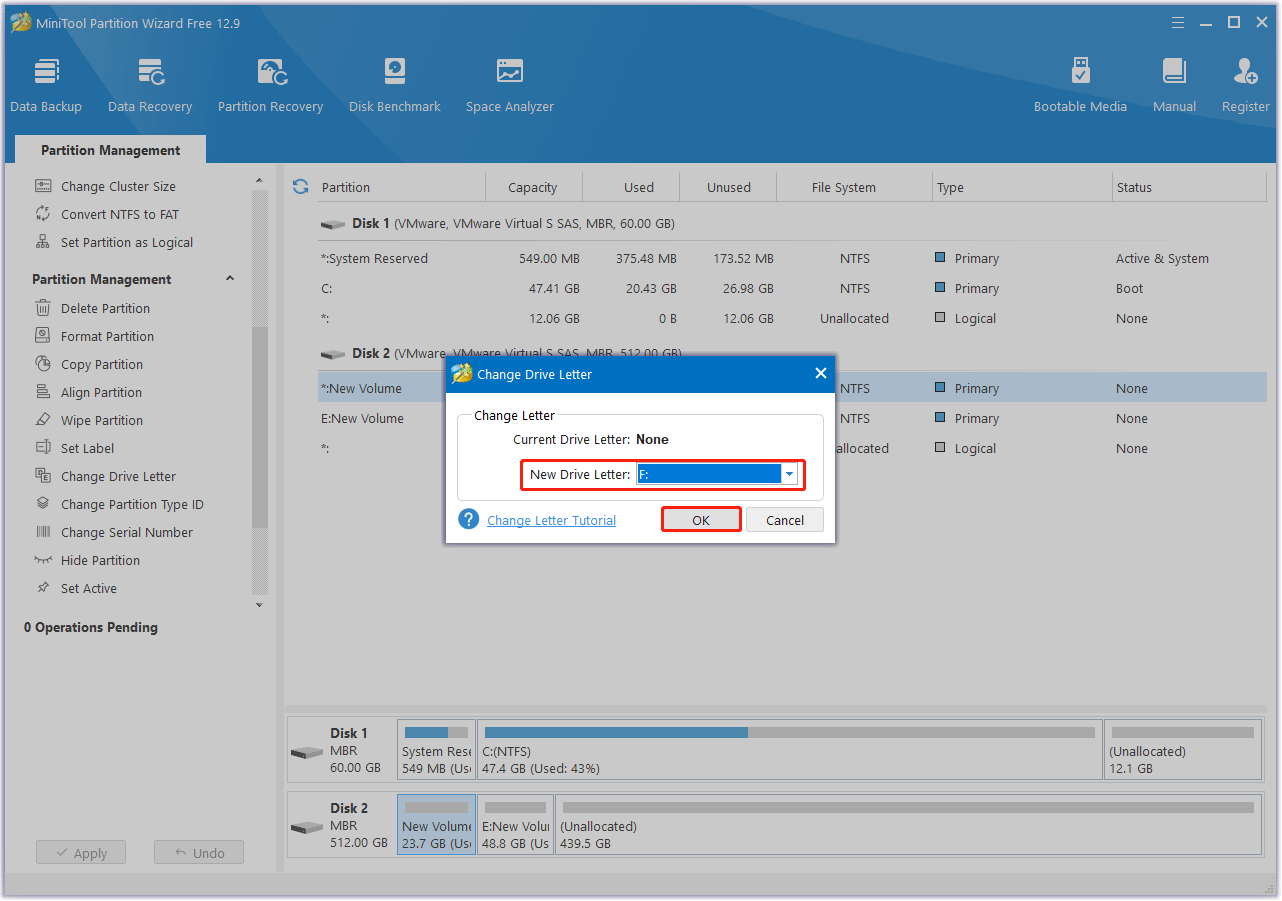
Step 1. Launch MiniTool Partition Wizard to enter its main interface. Then select the partition where you need to assign a drive letter and click Change Drive Letter from the left action panel.
Step 2. In the pop-up window, select a letter from the drop-down menu and click OK.
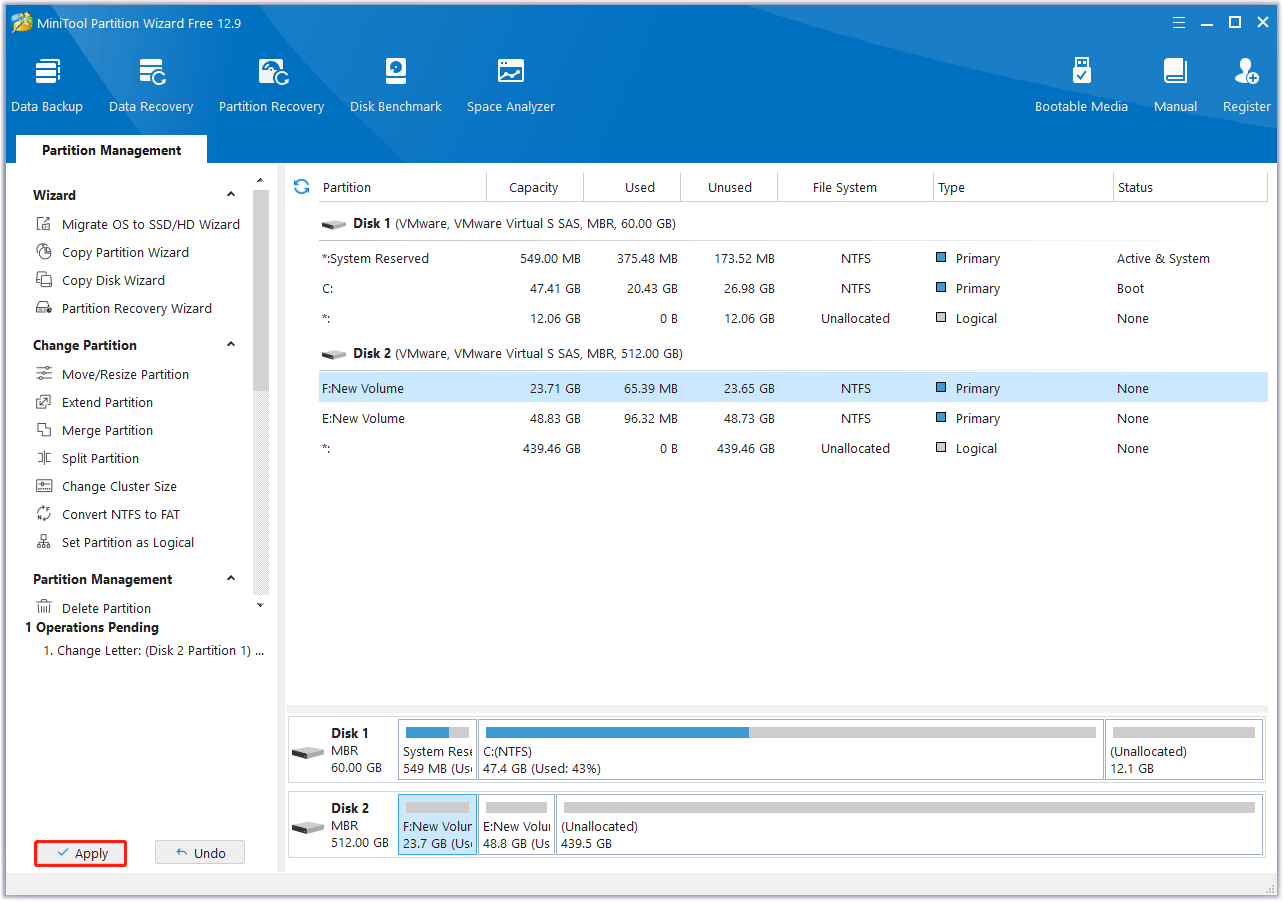
Step 3. When you go back to the main interface, click Appy to execute the pending operation.
Solution 5. Format the Drive
Formatting a hard drive is a common method for repairing various logical issues with both internal and external hard drives. If the drive isn’t showing up because it lacks a file system, format the drive and assign a file system to the storage device.
Here is the guide on how to format the second drive via MiniTool Partition Wizard.
MiniTool Partition Wizard FreeClick to Download100%Clean & Safe
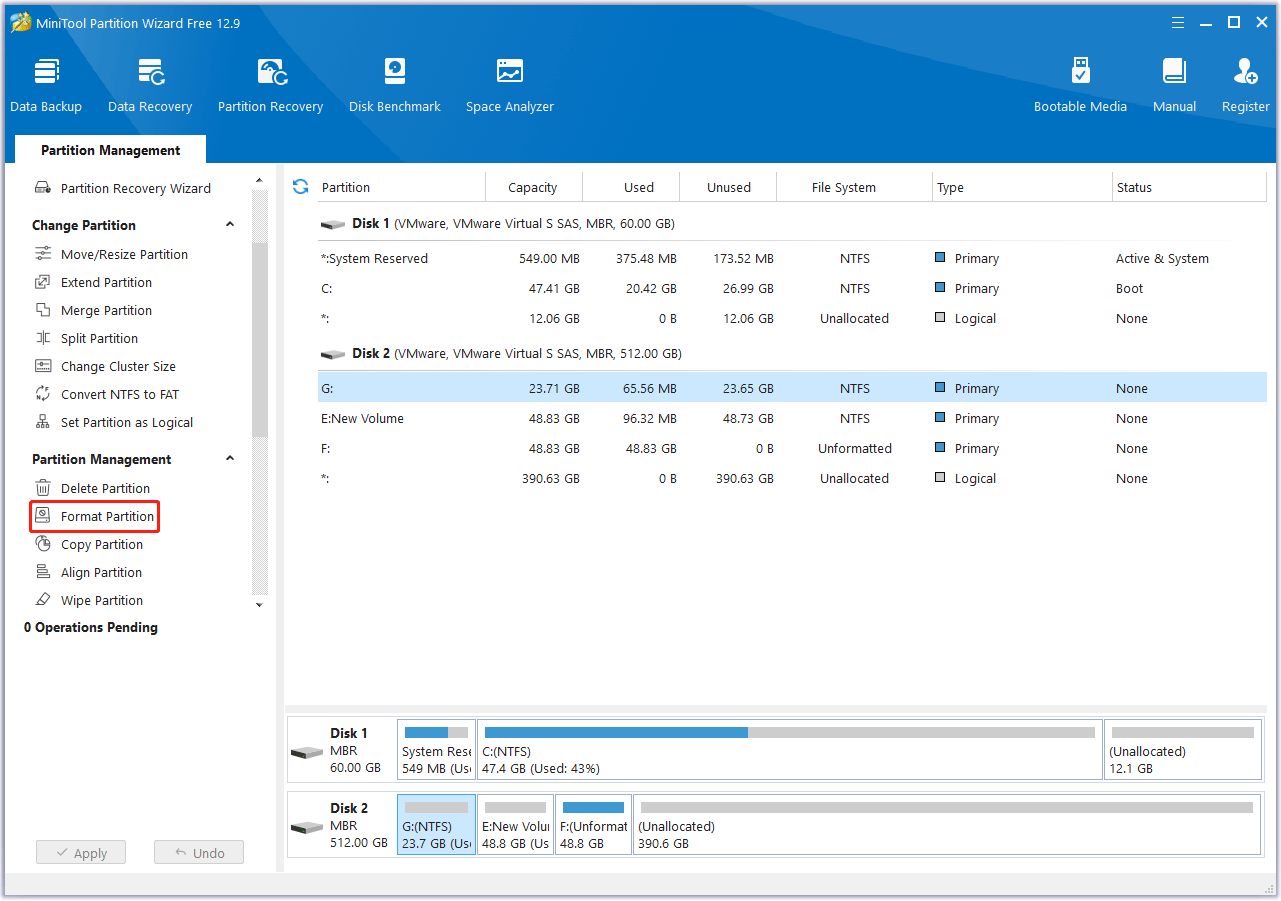
Step 1. In the main interface, highlight the hard drive partition and click Format Partition in the left panel.
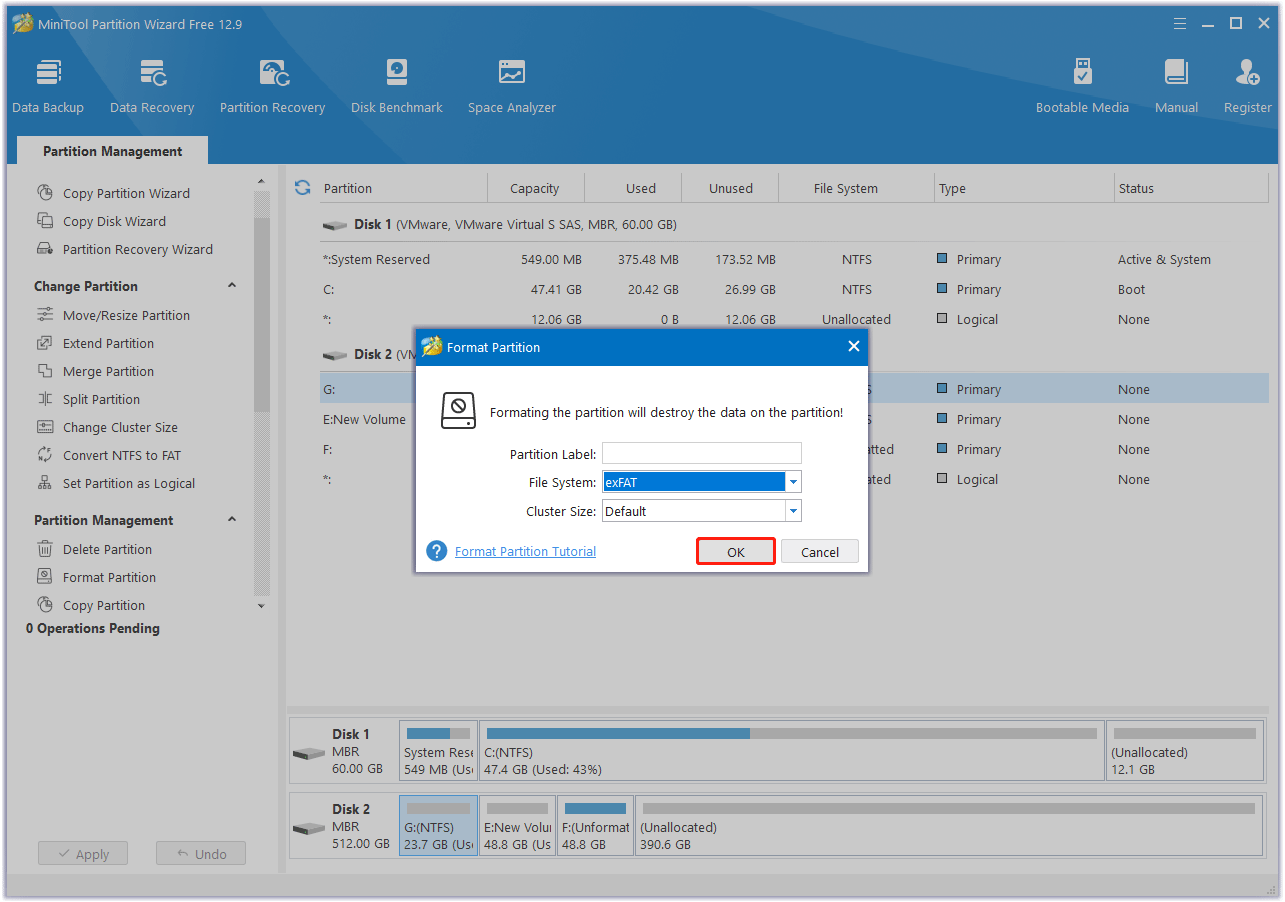
Step 2. In the pop-up window, configure parameters like partition label, fie system, and cluster. Then click OK.
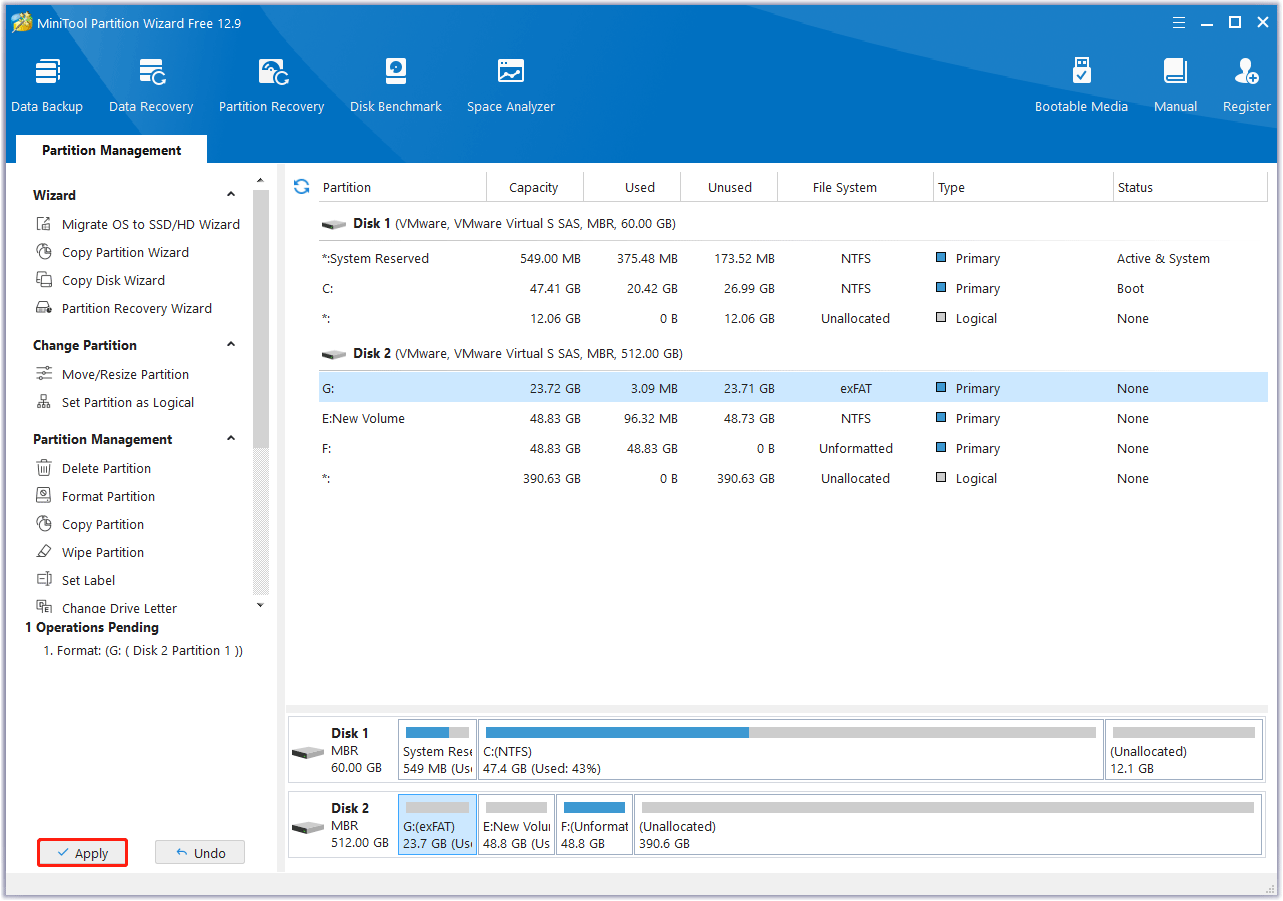
Step 3. Click Apply to carry out the operation.
Solution 6. Bring an Offline Drive Online
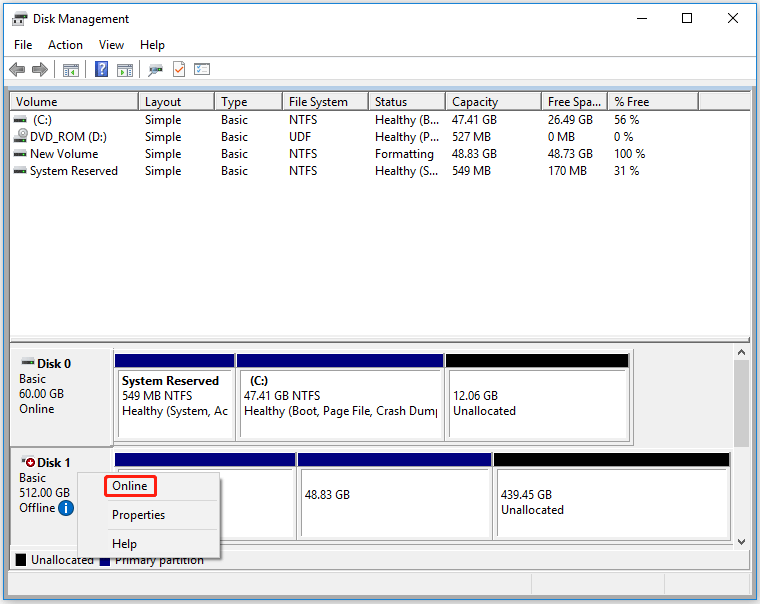
If the drive is labeled “Offline” in Disk Management, Windows has temporarily disabled it. To bring it online, simply right-click the offline drive and select Online. Then the drive should now show as Online and appear in File Explorer if it has a letter.
Solution 7. Update or Reinstall Disk Drivers
Outdated, corrupted, or missing storage controller drivers can prevent Windows from detecting drives. To update or reinstall them:
Step 1. Press Win + X and select Device Manager.
Step 2. Expand the Disk Drives category and look for your second drive.
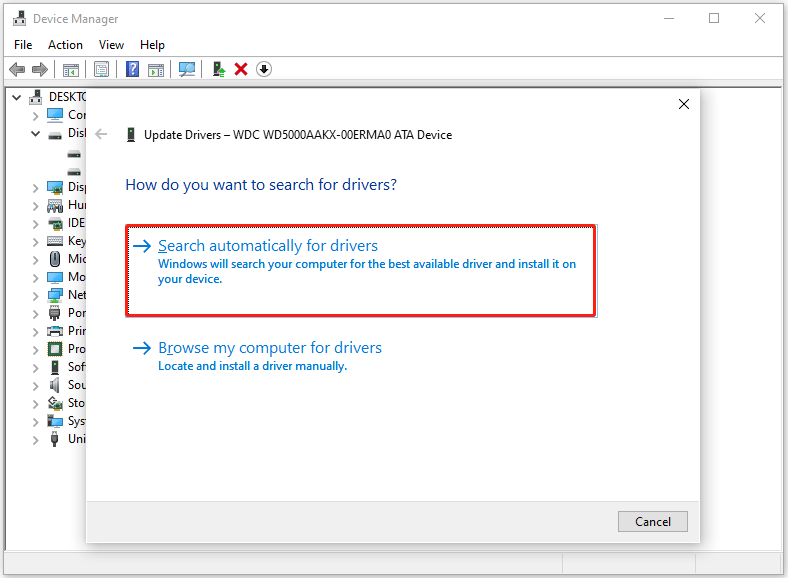
Step 3. If the drive has a yellow exclamation mark, right-click it and select Update Driver.
Step 4. Choose Search automatically for drivers. Windows will search for and install the latest driver.
Step 5. If updating fails, right-click the drive and select Uninstall Device. Restart your PC, and Windows will reinstall the driver automatically.
Solution 8. Run Hardware and Devices Troubleshooter
The Hardware and Devices troubleshooter is a utility that comes with Windows. It helps you fix issues related to hardware and devices. Here, you can use it to fix the issue of your second hard drive not showing up in Disk Management.
Step 1. Press Win + R to open the Run dialog box.
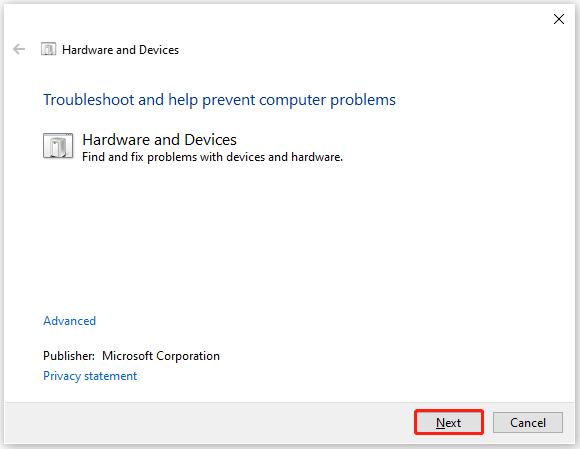
Step 2. In the box, type msdt.exe -id DeviceDiagnostic and click OK.
Step 3. In the pop-up window, click Next to run the troubleshooter. Then the troubleshooter will scan for issues and attempt to resolve them.
Solution 9. Check the BIOS Settings for Your Second Hard Drive
If the SATA port you are plugged into is disabled due to incorrect BIOS settings, you can resolve the issue by adjusting the BIOS settings.
Step 1. Restart your computer and enter the BIOS setup (usually by pressing F2, F10, or F12 during startup). The exact key depends on your computer.
Step 2. In the BIOS, navigate to the storage configuration or integrated peripherals section.
Step 3. Within the storage settings, find the SATA controller or AHCI mode settings. Ensure it’s set to Enabled.
Step 4. Press F10 to save the BIOS settings and exit.
Prevention Tips for Second Hard Drive Recognition Issues
To prevent secondary hard drive recognition issues, here are some tips:
#1. Keep your system and drives updated.
Regularly update your operating system and hard drive drivers. This ensures compatibility and resolves potential software conflicts.
#2. Avoid using USB hubs.
When connecting an external drive, plug it directly into your computer’s USB port rather than using a hub. Hubs can sometimes limit power or data transfer speeds.
#3. Monitor drive health.
Use the CHKDSK tool built into Windows to monitor drive health.
#4. Safely remove hardware.
Before unplugging an external drive, always use the “Safely Remove Hardware” option in the system tray. This ensures all data is properly written to the drive and prevents data corruption.
#5. Back up your data.
Regularly back up important data to another storage device to prevent data loss in the event of a hard drive failure.
Bottom Line
A second hard drive not showing up on Windows isn’t an unsolvable problem. Checking the connections, checking Disk Management, assigning a drive letter, updating drivers, running troubleshooters, and more can often resolve the issue.
Using the steps outlined in this guide, you’ll be able to diagnose and fix this error, ensuring that your second hard drive will show up and be usable properly.
If you have any questions or suggestions on how to use MiniTool Partition Wizard, please do not hesitate to contact us via [email protected].
Second Hard Drive Not Recognized FAQ
1. What is a second hard drive?
A secondary hard drive is an additional storage device inside a computer that is separate from the primary hard drive. It provides extra storage space for files, applications, and backups, and can be internal or external.
2. Can I add a second hard drive to the PC?
Yes, you can install a second hard drive in your laptop and desktop PC. It is usually possible to add a second internal hard drive to a desktop computer. Sometimes, even laptops can do this.
3. How to recover data from the corrupted second hard drive?
If the second hard drive is corrupted, you should prioritize data recovery and replace the drive. MiniTool Partition Wizard can help you recover data from the drive.
1. Click Data Recovery in MiniTool Partition Wizard.
2. Select the second hard drive and click Scan.
3. Check the needed files and click Save.
4. Select a location and click OK.
4. Is SSD better than HDD as a secondary drive?
Yes, generally speaking, an SSD is a better secondary drive than an HDD. This is especially true for tasks that require faster data access and quicker load times.
5. Why did my second SSD disappear?
The disappearance of a second SSD from your system can be caused by a variety of hardware and software issues. Common causes include loose connections, overheating, or driver issues. The SSD may also need to be initialized or assigned a drive letter.
About The Author

Position: Columnist
Vega enjoys helping people with computer problems, including disk management, data recovery, data backup, and more. She is constantly expanding her knowledge in related fields. And she will continue to bring more easy-to-understand professional articles to help people solve various problems on the PC.
User Comments :