Do you know how to scan a document on Windows 10? If not, you can read this post, in which MiniTool shows you how to do that with Microsoft Scan, and Windows Fax and Scan.
Storing sensitive written documents like W9s, contracts, and living wills digitally is a great way to preserve them.
Typically, printers and scanners are shipped with an optical disk containing the necessary drivers and tools, which are also available online if your PC doesn’t include an optical drive. Then, you can scan a document using the software provided by manufacturers.
In general, the manufacturer’s software is customized to your specific scanner and can provide a better experience. However, if you don’t want third-party tools installed on your PC, or the printer or scanner is too old to be fully compatible with Windows 10, you can use Microsoft’s two solutions: Microsoft Scan and Windows Fax and Scan.
Microsoft Scan
This tool is a visual upgrade to Microsoft’s older Fax and Scan tool. It provides most of the same features, depending on your printer, but removes the fax and email components. As for how to use it, please refer to the following steps:
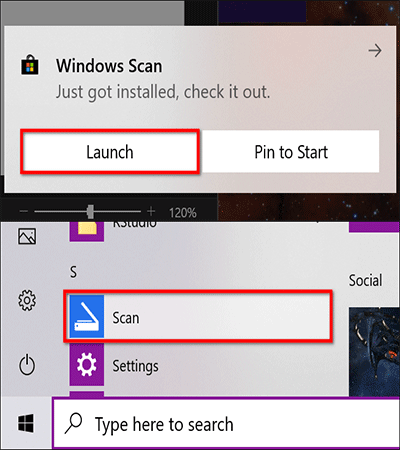
Step 1: Head to the Windows Scan app (free) listed on the Microsoft Store and click the Get button to download install this app.
Step 2: Launch this app by clicking the Launch button in the notification popping up after the app is installed on your PC, or searching this app in Start Menu and clicking the best-matched result.
Step 3: With the app open, your scanner should appear listed on the left. Click Show More to get the Scan app’s full menu. Here you can set scanning options.
- Scanner: It allows you to choose which scanner you want to use.
- Source: It allows you to choose how to feed paper to be scanned. It generally has three options: Auto-configured (an automatic document feeder), Flatbed (a flatbed scanner), and Feeder. The Flatbed mode will add two additional options: Color mode and Resolution (DPI), while the Feeder mode will add another two options: Scan both sides and Page size.
- File type: It provides four options: JPEG, PNG, TIFF, and Bitmap. From them, you can choose one to save the scan as.
- Color mode: It allows you to scan documents in full color, in grayscale, or a stark black and white.
- Resolution (DPI): It allows you to determine the sharpness of dots per inch (DPI) on the scanning image. The higher the DPI, the sharper the image, but the longer the scan time and the larger the document size.
- Scan both sides: You can toggle on/off this option to scan both sides of your document.
- Page size: You can choose the paper size such as A4, Legal, or Letter.
- Save file to: It’s set to Scans by default, which allows you to place your scanned documents in the path: C:UsersyouraccountPicturesScans.
Step 4: When you’re ready to scan, insert your document into the feeder, or lift the scanner’s lid. For the latter, place the document face-down on the glass and close the lid. Then, click the Scan button to begin the scanning process.
Windows Fax and Scan
Unlike the Microsoft Scan app, Windows Fax and Scan app, first appeared in Windows Vista, provides additional settings, like a built-in tool for emailing your scan, you’re not searching for the file through the Mail app, browser, or third-party email client. Please follow the steps below:
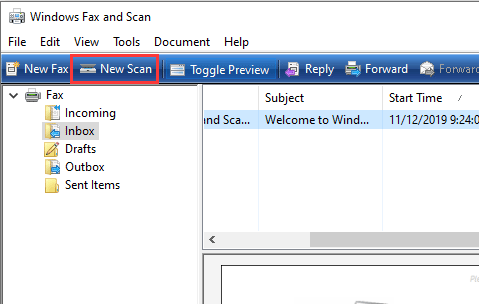
Step 1: Type “Windows Fax and Scan” into the Start menu box and then click the best-matched result to open it.
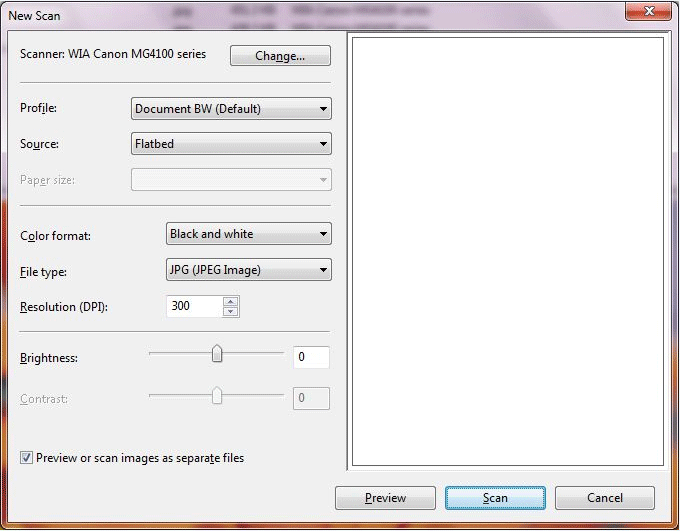
Step 2: Once it’s opened, click the New Scan option on the toolbar.
Step 3: Click Change to set the default scanner. Then, choose a scan profile such as Photo, Documents, or Last Used Settings. Next, set options like Source, Paper size, Color format, File type, DPI, etc.
Step 4: After these options are chosen, click the Preview button to see the results. If the pre-scan looks great, then click the Scan button to start the scanning process.
About The Author

Position: Columnist
Linda has been an editor at MiniTool for seven years. She continuously learns about computers and puts her knowledge into practice. Moreover, she is particularly knowledgeable in disk management, data recovery, system installation, and PDF editing. Her articles typically reference multiple examples or are based on her own experience, providing users with the most suitable solutions.
User Comments :