Lost disk space after defrag? If you are searching for solutions to this issue, you come to the right place. In this post, MiniTool Partition Wizard analyzes the causes of the lost disk space after defragmentation issue and provides a full guide to fix it.
Why Is the Disk Space Lost After Defrag?
The “lost disk space after defrag” issue is a common phenomenon that may occur on Windows 7 and 10. Many people encounter this bothering issue on their devices. How to fix the “lost disk space after defrag” issue? This question has been widely posted in many forums and communities. Here’s one example from the www.sevenforums.com forum:
Hi everyone. Today I defragmented my PC. I have 3 partitions: C in which I installed Windows and programs, D for downloads and other stuff, and E for games, movie making, and others. I used Defrag today. On C I won 0.5 GB. On D nothing changed but on E I've lost over 40 GB… What can I do to recover those GB back? Thanks.https://www.sevenforums.com/performance-maintenance/120782-lost-space-hard-after-defrag.html
After investigating extensive user reports and posts, I find that the enabled VSS is the culprit of the “lost disk space after defragmentation” issue. In addition, the created system restore point, incompatibility between the native defragger and the shadow copy service, and virus infection are also related to this issue.
How to Fix the “Lost Disk Space After Defrag” Issue?
How to fix the “lost disk space after defrag” issue? Here I summarize some practical methods. No matter you encounter the “lost disk space after defrag Windows 7” issue or the “lost disk space after defrag Windows 10” issue, you can try the following methods to get rid of it.
Method 1. Try the Way Provided in Community
First, you can try the way provided by a CCleaner Community user to fix the “lost disk space after defrag Windows 10” issue and “lost disk space after defrag Windows 7”. Here’s the guide:
- Make sure VSS is enabled.
- Create a System Restore Point.
- Then delete all Restore Points, and then make sure VSS is disabled again.
- Look at your free space and see if it returned or not.
Method 2. Run a Full Virus Scan
Viruses or malware infection may also cause the “lost disk space after defrag Windows 7” issue. In this case, you can try running a full virus scan to fix the error. Here’s how to run a virus scan:
Step 1. Click the Start icon on the left bottom.
Step 2. Type “windows defender” in the search box, and then select Windows Defender from the search result.
Step 3. In the Windows Defender window, click the down arrow beside Scan to open a drop-down menu, and then select Full scan from the menu.
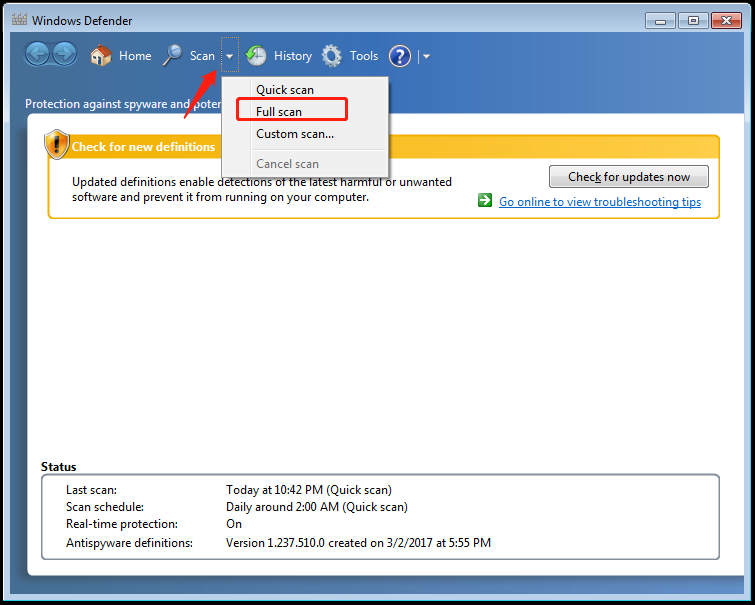
Step 4. Once done, check if the “lost disk space after defrag Windows 7” issue has been resolved.
Method 3. Delete System Restore Points and reduce the VSS Space
Some people report that deleting all system restore points and then creating a new system restore point with disk less storage usage helps them fix the “lost disk space after defragmentation” issue, you can also have a try. Here’s how to do it:
# 1. Delete all the System Restore Points
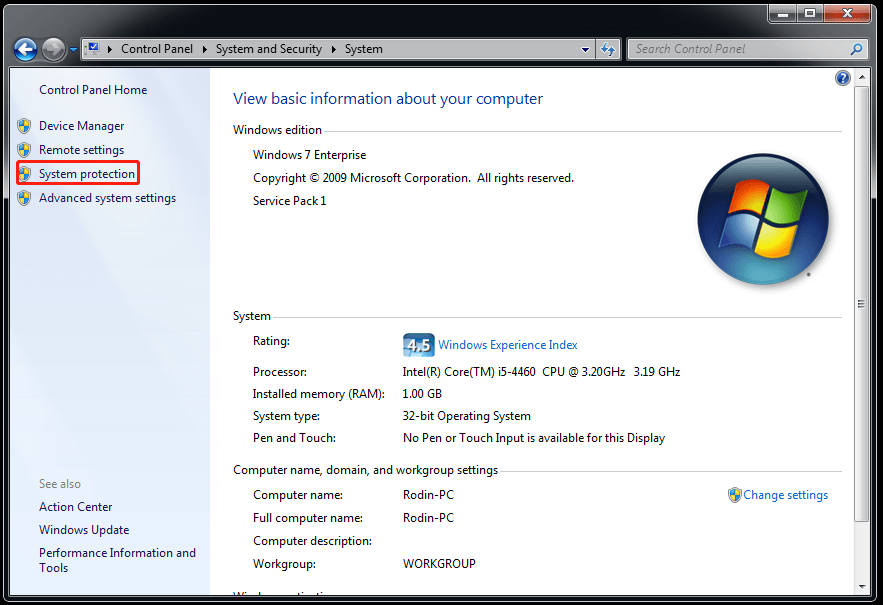
Step 1. Click the Start icon and then select Control Panel from the right panel.
Step 2. Set View by as Categories, and then navigate to System and Security > System.
Step 3. Click the System protection link in the left pane. If prompted by UAC, then click on Yes.
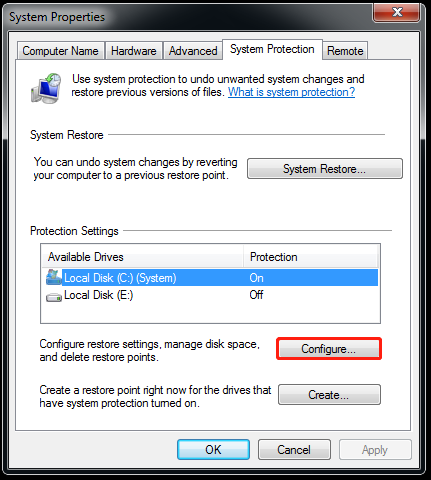
Step 4. In the pop-up System Properties window, select the available hard disk drive or partition that you want to delete the System Protection restore points. Next, click the Configure button.
Step 5. Click the Delete button, and then click the Continue button to confirm the deletion.
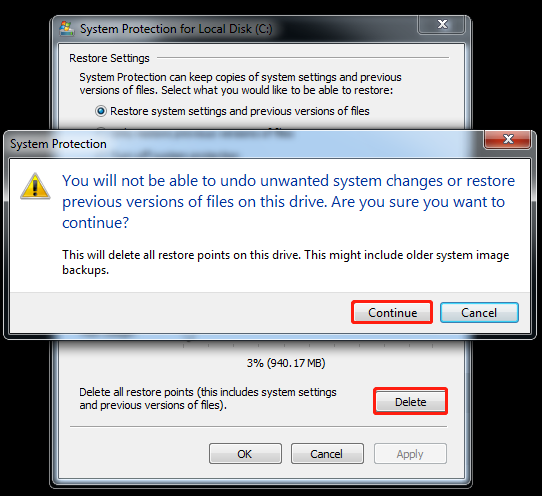
Step 6. Once complete, click Close. Next, click OK in the System Protection windows and System Properties window.
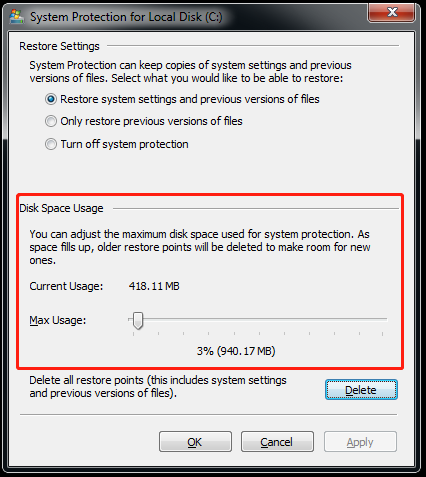
# 2. Create A New System Restore Point with Less VSS Space
- Repeat the first four steps in # 1 to enter the System Protection window.
- Adjust the Max Usage slider to how much disk space you want System Protection to use for restore points for the selected disk.
- Next, click OK.
Method 4. Scan for the Shadow Storage Created on Your Device
The Shadow Storage created on your device can also take up the storage space. In this case, you can try scan for the Shadow Storage created on your device to fix it. Please follow the guide:
Step 1. Log in as an administrator and then click the Start icon on the left bottom.
Step 2. Type “cmd” in the search box, right-click Command Prompt from the search result, and then select Run as Adminnistrator.
Step 3. Click Yes in the UAC (User Account Control) prompt window.
Step 4. In the elevated Command Prompt window, type “vssadmin list shadowstorage” and press Enter to see the amount of used storage and the maximum allotted amount.
Step 5. Next, type the following command and press Enter to resize the shadow copy storage association:
vssadmin Resize ShadowStorage /For=[your hard disk]: /On=[your hard disk]: /MaxSize=[how much space you want to allocate]
Step 6. After that, you should have more free space on your hard drive.
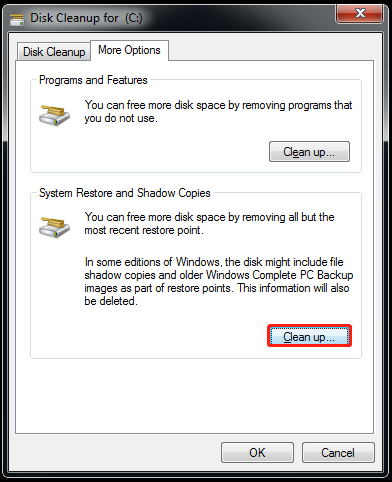
Once done, you can also use Disk Cleanup to delete all but the last Restore Point and all the old VSS copies. Here’s the way:
- Click the Start icon, and type “disk cleanup” in the search box.
- Select Disk Cleanup from the result.
- Select the C drive and click OK in the pop-up window.
- Then, click the Clean up system files button.
- Select C drive and click OK again.
- Go to More Options.
- Next, click the Clean up button under System Restore and Shadow Copies section.
- Once done, click OK.
Method 5. Format the Disk
Some people report that formatting the disk drive helps them fix the “lost disk space after defrag” issue successfully. You can also have a try. However, formatting the drive will erase all the data stored in it, so it is essential to clone all the data to another partition to prevent any data loss. Here’s the guide:
Part 1. Back up the Data on Your Disk
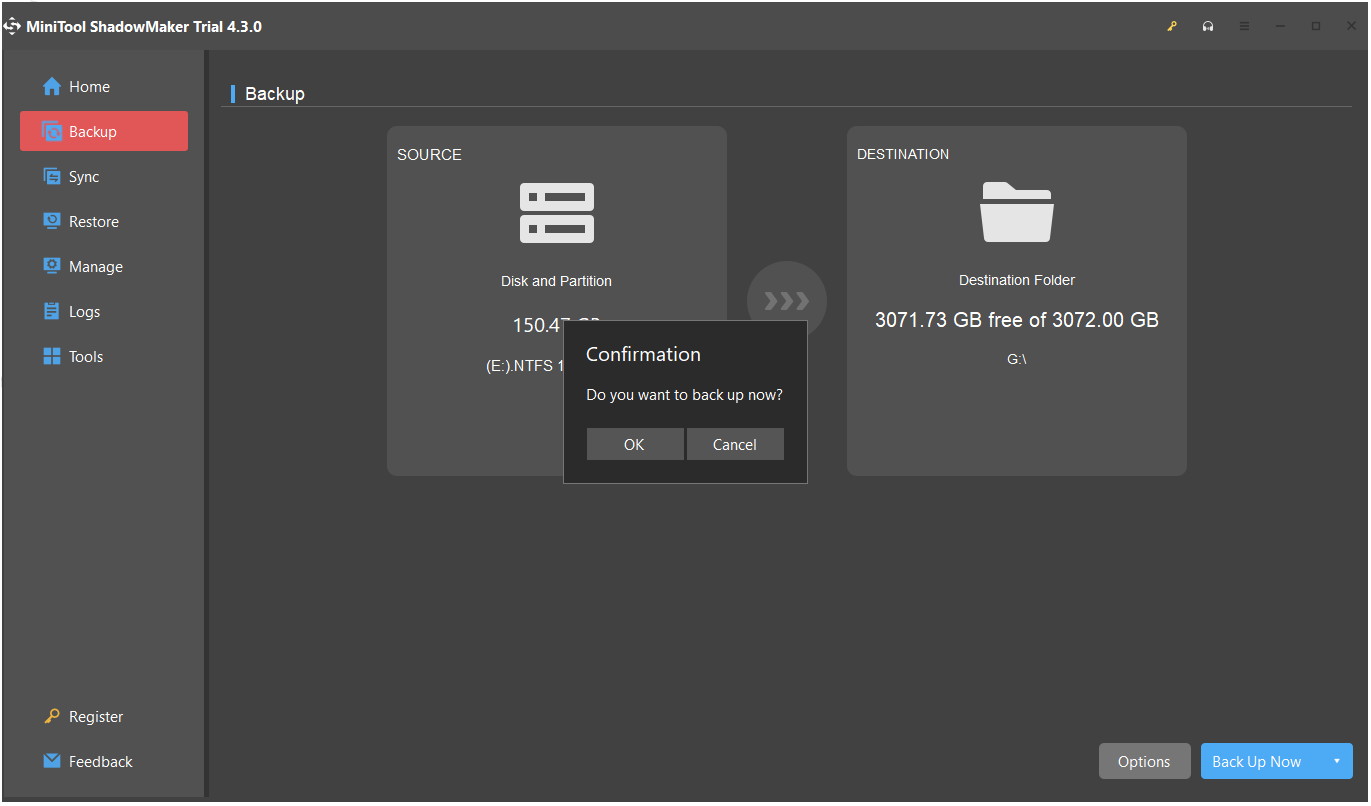
To back up the data on your disk drive, MiniTool ShadowMaker can help you with the process. Here’s the tutorial:
MiniTool ShadowMaker TrialClick to Download100%Clean & Safe
- Download and install MiniTool ShadowMaker on your PC.
- Then launch into its main interface.
- Click the Backup tab on the left pane, and then click Source to choose which data to back up.
- Click Disk and Partitions to back up the problematic drive.
- Choose the problem’s disk under Select a disk, and then tick the problematic drive on the right pane. Next, click OK.
- Select Destination to choose which drive to back up the data on the problematic drive. In the new window, select a drive and click OK.
- Click the Back Up Now button on the right bottom, and then click OK in the Confirmation window. After that, wait for the backup process to complete.
Part 2. Format the Disk
To format the disk, you have four choices. You can choose one of the following ways to format the hard drive according to your preferences:
# 1. Use File Explorer
The easiest way to format a hard drive on Windows is by using File Explorer. Here’s the way:
- Press the Win + E keys simultaneously to open the File Explorer window.
- Click This PC from the left pane.
- Right-click the affected disk drive, and select Format from the menu.
- Set the format options according to your needs.
- After that, click Start to execute the operation.

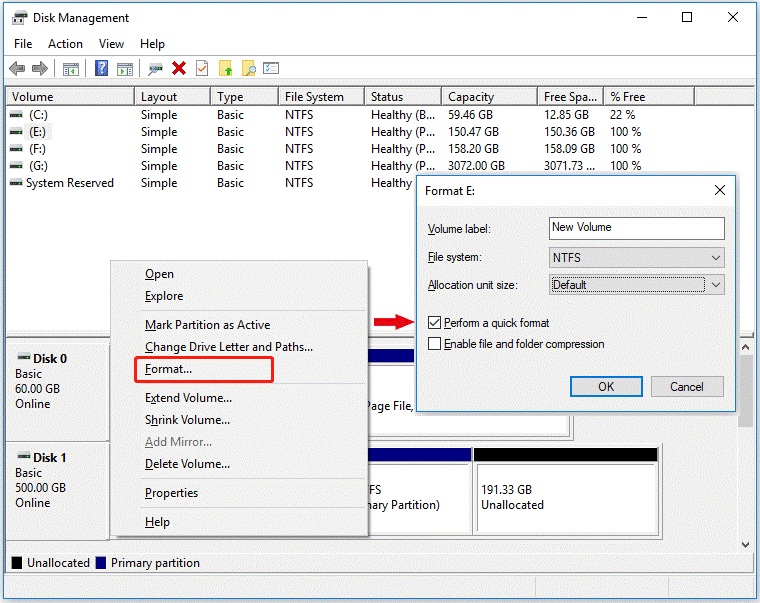
# 2. Use Disk Management
Disk Management is a built-in tool in Windows that can help you perform advanced storage tasks like initializing a new drive and extending or shrinking volumes. You can also use it to format a hard drive. Here’s the guide:
- Press the Win + X keys simultaneously to open the Quick Link menu, and then select Disk Management from the menu.
- Right-click the affected disk drive in the Disk Management window and select Format.
- In the Format window, set Volume label, File System, Allocation unit size, and then click OK.
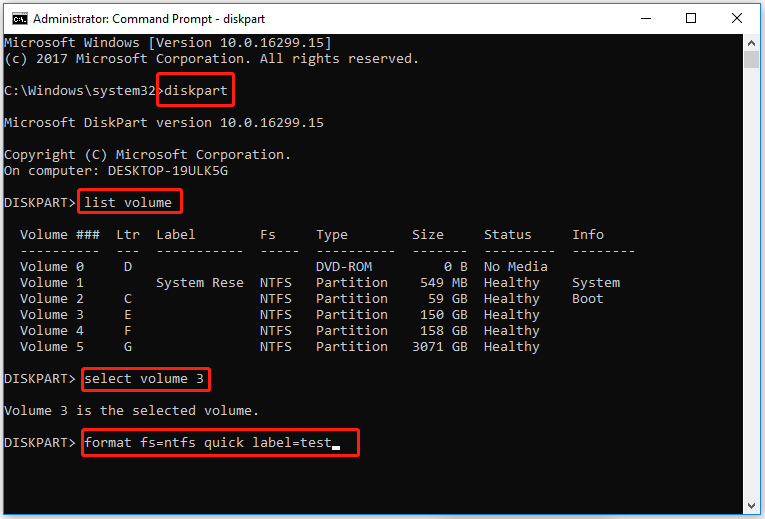
# 3. Use Command Prompt
Command Prompt is the default command line interpreter for the Microsoft Windows operating system. It can be used to execute various commands. You can use the DiskPart commands to format the hard drive, create partitions, clean disk and so on. Here’s how to use it to format hard drive:
Step 1. Press the Win + S keys simultaneously to open the Search window.
Step 2. Type “cmd” in the search box, right-click Command Prompt, and select Run as administrator.
Step 3. Type the following commands in order, and press Enter after each command:
- diskpart
- list volume
- select volume X (replace the X with the number of the affected disk drive)
- format fs=ntfs quick label=test
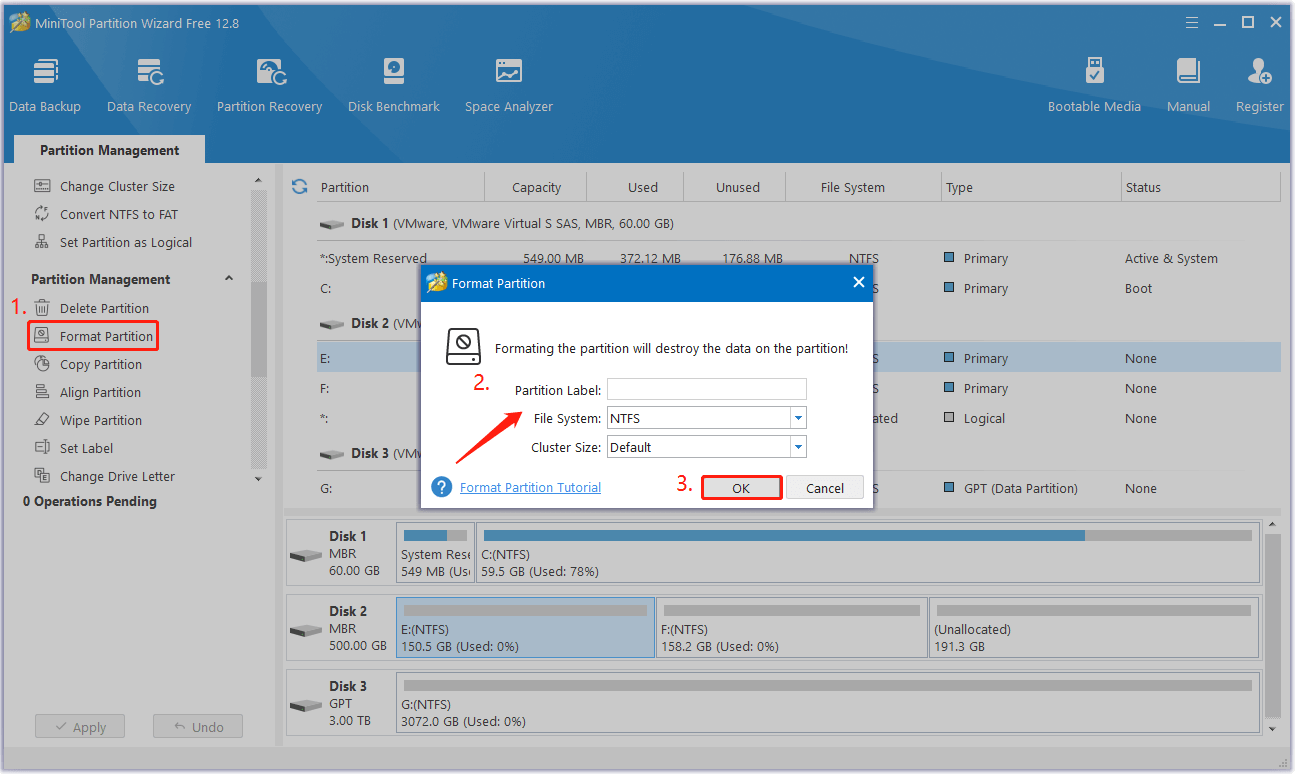
# 4. Use MiniTool Partition Wizard
In addition, you can also use MiniTool Partition Wizard. It is a professional and functional partition program that can help you format disks/USB devices/SD cards to FAT32/exFAT/NTFS/Ext2/Ext3/Ext4, check for disk errors, partition hard drive, convert MBR to GPT, do data recovery, and so on.
To use MiniTool Partition Wizard’s Format Partition feature, you can do as follows:
Step 1. Click the Download button to get the MiniTool Partition Wizard installation package, and then follow the on-screen instructions to complete the process.
MiniTool Partition Wizard DemoClick to Download100%Clean & Safe
Step 2. Launch into its main interface, and select the affected disk drive.
Step 3. Click the Format Partition option from the left pane. Then, set the Partition Label, File System, and Cluster Size for the selected partition and click OK.
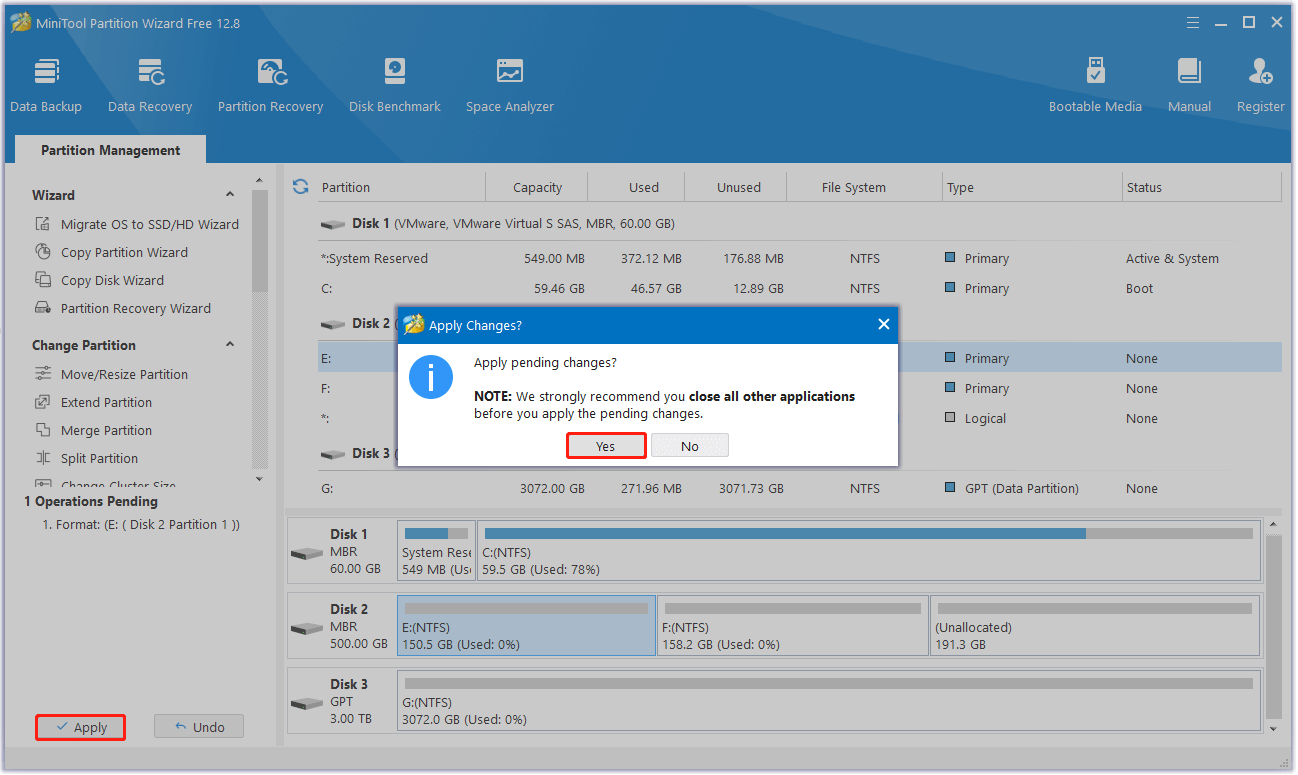
Step 4. Now, you can preview the formatted partition. If it is satisfying, please click the Apply and Yes button to apply the change.
Bottom Line
This post provides a full guide to fix the “lost disk space after defrag” issue. You can try to fix this issue by following this guide. If you can’t format partitions to other file formats except NTFS using the Windows tools. MiniTool Partition Wizard is a good choice.
If you have any confusion or options about this topic, share them with us in the following comment area. Also, you can send us an email at [email protected] if you have difficulty using the MiniTool software and we will get back to you as soon as possible.
About The Author

Position: Columnist
Charlotte is a technology columnist with a strong focus on the Windows operating system, specializing in disk management, backup, and data recovery. She is passionate about analyzing computer errors, identifying root causes, and delivering practical solutions. In her free time, she stays updated on the latest developments in computer systems and hardware while continuously learning new technologies to broaden her expertise. Her writing style is clear and easy to understand, making complex technical topics accessible even to users with limited computer knowledge.
User Comments :