LocalServiceNoNetworkFirewall is a service used by Windows Defender Firewall as part of Windows Security. Usually, it doesn’t consume much memory space and resources. However, some users have complained that the LocalServiceNoNetworkFirewall service is consuming too much CPU or power in Windows 11/10’s Task Manager. This causes the system to be so slow that it cannot be used.
Why does LocalServiceNoNetworkFirewall use so much CPU? It may be caused by the following reasons:
- Firewall conflict
- Lots of conflicting firewall rules
- Damaged installation of 3rd party security products
- Corrupted Windows Firewall settings
Then, how to solve the LocalServiceNoNetworkFirewall high CPU problem? Please keep reading.
Fix 1: Restart Windows Firewall
Some temporary glitches in Windows Firewall can cause high CPU usage for LocalServiceNoNetworkFirewall. In this case, restarting Windows Firewall can solve the problem. To do this, you can follow these steps:
Step 1: Press the Ctrl + Shift + Esc keys to open the Task Manager.
Step 2: Switch to the Services tab and right-click WinDefend.
Step 3: Select the Restart option from the context menu.
After restarting the service, see if the LocalServiceNoNetworkFirewal high CPU usage problem is now resolved.
![[Solved] Set Time Zone Automatically Greyed Out in Windows 11](https://images.minitool.com/partitionwizard.com/images/uploads/2022/10/set-time-zone-automatically-greyed-out-in-win-11-thumbnail.png)
Fix 2: Update Windows to the Latest Version
Incompatibilities between outdated operating systems and other system modules such as drivers or 3rd party firewalls can cause high CPU usage for LocalserviceNoNetworkFirewall. Therefore, updating Windows to the latest version may fix the high CPU issue.
Fix 3: Re-enable Third-party and Windows Defender Firewall
Are you using multiple firewall security on your PC? If yes, the problem may be caused by this. To fix this, you can try disabling both firewalls and then enabling them again.
Step 1: Right-click Firewall in the system tray and click the Exit button to turn off any third-party firewalls you are using.
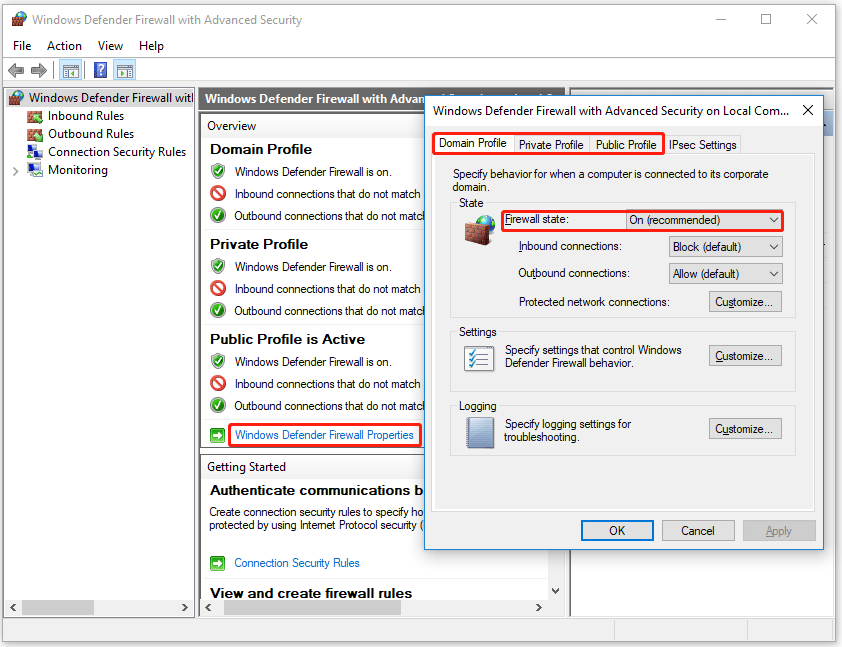
Step 2: Type Windows Defender in the Search box. Then right-click Windows Defender Firewall with Advanced Security and select Run as administrator.
Step 3: In the new window, click Windows Defender Firewall Properties. Set the Firewall status to the off position to disable Windows Firewall for the following profiles:
Domain configuration file
Private configuration file
Public configuration file
Step 4: Apply your changes and turn off Windows Defender. Then open Windows Defender again and enable its firewall as described above.
Fix 4: Revert Driver Update
If you recently installed some driver update, it may conflict with Windows Firewall. So, you can try rolling back the most recent driver update and see if that fixes the LocalServiceNoNetworkFirewal high CPU usage problem.

Fix 5: Reset Windows Firewall to Its Defaults
The high CPU usage of LocalServiceNoNetworkFirewall may be caused by the customization of the firewall. Therefore, you can try resetting Windows Firewall to its default settings and see if that resolves the issue.
Step 1: Type Windows Security from the Search to open the Windows Security application.
Step 2: Go to the Firewall & network protection tab and click the Restore firewalls to default button.
Step 3: Go to Virus & threat protection > Manage settings option.
Step 4: Open Add or Remove Exclusions under Exclusions. Then click Add an Exclusion and select Folder.
Step 5: Enter the following path in the address bar: C:\ProgramData\Microsoft\Windows Defender\
Step 6: Click Select Folder and close the Windows Security.
Once done, restart your PC, and when restarting check if the high CPU usage is resolved.
Fix 6: Delete Firewall Rules
This problem can be caused if there are rules from a previously installed third-party firewall added to Windows Firewall that conflict with Windows Firewall’s own rules. Therefore, you can remove the firewall rule to solve the problem. Here are the main steps to do this:
Step 1: Run Windows Firewall with Advanced Security as administrator.
Step 2: In the right pane, click Export Policy and save the file.
Step 3: Go to the Inbound Rules tab and delete the custom rule you want to delete. However, make sure not to delete important rules.
Step 4: Do the same for Outbound rules. See if this fixes the problem, if not, click the Action menu and select the Restore Default Policy option. Then confirm the recovery strategy.
Fix 7: Reinstall Third-party Security Suites
If you have installed a third-party security suite that is not installed correctly or the associated installation files are corrupt, it may conflict with Windows Firewall, causing this issue. In this case, you can try reinstalling a third-party firewall or security suite that is already installed on the system.

About The Author

Position: Columnist
Vega enjoys helping people with computer problems, including disk management, data recovery, data backup, and more. She is constantly expanding her knowledge in related fields. And she will continue to bring more easy-to-understand professional articles to help people solve various problems on the PC.
User Comments :