Autopilot.dll WIL errors can cause frequent crashes and unexpected system restarts in Windows 10 and 11, and are often triggered by events in the Windows Event Viewer.
There are many potential reasons that can cause the above error. The following are the most common:
Outdated Windows: Outdated operating systems often experience frequent system crashes, application bugs, and other similar issues.
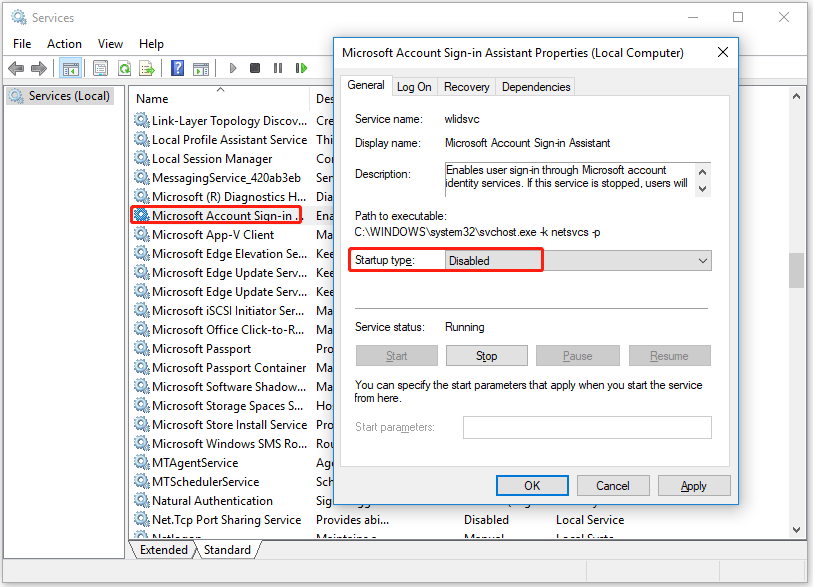
Microsoft Account Sign-in Assistant Service: This service is believed to be directly related to Autopilot.dll WIL errors, disabling it should resolve the issue.
Overclocking: In some cases, overclocking system memory can also cause crashes caused by said files.
Now that we know what might be causing the problem, let’s take a look at the troubleshooting methods that can help you solve the problem completely.
Method 1: Check for Windows Updates
Outdated operating systems can cause various errors, including Autopilot.dll WIL errors. Well, installing the latest Windows updates may solve this problem.
Step 1: Press Win + I to open Windows Settings.
Step 2: Click the Windows Update tab.
Step 3: Click the Check for Updates button and wait for the system to scan for pending updates.
If there are any pending Windows updates, they will show up here, after which you can install them and double-check that the “Autopilot.dll WIL error was reported” problem is resolved.
Method 2: Disable Microsoft Account Sign-In Assistant Service
According to some user reports, disabling the Microsoft account sign-in assistant service can prevent annoying bugs. Keep in mind that disabling this service will prevent you from using Outlook Calendar widgets, Phone Link apps, and similar services to disable the Microsoft Account Sign-In Assistant Service.
Step 1: Press the Win + R keys and type services.msc to open Windows Service Manager.
Step 2: Scroll down and find the Microsoft Account Sign-In Assistant Service. Right-click it and select Properties from the context menu.
Step 3: Under the General tab, click the Startup drop-down menu and select Disabled.

Step 4: Click Apply > OK to save the changes.
Method 3: Disable Overclocking (XMP)
XMP is a form of system memory overclocking and can be the cause of the crash. If you are using a machine with this feature enabled, we recommend disabling it. But not all computers have it.
Restart your PC and start pressing F2, F8, F10, Del, Esc, or other buttons repeatedly. Then check the overclocking, advanced or similar section for XMP capabilities. Finally, disable XMP and restart the system in normal mode.
Method 4: Repair Windows System Image
Running DISM can repair Windows system image and fix problems. The detailed steps are as follows.
Step 1: Press Win + R to open the Run dialog box. Then type cmd in the box and press Ctrl + Shift + Enter to open Command Prompt. When prompted by the UAC (User Account Control), click Yes to grant administrator privileges.
Step 2: In the elevated Command Prompt window, run the following commands one by one. Enter a command and press Enter. Once done, type the next command to run it.
DISM /Online /Cleanup-Image /CheckHealth
DISM /Online /Cleanup-Image /ScanHealth
DISM /Online /Cleanup-Image /RestoreHealth
Windows scans the entire system and repairs any bad sectors. This process may take a while. After the scanning process is complete, restart your computer to check if the “Autopilot.dll WIL error was reported” problem has been solved.

![[Solved] Set Time Zone Automatically Greyed Out in Windows 11](https://images.minitool.com/partitionwizard.com/images/uploads/2022/10/set-time-zone-automatically-greyed-out-in-win-11-thumbnail.png)
User Comments :