Due to the different time zones around the world, Windows has included the function of setting the time zone in its operating system. Having issues such as setting the time zone automatically grayed out has become a common problem with the new Windows 11 operating system. This prevents users from accessing certain websites and applications.
Well, how to fix “Set time zone automatically greyed out in Windows 11”? The detailed steps are shown below.
Fix 1: Enable Location Services
In order for Windows to automatically set the time zone, you should make sure that location services are not disabled on your computer. If the service itself is disabled and cannot get your location, Windows may not allow you to enable the automatic time zone settings. So, follow the steps below to enable location services in Windows 11.
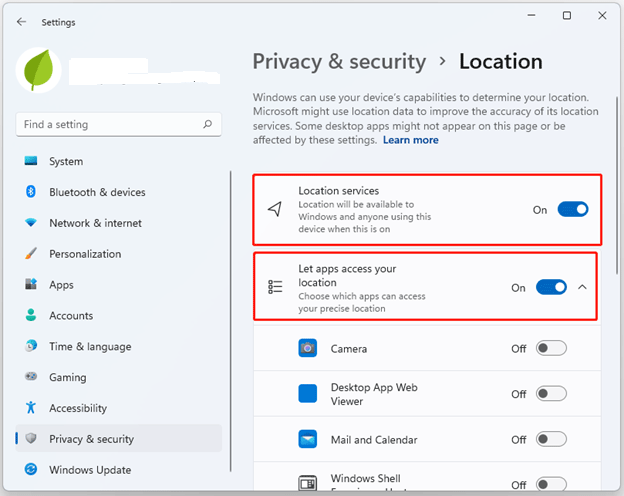
Step 1: Press the Win + I keys to open the Settings interface.
Step 2: Click the Privacy & Security tab on the left-side side.
Step 3: Scroll down to App permissions and click Location to explore it.
Step 4: On the right-hand pane, set Location services to On. Set Let apps access your location to On.
Then restart your PC and check if the “Set time zone automatically greyed out in Windows 11” problem is resolved. If not, try the next method.
Fix 2: Troubleshooting with a Clean Boot
One possible reason is that third-party software on your computer may have disabled the feature. Then performing a clean boot might be one of the ways.
To perform a clean boot, follow these steps:
Step 1: Type MSConfig in the search bar and press Enter.
Step 2: Go to the Services tab.
Step 3: Tick the boxes related to Hide all Microsoft services and click the Disable all button.
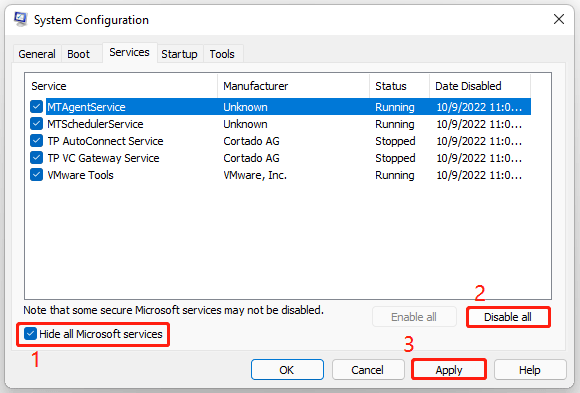
Step 4: Click Apply > OK to save the changes.
Now restart your computer to start the system in a clean boot state. Then check if the automatic time zone setting is still greyed out.
Fix 3: Using Registry Editor
If you can’t turn on the automatic time zone feature from Windows Settings, you can use the Registry Editor to enable the automatic time zone feature.
Before doing this, we recommend that you back up the registry on your computer.
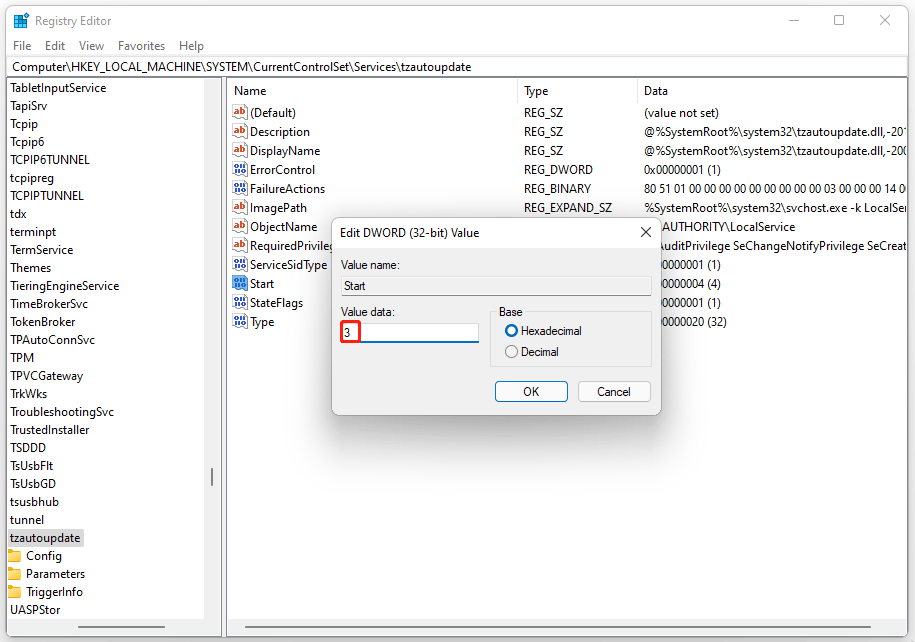
Step 1: Press the Win + R keys and type regedit to launch Registry Editor. Then Click Yes at the UAC prompt.
Step 2: In the window, follow the path below and press Enter:
Computer\HKEY_LOCAL_MACHINE\SYSTEM\CurrentControlSet\Services\tzautoupdate
Step 3: In the list, double-click a value called Start and set the Value data to 3 to automatically enable Set time zone.
Step 4: If the location feature is off, it is recommended to enable it. To do so, follow the path below in Registry Editor.
Computer\HKEY_LOCAL_MACHINE\SOFTWARE\Microsoft\Windows\CurrentVersion\CapabilityAccessManager\ConsentStore\location
Step 5: Find Value in the list and double-click it, then enter Allow in the Value data box.
Step 6: After that, click OK to save the value.
Fix 4: Use Local Group Policy
Administrators can set a group policy that prevents any user from interfering with time one settings.
Group Policy settings are only available for Windows 11 Pro or Enterprise users.
Step 1: Press the Win + R keys and type gpedit.msc to launch Local Group Policy.
Step 2: Navigate to the following settings:
Computer Configuration > Administrative Templates > Windows Components > Location and Sensors > Windows Location Provider > Turn off Windows Location Provider
Step 3: Double-click it and set the value of the Turn off Windows Location Provider setting to Not Configured.

Step 4: Click Apply and Exit.
Fix 5: Repair System Files
The SFC and DISM scan can repair damaged system files and fix problems.
Step 1: Press Win + R to open the Run dialog box. Then type cmd in the box and press Ctrl + Shift + Enter to open Command Prompt. When prompted by the UAC (User Account Control), click Yes to grant administrator privileges.
Step 2: In the elevated Command Prompt window, run the following commands one by one. Enter a command and press Enter. Once done, type the next command to run it.
SFC/scannow
DISM /Online /Cleanup-Image /CheckHealth
DISM /Online /Cleanup-Image /ScanHealth
DISM /Online /Cleanup-Image /RestoreHealth
Windows scans the entire system and repairs any bad sectors. This process may take a while. After the scanning process is complete, restart your computer to check if the “Set time zone automatically greyed out in Windows 11” problem has been solved.

About The Author

Position: Columnist
Vega enjoys helping people with computer problems, including disk management, data recovery, data backup, and more. She is constantly expanding her knowledge in related fields. And she will continue to bring more easy-to-understand professional articles to help people solve various problems on the PC.
User Comments :