Chromebook Storage Space
As easy as Chrome OS is to use, there’s one area where many Chromebooks fall short: storage space. Most cheap Chromebooks have no more than 64GB of storage, although there are some high-end Chromebooks with disk spaces between 128GB and 256GB. Once you hit your Chromebook’s storage limit, you’ll start getting errors downloading and creating files.
When your Chromebook is running low on disk space, Chrome OS will continually display an alert or notification that says “Device is low on space: Free up space or select data may be automatically deleted.”
You may also encounter the following issues:
- Download file
- Load web page
- Change or save settings, such as passwords
- Add a new user account to your Chromebook
- Use Android apps
When your Chromebook runs low on storage, it may automatically start deleting downloaded files, unused accounts, browsing data, and more.
This highlights the importance of monitoring your Chromebook before it runs out of storage. Free up storage yourself, or your Chromebook may delete important files in the process. So, you don’t have to wait until you get this error message to free up space on your Chromebook.
Check the Storage Used
Before freeing up space on your Chromebook, you should first check how much storage you have left and what needs to be trimmed. Luckily, there’s a storage management tool embedded in the Chrome OS Settings app.
This tool monitors your Chromebook’s storage and it will tell you how much storage is being used and how much is available. You can also use storage management tools to perform device cleanup.
1. In the lower right corner, select Time > Settings.
2. In the Devices section, choose Storage Management.
3. Here you’ll see how much storage space is left on your device, and how much space is being used by:
- My files: This includes the total storage space used by multimedia (audio, video, images, recordings, screenshots, etc.) and downloaded files on your Chromebook.
- Browsing data: Information such as your browsing history or saved form entries.
- Apps & extensions: This category includes storage used by apps installed on your Chromebook, including their data and cache files.
- Linux storage: This is the disk space allocated for installing and running Linux applications. If at any point you’ve set up a Linux development environment on your Chromebook, you’ll find this option in the storage management menu.
- System: This is the storage used by Chrome OS and other built-in apps. You cannot delete system files or applications.
Alternatively, you can check available storage using Chrome. Type or paste chrome://quota-internals in the address bar and press Enter. On the Summary tab, Free disk space for the profile directory is the Chromebook’s available storage space.
How to Free Up Space on Chromebook
You now understand how Chrome OS groups and manages disk storage. Next, we’ll show you several ways to free up space on your Chromebook.
Way 1: Delete Redundant Files or Move Files to Google Drive
Open the Files app and browse each folder. View images, screenshots, screen recordings, videos, application settings files, and other documents that you no longer use or need.
Click on the AZ icon and select the Size option. The largest files appear at the top. This command allows you to easily identify large files that are taking up storage space on your Chromebook and delete the ones you don’t need.
Alternatively, you can back up your files in the cloud instead of deleting them. Move the file to a Google Drive folder. This way, you can free up storage space on your Chromebook without losing any files.
Way 2: Uninstall Unused Apps
Apps create user data, cached data, and other junk files that take up storage space. Keeping multiple apps around that you don’t use can cause your Chromebook to quickly run out of disk space. Uninstall unnecessary apps to free up storage space. Go to the Chrome OS storage management menu and select Apps and extensions.
Go through the list and note down apps or extensions that you barely use. Select the app you want to remove from your Chromebook and click the Uninstall button.
You cannot uninstall core system apps like Chrome, Files app, Play Store, Web Store, etc.
Way 3: Clear Chrome Browsing Data
Not only is Chrome a big memory hog, but the browser also creates and stores all kinds of data on your device. Clear some unwanted browsing data to free up space on your Chromebook.
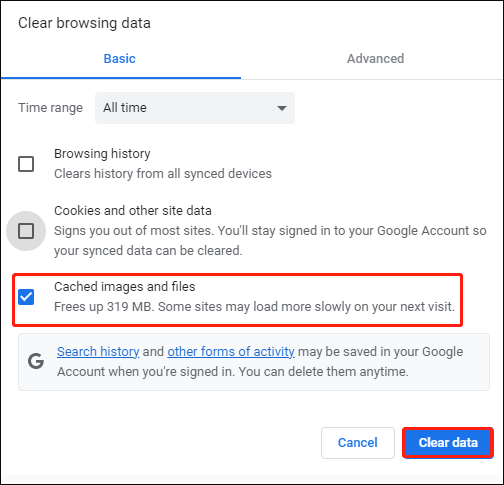
Step 1: Go to Settings > Device > Storage Management, and select Browse Data. This will open a new tab where you can clear your browsing data.
Step 2: In the Basic section, check Cached images and files, set the Time range to All time, and click the Clear data button. You should then see how much space you can free up on your Chromebook.
Way 4: Delete Offline Files
When you enable offline availability for a Google Drive file or folder, Chrome OS downloads the file and saves it as a cache file on your device. You can then access files on your Chromebook without an internet connection. This feature allows you to access your files offline, but it consumes your local storage.
If you have large files or folders enabled for offline access, delete them from your Chromebook and access them from your Google Drive folder instead. This can help you free up a lot of space on your Chromebook.
Open the Files app, expand the Google Drive category, and select Offline Folders. Then, select a folder or file and turn off the Available offline switch available on the menu bar.
Way 5: Reduce or Remove Linux Disk Size
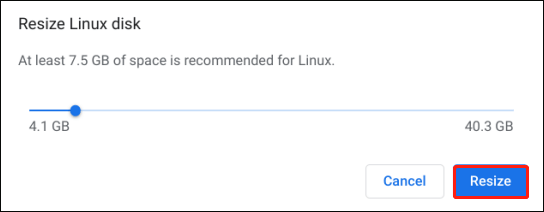
Google recommends allocating at least 7.5GB for Linux development areas. However, if you rarely install or use Linux applications, you can free up space on your Chromebook by reducing the Linux storage. The steps are as follows:
Step 1: Select Linux Storage on the Storage Management page and click the Change button next to Disk size.
Step 2: Move the slider to the left to reduce the Linux disk size according to your preference (cannot go below 4.1GB) and click Resize.
If you don’t want to install or use any Linux applications on your Chromebook, click the Remove button next to Remove the Linux development environment.
Way 6: Use SD Card to Expand Chromebook’s Storage
If none of the above work for you, and you’re still struggling to find space on your Chromebook, external storage expansion is your last resort. Most Chromebooks have a microSD card slot, which you can use to instantly add extra storage.
To expand your Chromebook’s limited internal storage, you can add an external storage device like an SD card. Before using it, you need to format it.
How to format SD card for Chromebook? There are two options for you.
Formatting the SD card will cause data loss. So, make sure there is no important file on the SD card. Otherwise, please back up important data in advance.
Option 1: Format SD Card via Chromebook
Chromebooks offer a very easy option to format SD cards as it is available in the Chrome OS file manager. You just need to perform simple operations.
Step 1: Insert the SD card into a port on the Chromebook.
Step 2: Find the Apps icon and click it.
Step 3: Go to Settings and choose Files.
Step 4: In the side menu bar, find your SD card and right-click it.
Step 5: Then select Format device. It will give you a disclaimer confirming that you wish to delete all data. Click OK to continue.
Option 2: Format SD Card via MiniTool Partition Wizard
If you have some problems with formatting the SD card with the Chromebook itself, you can use the best SD card formatter — MiniTool Partition Wizard, not only because it is easy to use, but also because it provides multiple file systems. Most importantly, SD cards between 32GB and 2TB can be successfully formatted as a FAT32 file system, breaking the limitation of Windows.
MiniTool Partition Wizard FreeClick to Download100%Clean & Safe
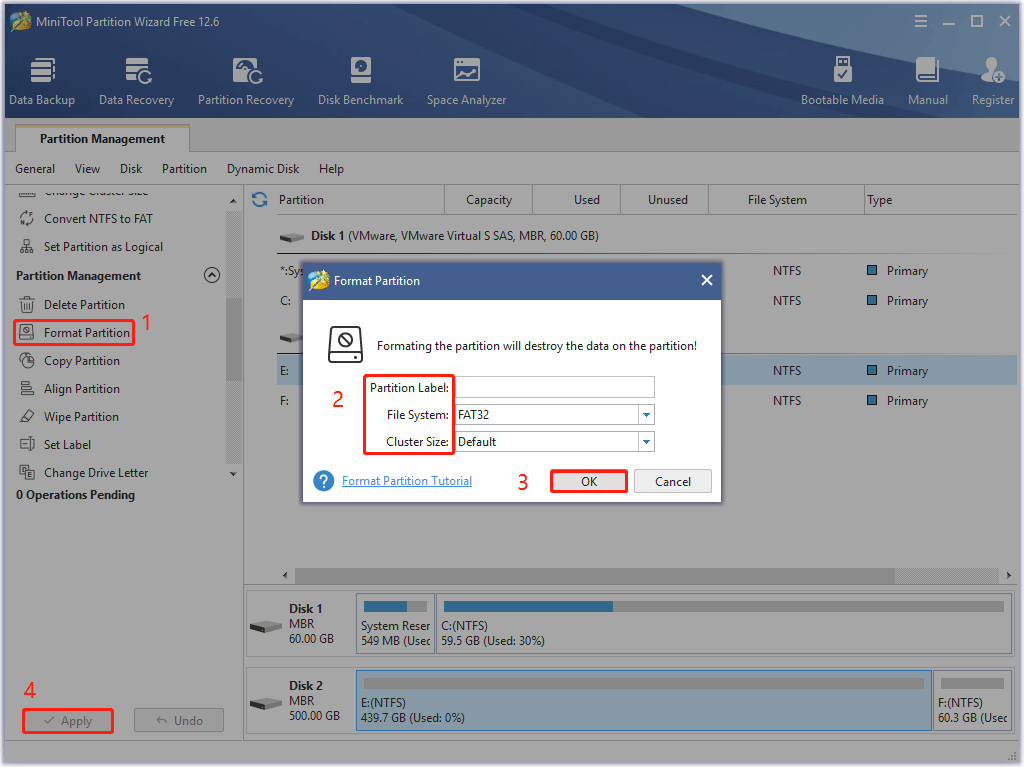
Step 1: Connect the SD card to your Windows PC via a card reader, then launch the MiniTool Partition Wizard.
Step 2: Select the partition on the SD card, then select Format Partition from the left operation panel.
Step 3: Set the Partition Label, File System, and Cluster Size in the prompt window. Then click OK and Apply to execute the action.
After formatting the SD card, you can use it to expand Chromebook’s storage.
Bottom Line
This post mainly focuses on how to free up space on Chromebook. In addition, we also introduce how to get more storage on Chromebook. If you have any ideas about this topic, you can leave them in the following comment zone.
If you have any suggestions or need any help when you use MiniTool Wizard Partition, you can send us an email at [email protected] or leave a comment below. Thank you in advance.
About The Author

Position: Columnist
Vega enjoys helping people with computer problems, including disk management, data recovery, data backup, and more. She is constantly expanding her knowledge in related fields. And she will continue to bring more easy-to-understand professional articles to help people solve various problems on the PC.
User Comments :