
Windows Has Detected a Hard Disk Problem
“Windows detected a hard disk problem” is a warning that Windows shows when it finds signs that your hard drive is failing. It can appear in Windows 11, 10, 8, and 7. The message usually says:
“Back up your files immediately to prevent information loss, and then contact the computer manufacturer to determine if you need to repair or replace the disk.”
Generally speaking, this error shows you a serious warning.
- The hard drive is failing and it may die sooner or later.
- All data on the hard drive, including programs, applications, documents, excels, files, photos, videos, may be lost once the disk died.
- The system file in Windows may get corrupted and the operating system may be unbootable.
- The computer may freeze, namely, it will load for a long time and finally stop responding.
Common causes include bad sectors, file system errors, corrupted system files, virus infection and improper operations such as forced shutdowns.
Save Your Data First When Windows Has Detected a Hard Disk Problem
Once Windows detects a hard disk problem, save your important data first, as Microsoft suggests. You have two options:
- Copy your important files to an external drive or cloud storage. This is the quickest way if only some files matter. If the drive is failing, copy the most important files first.
- Clone the whole disk to another drive. A clone is an exact copy of the entire disk, including the system and programs. It is not a backup with versions or schedules, but it keeps everything you have.
For cloning, MiniTool Partition Wizard Free Edition can copy a whole disk or a single partition to another drive. It is a free partition and disk management tool that is compatible with Windows 11/10/8/7.
So, download and install it on your computer, and copy the disk as soon as Windows 11/10/8/7 detects a hard disk problem.
MiniTool Partition Wizard FreeClick to Download100%Clean & Safe
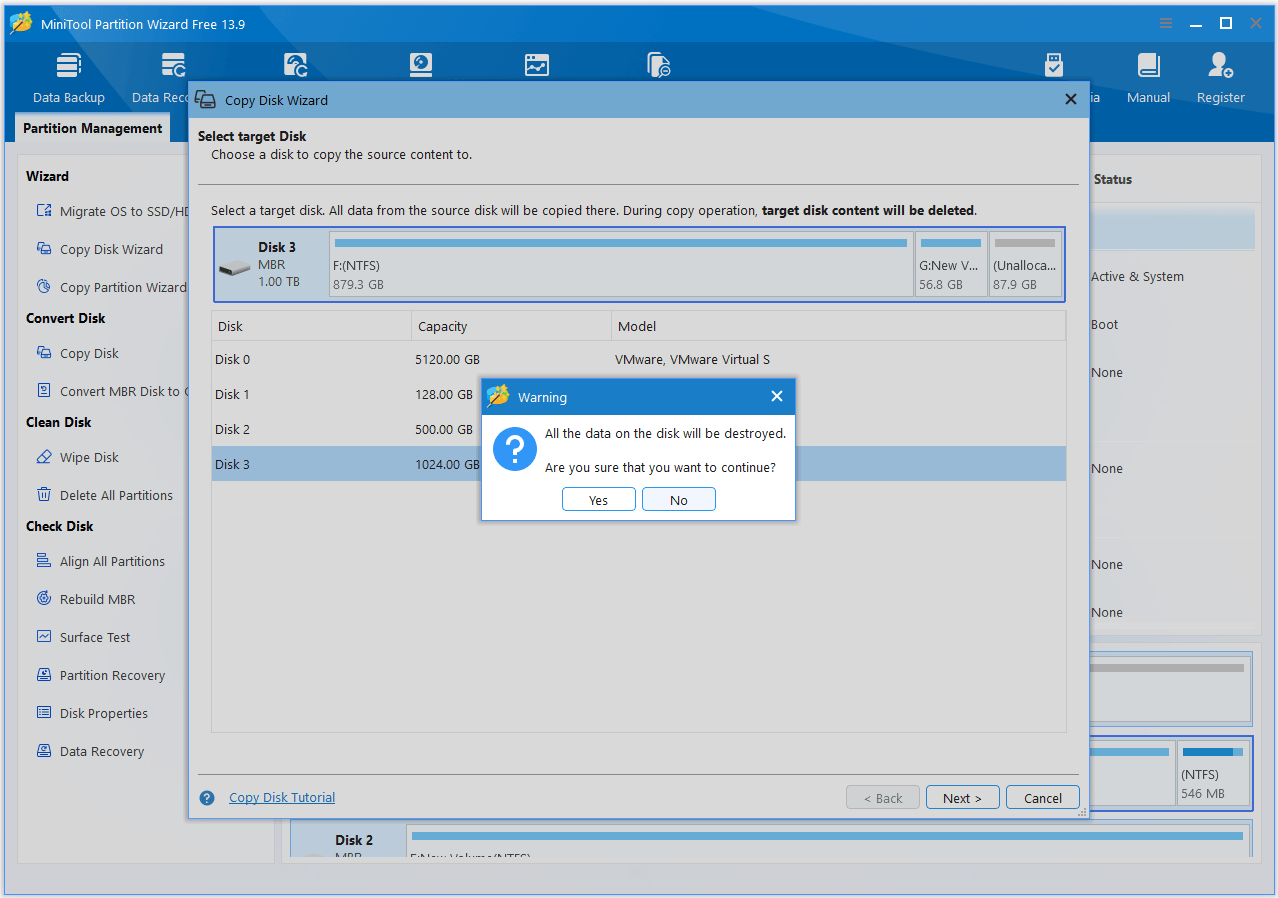
2. During the process, all data from the source disk will be copied to the destination disk, that is to say, the target disk content will be deleted, so ensure the important data on the target disk is backed up.
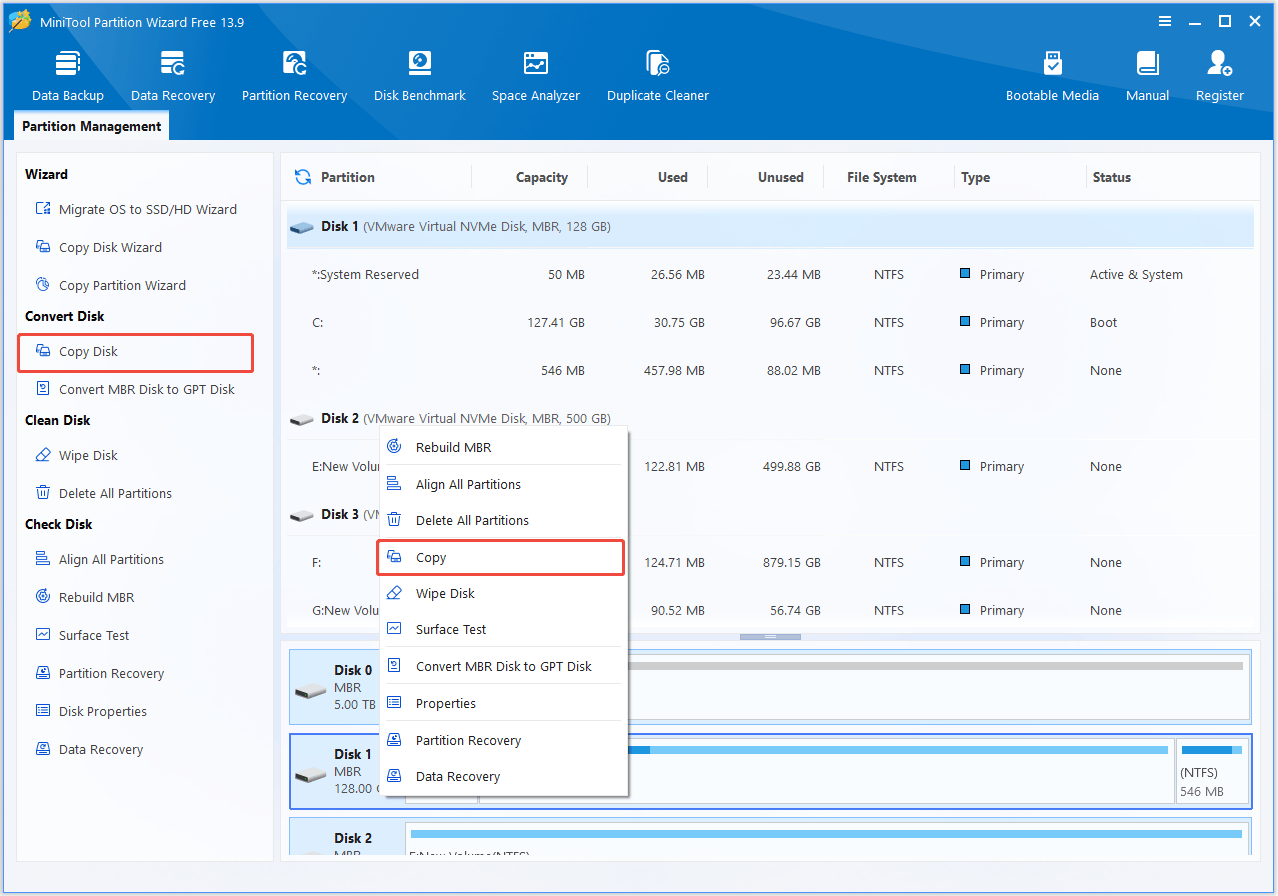
Step 1: Launch this free application. Then right-click the source hard drive and select Copy feature or click Copy Disk in the left pane.
Step 2: Then select a target hard drive to copy the source content to. Click Next to continue.
Step 3: Next you can preview the changes you have made. The following picture shows you two copy options, you can choose to fit partitions to the entire disk, or copy partitions without resizing during disk clone.
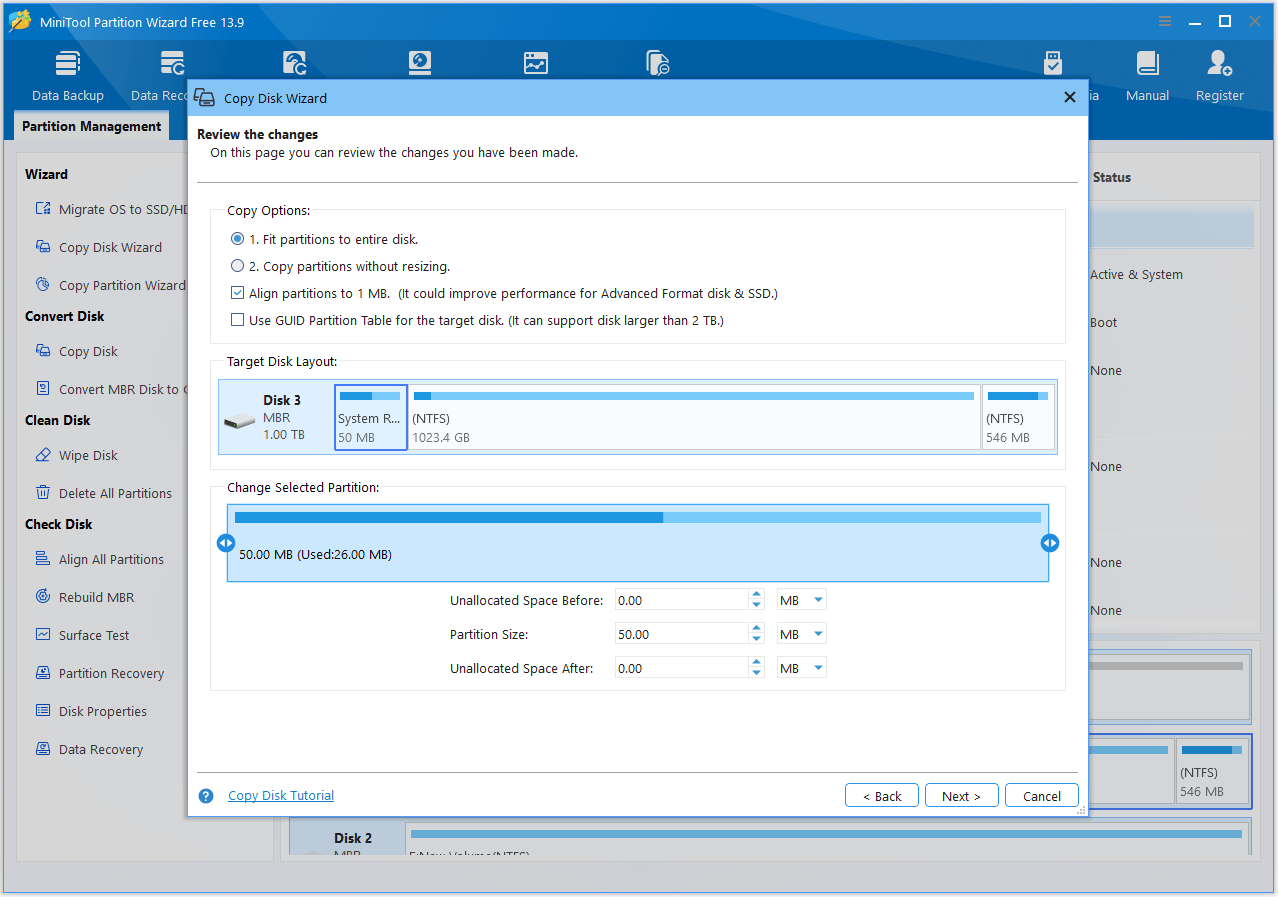
Here it is suggested to choose to align partitions to 1MB and this option can improve performance for advanced format hard drive or SSD. Moreover, Use GUID Partition Table for the target disk can make your target disk become GPT disk but this feature is a paid one, and you need to get Pro Edition or advanced one to achieve your aim.
Related article: The Best Way to Clone MBR to GPT without Boot Issue
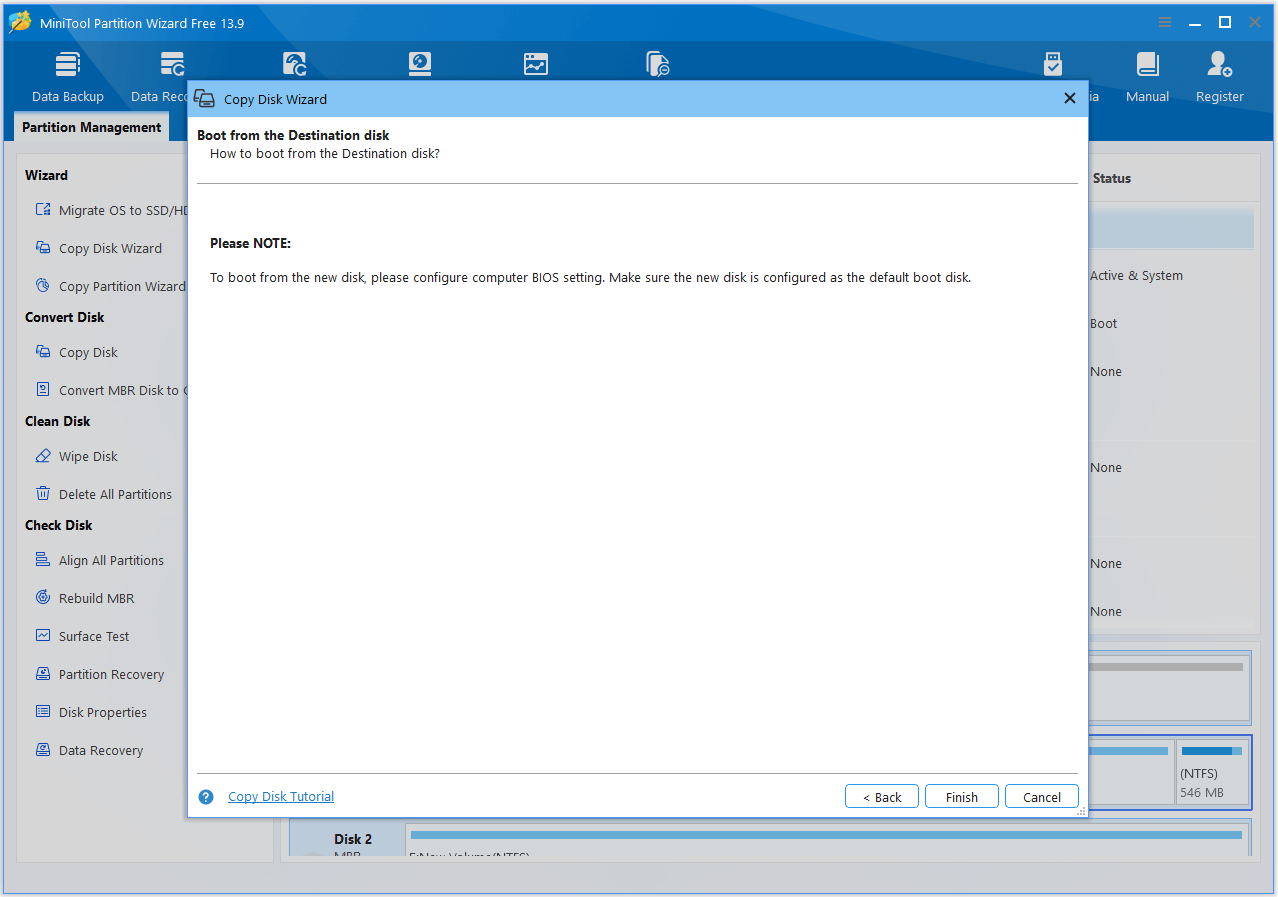
Step 4: If you want to boot from the target disk, please configure BIOS setting and make sure the new disk is configured as the default boot disk.
Step 5: At last, click Apply to execute all changes.
In addition to making a backup for the entire disk, you can also copy partitions where you have saved important data. Just choose a mode according to your needs. Besides, it is recommended to migrate the system to SSD/HD in Windows 10 which can help you make a backup for the operating system and do a recovery from a disaster.
How to Fix Windows Detected a Hard Disk Problem
After protecting your important data, try the following methods to determine and fix the cause of the “Windows detected a hard disk problem” error.
Fix 1. Scan for Malware and Viruses
Malware or viruses can sometimes cause system instability and disk-related problems. If you suspect malware, run a full scan with Windows Security or another trusted antivirus program.
To run a scan with Windows Security:
- Press Win + I to open Settings.
- Go to Privacy & security (Windows 10: Update & Security) > Windows Security.
- Select Virus & threat protection.
- Choose Scan options.
- Select Full scan and click Scan now.
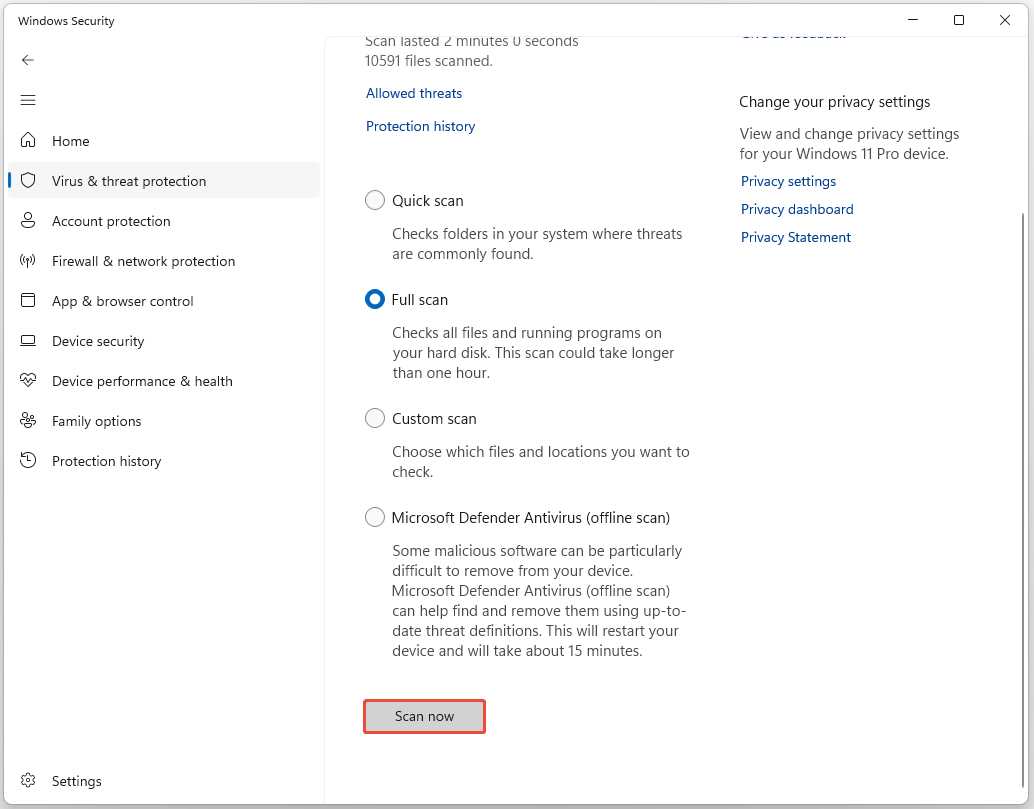
Wait for the scan to finish and follow Windows Security’s recommendations if threats are detected.
If no malware is found, continue with the next method.
Fix 2. Run SFC to Repair Corrupted System Files
In Windows 10/8/7, there is a basic tool to help you to fix many errors. When there is a disk problem, you don’t know whether the system file is damaged or not. So you can use System File Checker which is also called SFC to check system file error and deal with the integrity issue. This tool is helpful to repair many problems and it is easy-to-use.
Step 1: Input cmd in the search box and right-click the tool from the search result to choose Run as administrator.
Step 2: Type sfc /scannow prompt. Then please wait for a while until verification completes. Don’t close the window before verification is 100% complete.

This command can help to quickly scan all protected system files and then replaces those corrupted or damaged files with a backup copy in Windows when there is a system file error. If this command doesn’t work for you to fix “Windows detected a hard disk problem” error, please try way 3.
Fix 3. Run CHKDSK to Check the Disk
Windows includes the CHKDSK utility for checking a volume for file system errors and certain disk-related problems.
Step 1. Open Command Prompt as administrator.
Step 2. Enter the following command and press Enter:
chkdsk C: /f
Replace C: with the drive letter of the affected volume if necessary.

If Windows reports that the volume is in use, you may be asked whether you want to schedule the check for the next restart. Type Y and press Enter, then restart the computer.
If you suspect bad sectors, you can use:
chkdsk C: /r
The /r parameter tells CHKDSK to locate bad sectors and attempt to recover readable information from them.
Important: CHKDSK can repair certain file system errors, but it cannot repair a physically failing hard drive. If the disk is showing signs of physical failure, back up your data and consider replacing the drive.
In addition to using the command line, you can try another way to run a disk check. Take Windows 10 as an example.
Step 1: Please open Windows Explorer, and right click the system partition, then select Properties.
Step 2: Then under the Tools tab, click the Check button.

Step 3: Click Scan drive to start scanning your drive.

If the message “Windows detected a hard disk problem” is caused by system file error, after you perform a disk check, the issue will be fixed. If this way still can’t fix the hard disk problem detected issue in Windows 10/8/7, just try the next way.
Fix 4. Perform a Surface Test for Bad Sectors
Bad sectors are another possible reason for the “Windows detected a hard disk problem” warning. A surface test can help determine whether the drive contains unreadable areas.
MiniTool Partition Wizard provides a Surface Test feature that can scan the disk for bad sectors.
Step 1: Launch this free partition manager and then enter into the clear and simple main interface. You need to select a target hard drive and then click Surface Test in the Check Disk menu or choose the feature from the context menu.
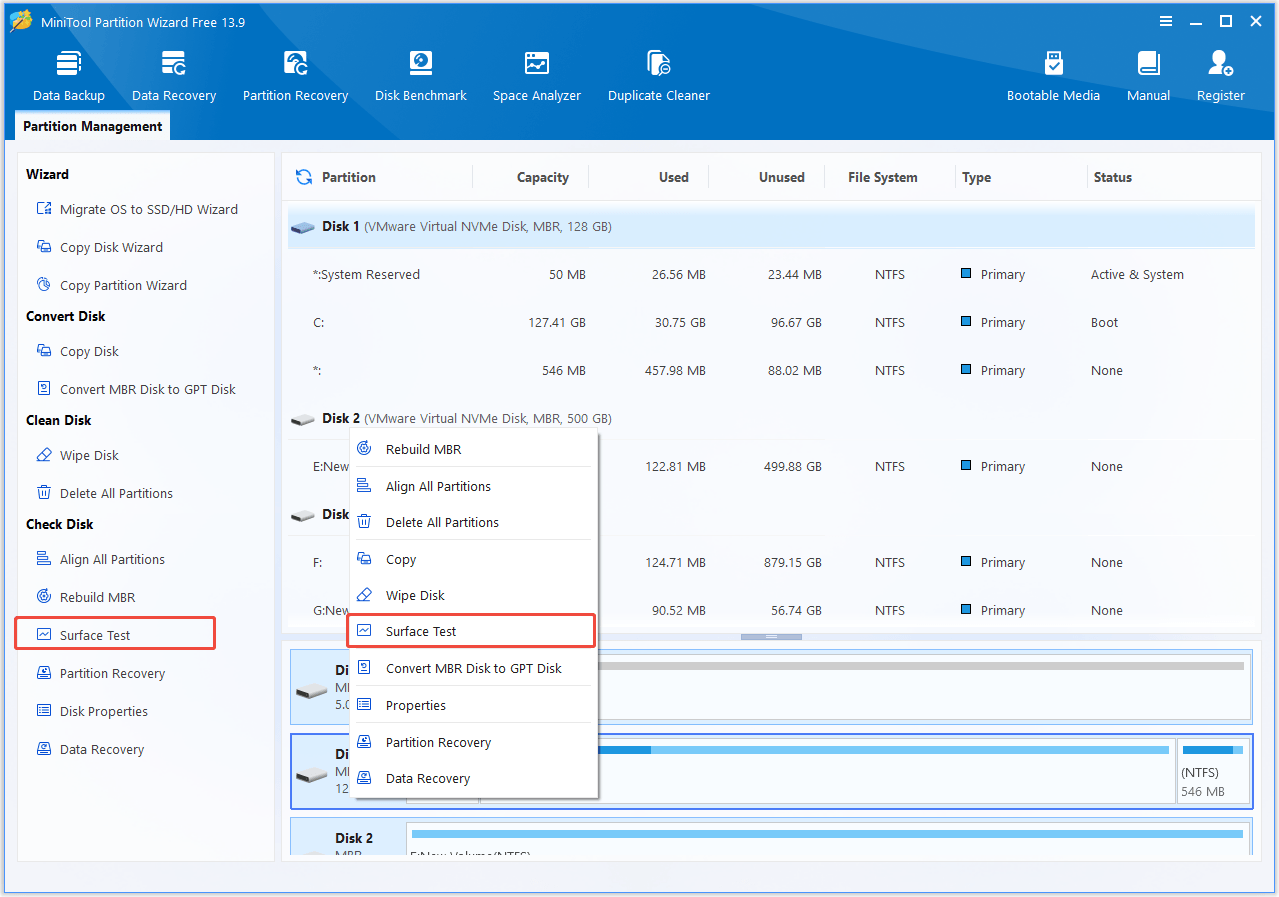
Step 2: Click Start Now to perform a disk test operation. This process will take a few minutes, so please wait patiently. From the picture below, you can clearly find MiniTool Partition Wizard can help to mark disk block without read error green. If there are some errors, this software marks them red.
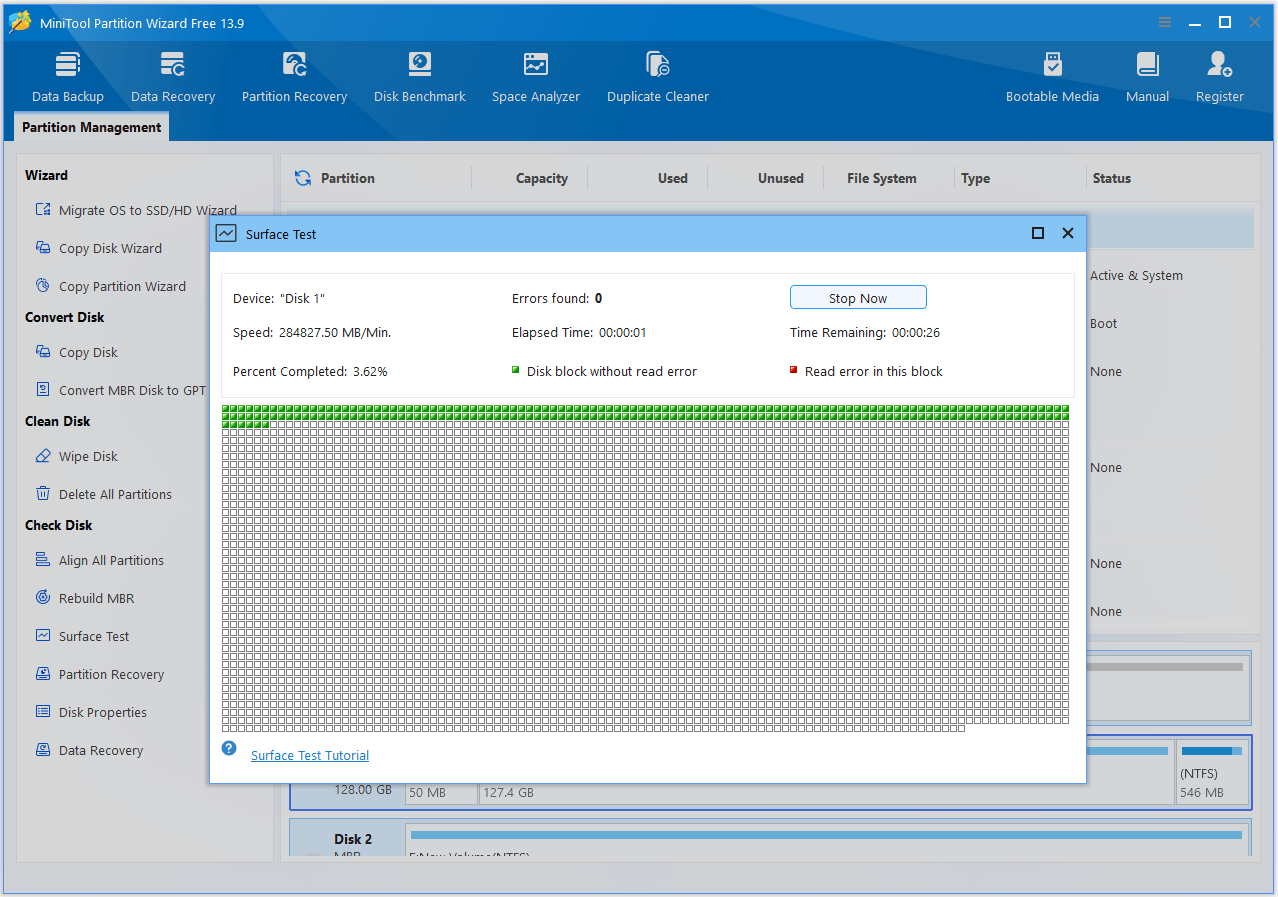
If you have finished doing the disk surface test and find there are some errors in the hard drive, you need to repair hard drive to solve the issue. Unfortunately, MiniTool Partition Wizard only can check disk but it is unable to fix the bad errors and you can look for third-party software to help solve the problem. Or you can use chkdsk (drive letter:) /r command prompt to shield the bad sectors.
Still Not Fixed? Replace the Hard Drive
If you have tried all the ways above but the problem remains, you need to replace the hard drive. Before replacing the disk, copy your important files to another drive, or clone the disk with MiniTool Partition Wizard.
How to Avoid Windows Hard Disk Problem Warning
Probably Windows will reports you such a message when there is no system file error, no virus attack or disk error in Windows 10/8/7, therefore, after trying all methods, in order to not receive this warning again, it is suggested to disable the setting about this topic.
Here is the guide on Windows detected a hard disk problem disable:
Step 1: Press Win + R and then input gpedit.msc to open Local Group Policy Editor.
Step 2: Please go Administrative Templates > System > Troubleshooting and Diagnostics > Disk Diagnostics.

Step 3: And then double click Disk Diagnostic: Configure execution level and set it to Disabled. At last, click Apply and OK.

Summary
The “Windows detected a hard disk problem” warning may be caused by file system errors, corrupted system files, bad sectors, malware, or a failing drive.
Before troubleshooting, protect your important data by backing it up or cloning the disk if necessary.
Then, scan for malware, run SFC and CHKDSK, and perform a surface test to identify issues. If the drive shows physical failure or continues to have errors, replacing it is the best option.
For questions about MiniTool software, feel free to leave a message or email us at [email protected].
Windows Detected a Hard Disk Problem FAQ
About The Author

Position: Columnist
Charlotte is a technology columnist with a strong focus on the Windows operating system, specializing in disk management, backup, and data recovery. She is passionate about analyzing computer errors, identifying root causes, and delivering practical solutions. In her free time, she stays updated on the latest developments in computer systems and hardware while continuously learning new technologies to broaden her expertise. Her writing style is clear and easy to understand, making complex technical topics accessible even to users with limited computer knowledge.
User Comments :