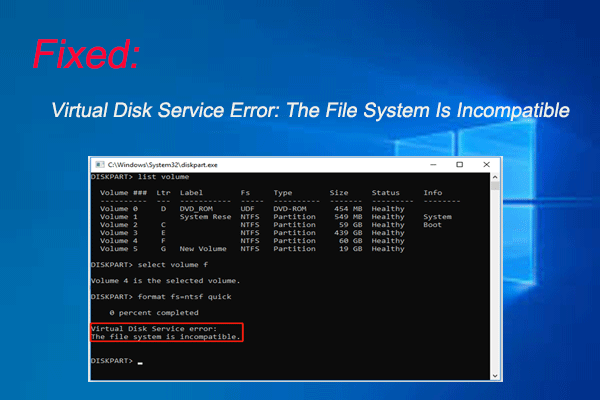
Are you encounter the “Windows 10 won’t boot after partition resize” issue? How to fix it? What causes the issue? This post of MiniTool Partition Wizard will show you the reasons and provide several effective ways for the boot failure after partition resize Windows 10 error.
Windows 10 Won’t Boot after Partition Resize
Resizing partitions is normal partition management work. Users may need to create, delete and resize partitions to customize their disks during daily use. Especially the C drive, if the C drive is full or damaged, the computer will be greatly affected. Therefore, many users resize the C drive, which may cause some problems. And one of the symptoms is boot failure after partition resize.
Here is a true example from the Microsoft forum:
I bought a new laptop and using disk management, I partitioned my C drive from 930 GB TO 530 GB. Now unable to partition anymore, I decided to use 3rd party software to partition the C drive and cut down my C drive to 130 GB. After the laptop restarted, Windows is unable to boot. Please help me with how to BOOT the Windows.https://forums.tomshardware.com/threads/windows-10-not-booting-after-partitioning-c-drive.2787713/
Causes for Windows 10 Won’t Boot after Partition Resize
C drive is also called a system drive because it stores all OS files. When you resize the C drive incorrectly, it may trigger:
- The BOOTMGR files corrupted: BOOTMGR (Windows Boot Manager) is a small piece of software located on the boot partition that helps Windows 10 OS start. If it is corrupted, you might encounter the “Windows 10 won’t boot after resizing boot partition” issue.
- MBR part damaged: MBR (Master Boot Record) plays an important role in booting Windows. If the MBR is corrupted, you’ll not be able to boot Windows.
- OS file loss: OS file is a critical computer file without which a computer system may not open correctly.
- …
All of these above can be the reason why your Windows 10 won’t boot after partition resize. Well, how to fix this problem? Keep reading.

How to Fix Windows 10 Won’t Boot after Partition Resize
Here we summarize 4 feasible ways to help you fix the “Windows 10 won’t boot after resizing boot partition” error. You can try them in order until the error gets fixed.
Solution 1. Fast Recover the Lost Data from the System Partition
As mentioned above, the OS file may be lost when you incorrectly resize the C drive. So, it’s important to recover the lost data from the system partition. How to do it? Here we highly recommend you use MiniTool Partition Wizard.
MiniTool Partition Wizard Bootable Edition can help Windows users complete various partition operations when Windows fails to start, including recovering lost/deleted partitions, rebuilding MBR, adjusting system partition/boot partition, cloning disk/partition, etc.
MiniTool Partition Wizard DemoClick to Download100%Clean & Safe
For the problem that the system cannot boot, you should prepare a working computer and a USB or CD/DVD in advance, and then click the provided button to download MiniTool Partition Wizard.
The main steps to help you recover data if the system fails to boot are briefly described below. Follow them to recover your important data from the partition.
Step 1: Plug the prepared USB into the working computer or insert the prepared CD/DVD into its CD/DVD burner.
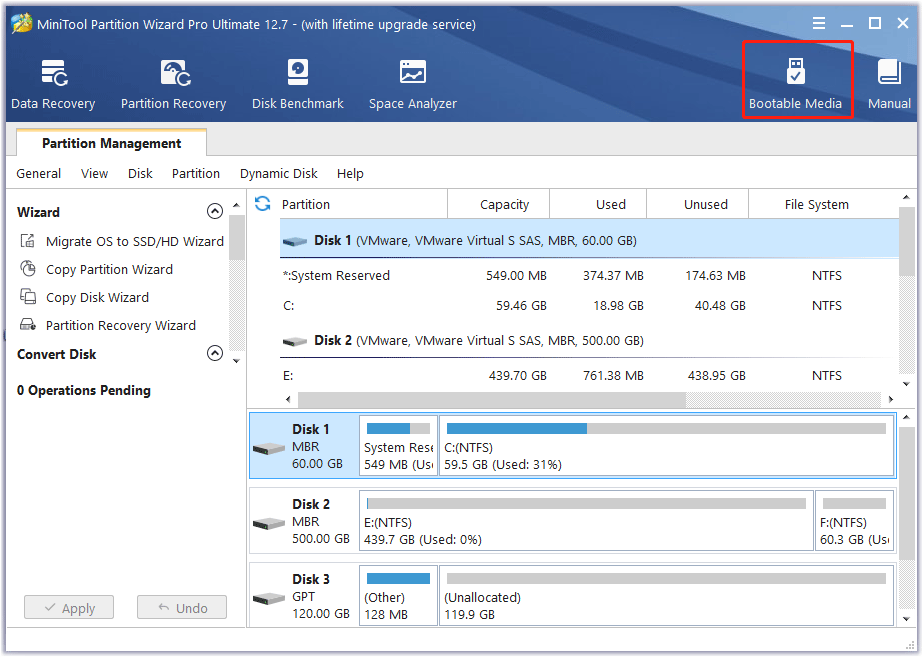
Step 2: Download the software and then launch it to access its main interface. Click Bootable Media in the upper right corner and follow the on-screen instructions to create a bootable USB, CD, or DVD.
Step 3: Plug the bootable USB into the original computer which the operating system cannot boot or put the bootable CD or DVD into it.
Step 4: Restart the computer and press F2 or another key to enter BIOS menu. Change boot settings to make your computer boot from the USB or CD/DVD flash drive.
Step 5: In the main interface of MiniTool Partition Wizard, click on the disk where the system partition was originally located and choose Partition Recovery from the left action panel.
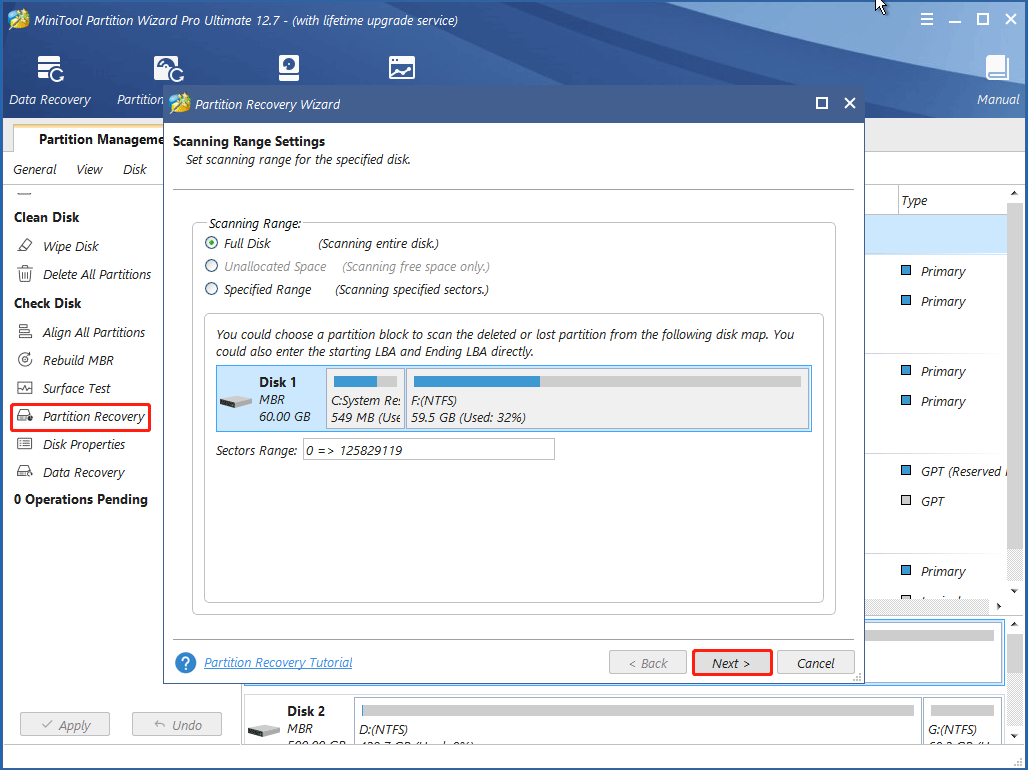
Step 6: Select the scan range from Full Disk, Unallocated Space, and Specified Range, and click the Next button.
- Full Disk: It is recommended when the user does not know where the lost partition is located.
- Unallocated Space: It is recommended to use if the user did not create any new partition after the partition was lost.
- Specified Range: It scans the specified sectors.
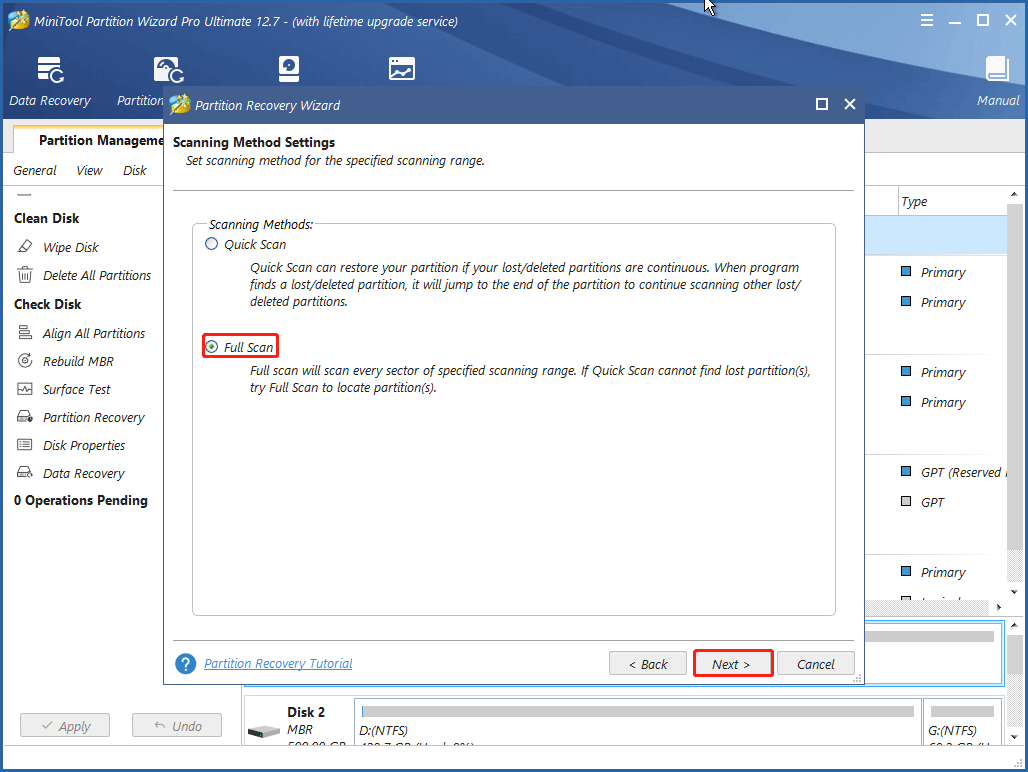
Step 7: Set the scanning method for the selected scanning range. Here we recommend you choose Full Scan to scan every sector for the selected scanning range. Then click on the Next button.
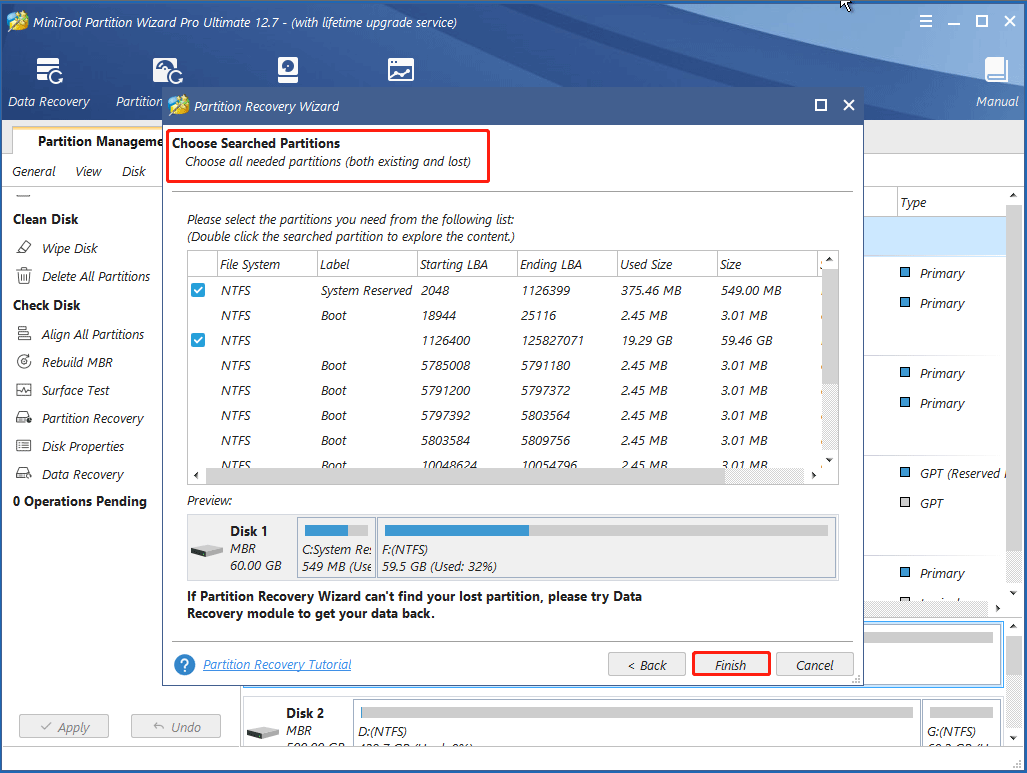
Step 8: Check all needed partitions, including lost/deleted partitions and existing partitions. Then click the Finish button to go back to the main interface. Finally, click on Apply to execute.
After finishing recovering the lost data from the system partition, you should change the boot order in BIOS to boot from your hard disk. Nevertheless, if this method fails to work, you may need to try the next method.
Solution 2. Run Windows Startup Repair
For this solution, there are two ways, namely using the Windows Installation Disc and using a bootable USB drive. You can follow the guide to fix the issue.
Way 1: Using Windows Installation Disc
If there is a Windows installation disc in hand, you can directly follow the steps below:
Step 1: Power off your computer.
Step 2: Insert the Windows installation disc into your computer. Then restart your computer and press any key during startup.
Step 3: Select language, time, and keyword settings, and then click on Next.
Step 4: Click on Repair your computer in the lower left corner of the Install now screen.
Step 5: Select the operating system you want to use.
Step 6: Click on the Troubleshoot button, Advanced options button and choose the Startup Repair button.
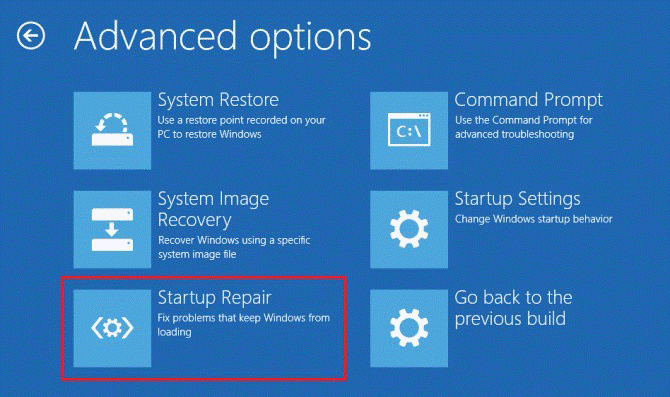
Step 7: Select your account, type your account passwords, and click on the Continue button. Please note that once you have completed the above steps, the Startup Repair will proceed to scan, detect, and fix any problems that may stop your PC from booting correctly.
Way 2: Using a Bootable USB Drive
If you want to fix the boot failure after partition resize without the Windows installation disc, you can try this way through which you can also access the Advanced settings environment.
If there is no bootable USB drive available, create one by referring to this post.
Step 1: Power off your computer.
Step 2: Insert the USB flash drive with the Windows Media Creation tool into the USB port.
Step 3: Power on your computer again. When your computer starts up, please boot your computer from USB.
If your computer isn’t starting from the USB drive, you need to change your system’s BIOS settings to make sure it can boot from USB.
Step 4: Repeat operating Step 3 to Step 8 in Way 1.
Once done, unplug the Windows install media and reboot your computer to check if the problem is solved. If not, you can go to the next solution.
Solution 3. Fix MBR via Command Prompt
As mentioned above, this “Window 10 won’t boot after partition resize” issue may be caused by the corrupt MBR. Then you can fix your MBR via Command Prompt. The steps are as follows:
Step 1: Shut down your computer.
Step 2: Insert the Windows installation tool and turn on your computer.
Step 3: Press any key at the “Press any key to boot” message.
Step 4: Click on Repair your computer.
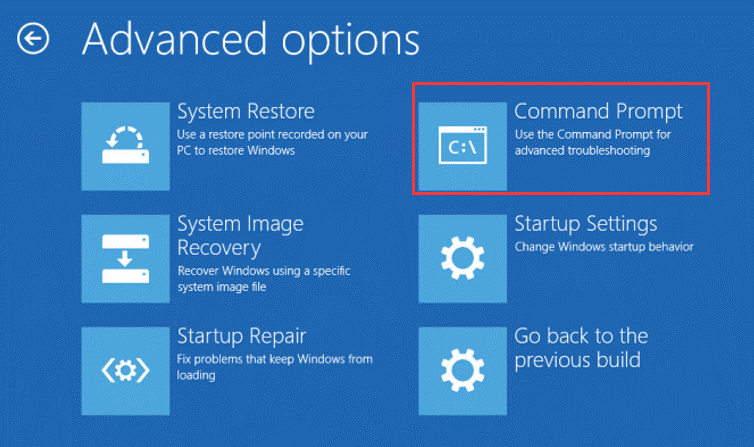
Step 5: Select Troubleshoot, Advanced options, and then click Command Prompt.
Step 6: In the Command Prompt window, type the following commands and press Enter after each:
- bootrec /fixmbr
- bootrec /fixboot
- bootrec /scanos
- bootrec /rebuildbcd
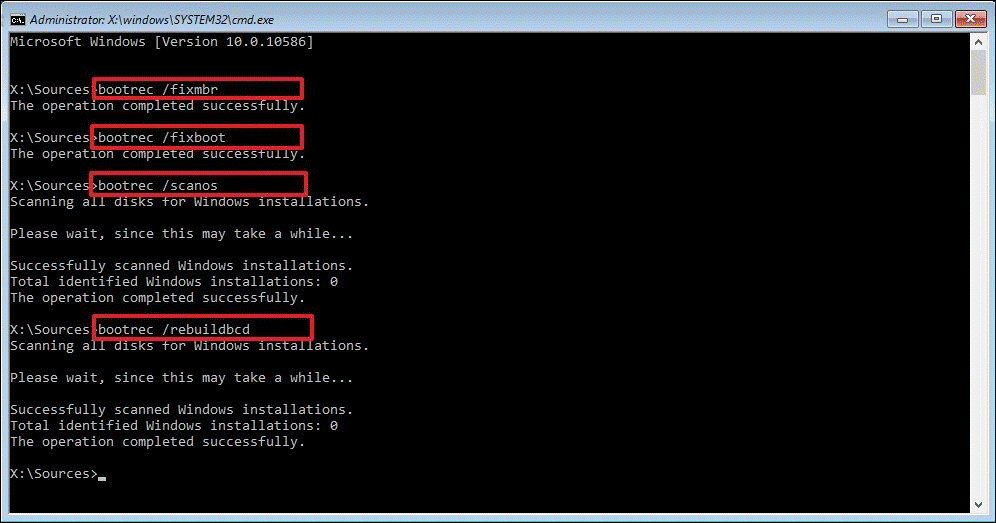
After finishing the commands above, you should be able to successfully boot into your computer.
Solution 4. Make a Windows 10 Recovery USB
There is a user from the Microsoft forum who reported that the “Windows 10 won’t boot after partition resize” error can be solved by making a Windows 10 recovery USB and doing a Startup Repair.
How to create a Windows 10 recovery USB from another computer to restore your PC when it is unbootable? You can refer to this guide to know more details. After that, you should do a Startup Repair just as we explained above.
![[Fixed] Garmin USB Device Not Recognized in Windows 10/11](https://images.minitool.com/partitionwizard.com/images/uploads/2023/04/garmin-usb-device-not-recognized-thumbnail.png)
Bonus: Resize Partition with MiniTool Partition Wizard
After you encounter the “Windows 10 won’t boot after partition resize” issue, you may want to look for a professional resizing partition tool to avoid this error. Here, we highly recommend MiniTool Partition Wizard. This resizing tool can resize Windows partition that has free space without data loss.
Plus, it can help you complete many complicated operations, such as extending partitions, converting MBR to GPT without data loss, migrating OS to HD/SSD, and so on.
Let’s see how to resize a partition using the resizing tool.
To resize a system partition, please use MiniTool Partition Wizard Bootable in case of boot issues. And it’s recommended to back up your data before it.
MiniTool Partition Wizard DemoClick to Download100%Clean & Safe
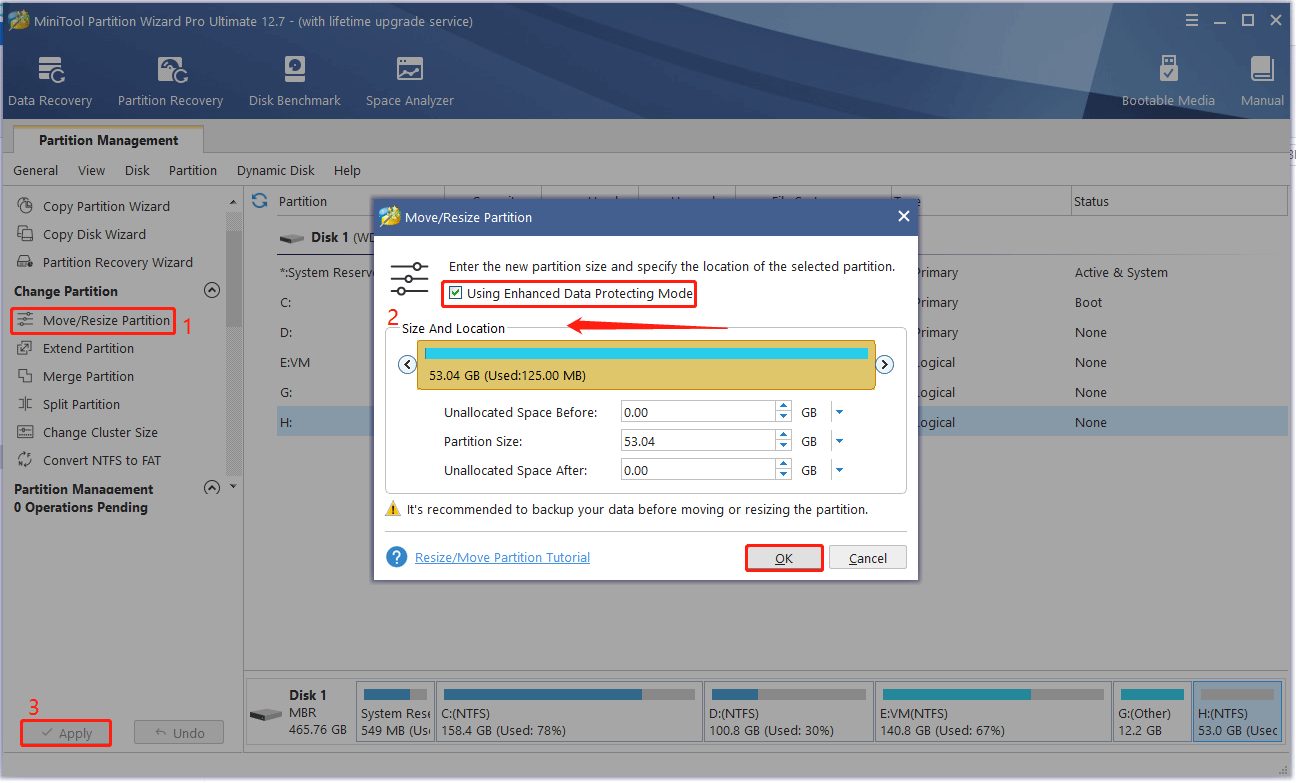
Step 1: Launch MiniTool Partition Wizard to access its main interface. Then select the partition that you want to resize and choose the Move/Resize Partition feature from the left action panel or choose Move/Resize from the right-click menu.
Step 2: On the Move/Resize Partition window, you should:
- Tick the Using Enhanced Data Protecting Mode
- Move the slide handle to the left or right and click the OK
In this step, you can adjust the location of the partition and the unallocated space on the hard disk by dragging the entire partition handle.
Step 3: The software returns to the main interface. On the interface, preview the reduced result. If you are satisfied with it, you can click the Apply button to apply the change.
Bottom Line
How to fix the “Windows 10 won’t boot after partition resize” issue? This post focuses on the causes of error and provides several feasible ways. If you are one of those who encounter this problem, you can pay attention to this post.
For any other opinions about this error, you can leave a message in our comment area below. If you meet certain issues while using MiniTool Partition Wizard, you can send us an email via [email protected] to get a quick reply.
About The Author

Position: Columnist
Vega enjoys helping people with computer problems, including disk management, data recovery, data backup, and more. She is constantly expanding her knowledge in related fields. And she will continue to bring more easy-to-understand professional articles to help people solve various problems on the PC.
User Comments :