When trying to launch the game or join the multiplayer modes, many players get the “Warzone unable to access online services” error. Are you still troubled by the issue? Don’t worry. This post of MiniTool explores several effective fixes.
Call of Duty: Warzone is a widely popular battle royal video game released for Windows PC, PlayStation 4/5, and Xbox One. Sometimes, however, this game can also run into various errors such as Warzone stuck on checking for update, Warzone mic not working, and the one discussed here.
What causes the Warzone unable to access online services issue? According to a survey, the problem is often related to server outages or network connectivity. In addition, a temporary glitch, DNS cache, corrupted game data, and unsupported region also can cause the error. Here we summarize 6 applicable methods as follows. Let’s try them in order.
![Call of Duty Cold War Not Connecting to Online Services? [Fixed]](https://images.minitool.com/partitionwizard.com/images/uploads/2021/12/call-of-duty-cold-war-not-connecting-to-online-services-thumbnail.jpg)
# 1. Check Warzone Server Status
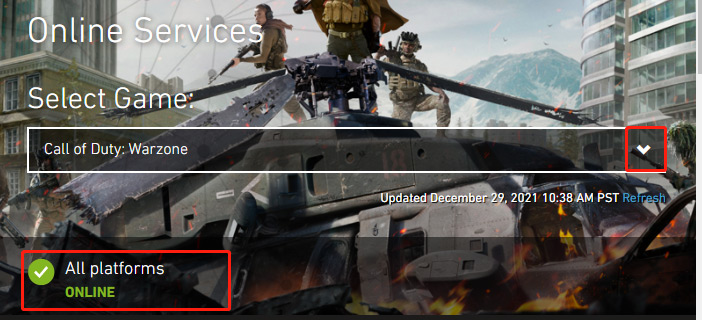
Sometimes the Warzone servers may experience an outage. So, you need to check if the Warzone servers are online first. Click here to open the Activision support page., and then select Call of Duty: Warzone from the drop-down menu and check if All platforms are Online. If the services are down or under maintenance, all you need to do is to wait until the servers are back online.
# 2. Perform a Simple Restart
Many gamers reported that they managed to fix the “Unable to access online services Warzone” error simply by restarting the game launcher and router. By doing so, the temporary glitch and connectivity issues should be resolved. Let’s have a try.
- Restart the game and Blizzard launcher: Click on the Blizzard icon at the top left corner and select Exit. Close Warzone. Then relaunch the game and Blizzard to check if the “Warzone can t connect to online services” issue gets solved.
- Restart your PC or game console: If you are using PS4, you can hold the Power button until the console is turned off completely. Then unplug the power cable from PS4 for about 30 seconds, and re-plug the power cable, and press the Power button to turn it on.
- Restart your router: Unplug your router’s power cable, and wait for about 30 seconds, and then plug it back in.
If you still can t connect to Call of Duty online services after simple restarts, move down to the following solutions.
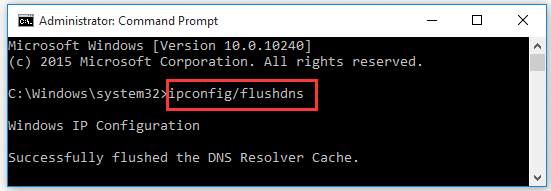
# 3. Flush DNS Cache
Sometimes the temporary network cache can trigger the “Warzone won t connect to online services” issue. To fix it, you can try flush DNS cache.
Step 1. Press Win + R keys to open the Run dialog box, and then type cmd in it and press Ctrl + Shift + Enter keys to open an elevated command prompt.
Step 2. In the elevated Command Prompt window, type the following commands in order and hit Enter after each one.
- ipconfig /flushdns
- ipconfig /registerdns
- ipconfig /release
- ipconfig /renew
- netsh winsock reset
Once done, restart your computer and check if you get the “Warzone unable to access online services” issue fixed.
# 4. Change Your DNS Settings
If the above method fails to resolve the problem, you may consider changing your DNS server to a different one like Google. To do so, follow the steps below:
Steps for PC:
Step 1. Open your Control Panel from the Start menu.
Step 2. Change the View by type to Category, and then navigate to Network and Internet > Network and Sharing Centre > Change adapter settings.
Step 3. Right-click the active network and select Properties.
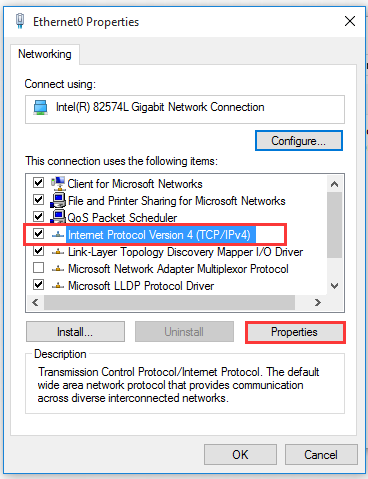
Step 4. Navigate to the Networking tab, and then select Internet Protocol Version 4 (TCP/IPv4) and click on Properties.
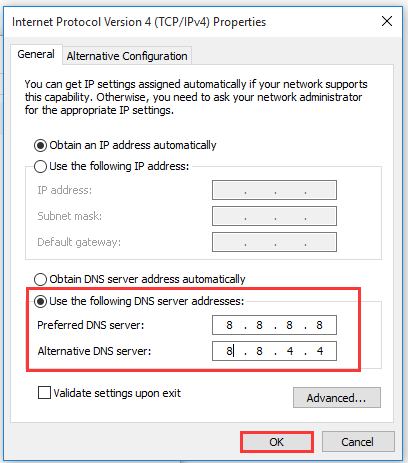
Step 5. Select the Use the following DNS server addresses option, and then set the Preferred DNS server: 8.8.8.8, Alternative DNS server: 8.8.4.4. After that, click on OK to save the changes.
Steps for PS4:
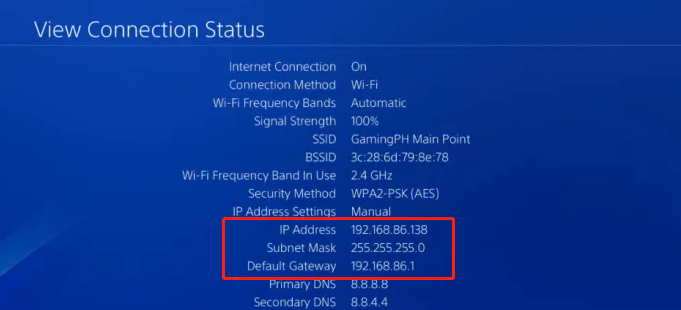
Step 1. Open the Setting menu from the PS4 dashboard, and then navigate to Network > View Connection Status.
Step 2. Note down the numbers next to IP Address, Subnet Mask, and the Default Gateway.
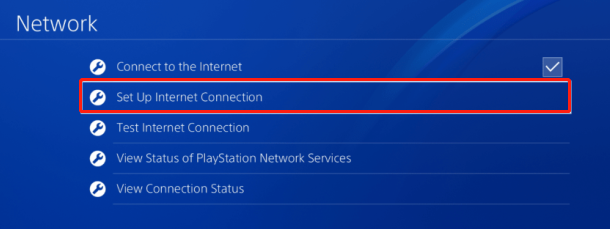
Step 3. Navigate back to the Network settings window and select Set Up Internet Connection. Then select your connection and you will be prompted to set up your Internet connection.
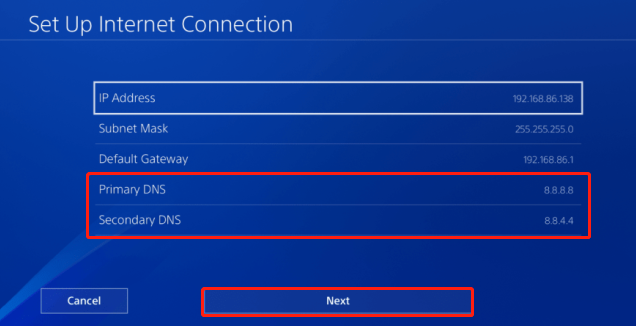
Step 4. In the new window, select Custom > IP Address Settings > Manual.
Step 5. Now you can enter the IP Address, Subnet Mask , and the Default Gateway information you noted down in Step 2. And then set Primary DNS: 8.8.8.8 and Secondary DNS: 8.8.4.4 and click on Next to continue.
–images from gameinpost
Step 6. Select Automatic for the MTU settings and Not to Use for the Proxy Server. Then you can click on Test Internet Connection to see if this server works fine.
Then you can relaunch the game and see if the Warzone not connecting issue disappears.
# 5. Switch to Another Region
Sometimes the “Warzone unable to access online services” error also occurs when your current region is not supported by the game server. In this case, you can try changing the region in Blizzard.
Step 1. Launch your Blizzard client and navigate to the Ballte.net menu.
Step 2. Select Call of Duty: Warzone from the left pane and click on the small Globe icon at the bottom.
Step 3. Then you will see the 3 regions: America, Europe, and Asia. Choose the one different from your current region.
Noce done, restart your game and see if the “Warzone can t connect to online services” problem is fixed.
# 6. Port Forwarding for Warzone
In addition to the above solutions, you can try forwarding the ports used by the Call of Duty: Warzone. To do so, you need to open your router’s user interface and port forward.
Step 1. Open your web browser, and then type the router’s IP address in the address bar and hit Enter. (If you don’t know how to find your IP address, this guide can help you.)
Step 2. On the login page, type your user name and password. Then click on the Login button to open the router page.
Step 3. Inside the router settings, go to the Advanced menu and select NAT Forwarding or Port Forwarding from the left pane.
Step 4. Select the Virtual Servers option from the right pane and then you can see if there is a button named Add that allows you to add additional ports. If it is, click on Add.
Step 5. Add the ports that you need to forward for COD Warzone. Bear in mind that the ports are different depending on the platform (PS4, Xbox One, and PC). Here we list them as follows:
PC
- TCP: 3074,27014-27050
- UDP: 3074,3478,4379-4380,27000-27031,27036
PS4
- TCP: 1935,3478-3480
- UDP: 3074,3478-3479
Xbox
- TCP: 3074
- UDP: 88,500,3074-3075,3544,4500
Step 6. Once done, restart both your router and console/PC, and check if the Warzone connection failed issue can be resolved.

User Comments :