Far Cry 6, is a widely popular first-person shooter game released for Microsoft Windows, PlayStation 4, PlayStation 5, Xbox One, Xbox Series X/S, Stadia, and Amazon Luna.

But nothing is perfect, it also has some errors that bother the players a lot, such as Warm up PSO cache issue.
What Is Warm Up PSO Cache?
Far Cry 6 is such a huge open-world game same as the previous entries in the series and has many things that you can explore. The island of Yara is one of the biggest Far Cry maps to date. So, there is a tremendous amount of assets that the game needs to load before launching.
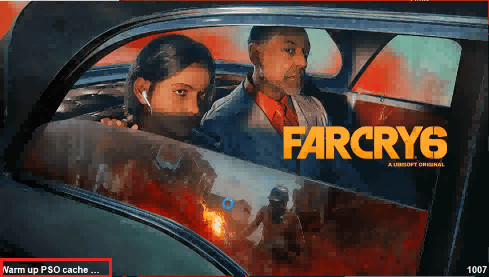
Warm up PSO cache is the process that happens in the background to load the assets and resources including textures, models, and more. Once the loading is complete, you will be able to enter the game.
But sometimes the process is prolonged and makes the players spend much time on it. And the worst situation is that the game crashes, making the game fail to start.
As a result, “Warm up PSO cache” becomes a concern in the minds of players. To address the crash problem and reduce the time it takes for “Warm up PSO cache,” do the following.
System Requirements for Far Cry 6
Before fixing the Far Cry 6 Warm up PSO cache error, please make sure your PC satisfies the system requirements of Far Cry 6.
The minimum requirements and recommended requirements are listed below.
Minimum requirements (30 FPS)
- Operating System: Windows 10 (20H1 version or newer, 64-bit versions)
- Processor: AMD Ryzen 3 1200 @ 3. GHz or Intel Core i5-4460 @ 3.1 GHz (AVX, AVX2, and SSE 4.2 support required)
- RAM: 8 GB (Dual-channel mode)
- Video card: AMD RX 460 (4 GB) or NVIDIA GeForce GTX 960 (4 GB)
- DirectX: DirectX 12
- Hard Drive: 60 GB available storage
Recommended requirements (60 FPS)
- Operating System: Windows 10 (20H1 version or newer, 64-bit versions)
- Processor: AMD Ryzen 5 3600X @ 3.8 GHz or Intel Core i7-7700 @ 3.6 GHz (AVX, AVX2, and SSE 4.2 support required)
- RAM: 16 GB (Dual-channel mode)
- Video card: AMD RX Vega 64 (8 GB) or NVIDIA GeForce GTX 1080 (8 GB)
- DirectX: DirectX 12
- Hard Drive: 60 GB available storage
The minimum requirement for running the HD Texture Pack for Far Cry 6 is 12GB of VRAM. For 4K configurations, you will need 16GB of VRAM. If you download and run the HD Texture Pack with lower VRAM capabilities, you will encounter performance issues while playing.
Solution 1. Wait 5-15 Mins
When you boot the Far Cry 6 on your computer for the first time, it’s normal to need time to wait for the game to load. Because the Far Cry 6 is a massive game and its HD Texture Pack needs time to be loaded.
So, when you find the Warm up PSO cache process is too slow, the first thing you need to do is to wait five to fifteen minutes to see whether the game is open normally or not.
Solution 2. Restart the System
If waiting can’t fix this error, you can try restarting your computer and game to fix the error. In all cases, a restart will wipe away the current state of the software and all the codes stuck in the misbehaving state. Here is the way:
- Open the Task Manager. You can open it by pressing Ctrl, Shift, and Esc keys on the keyboard at the same time or by right-clicking the Start Menu and selecting Task Manager.
- Find the Far Cry 6 on the Processes page.
- Then right-click it and select End Task on the menu.
- After that, reboot your computer and restart the game.
Solution 3. Verify Game Files Via Ubisoft Connect
If restarting the computer also can’t fix this error, you can guess that there might be some corrupted game files. So, you can use Ubisoft Connect and Epic Games Launcher to verify the game files. Here is the way below.
For Ubisoft Connect:
- Open the Ubisoft Connect, then click the Games tab.
- Highlight Far Cry 6, then click the arrow icon in the bottom right.
- Click Verify files in the drop-down menu.
- If you received a notice for repair files, you need to click Repair. Then Ubisoft Connect will finish the left work.
For Epic Game Launcher:
- Open the Epic Games Launcher and click Library.
- Click the three dots next to Far Cry 6.
- Then select Verify from the menu. It may take a few minutes to verify all your files.
- Once done, relaunch the game and check if the Far Cry 6 Warm up PSO cache error is fixed.
Solution 4. Reinstall the Game
Some people fix this Far Cry 6 Warm up PSO cache error by reinstalling the game on their computers. So, you can try uninstalling the game on your computer, and then reinstalling it. This solution can work for some users. You can also have a try.
For Ubisoft Connect:
- Open the Ubisoft Connect and select Game.
- Then hover over Far Cry 6 and an arrow will appear.
- Click the arrow to open the drop-down menu, and then select Uninstall.
- After done, you can try to reinstall the game.
For Epic Games Launcher:
- Open the Epic Games Launcher and click Library.
- Click the three dots beside the Far Cry 6, and then select Uninstall.
- After done, you can try to reinstall the game.
Solution 5. Move Your Game Files to the SSD
All the preloaded files of the game and online games are stored in a storage disk. It asks the users to have enough disk space to store the game files and other program files. Both HDD and SSD can store data, but there is something different between them.
In general, the users can store the game files on HDD and have a nice experience in playing the game as long as the HDD is big enough. But SSD is better than HDD in some ways:
- The SSD is better than the HDD on the part of game loading speed because the SSD can read the data faster and use less energy.
- The SSD also generates less heat when the computer is running a massive game and that can avoid the game crashing due to overheating.
Some people report that they have fixed this Far Cry 6 Warm up PSO cache by moving all the game installation files to SSD. If you install Far Cry 6 on your HDD, you can also try switching the position of the game file.
If your computer uses an HDD, to upgrade it to an SSD, you can choose to use Migrate OS to SSD/HD Wizard function in MiniTool Partition Wizard. This function can keep your data safe. And you can use your system normally after migration.
One thing you need to pay attention to is that this function is only available for the Pro version and above.
MiniTool Partition Wizard DemoClick to Download100%Clean & Safe
Step 1: Open the MiniTool Partition Wizard Pro version.
Step 2: Click Migrate OS to SSD/HD Wizard on the left toolbar.
Step 3: Select option A and click Next. Option A supports you in migrating all the partitions to a new disk. For option B, it supports you in migrating only the OS system to a new disk and keeping the original disk.
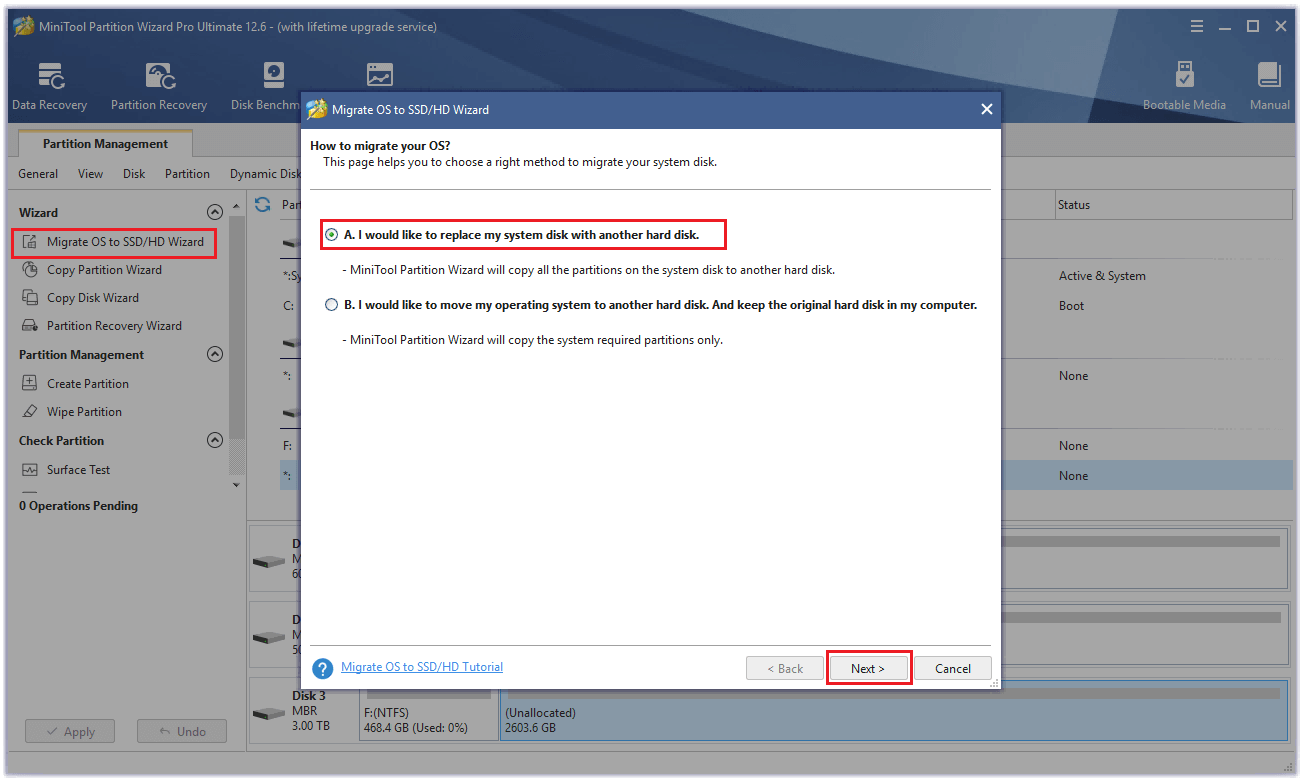
Step 4: Select the destination disk and click Next.
Step 5: Then you will enter the Review the changes page. You can select the copy options and change the disk layout. After that, click Next.
Step 6: Click Finish, then click Apply. After that, you will see an Apply Changes window, click Yes.
Step 7: Then you need to wait patiently for these changes to be completed.
Step 8: Once done, restart your computer and press the BIOS key on the Start-up page to enter the BIOS.
Step 9: You need to set the SSD disk as the boot disk here. After done, press F10 to save the changes.
Step 10: Then you can boot from the SSD disk and remove the HDD from your computer.
Solution 6. Wait for In-Game Updates
If all the solutions above can’t fix this error, you can guess this game itself is buggy. So, you just need to wait for the Far Cry 6’s developer to publish a new patch specific to this error. Or you can also contact Ubisoft Support for further assistance.
Further Reading:
Some players will meet Black Screen after updating the Far Cry 6. When you meet the Black Screen error, you can’t access the game.
The best way to fix this error is to repair the game. But please remember that the game file is bigger than 40GB.
Bottom Line
After reading this post, you can know how to fix the Warm up PSO cache issue. For any questions about using MiniTool Partition Wizard, leave comments below. If you have any problem with MiniTool Partition Wizard, please send us an email via [email protected].


User Comments :