You sometimes are required to reinstall graphics drivers. Here comes the question – do you have to uninstall old graphics drivers before installing new ones. Well, MiniTool would focus on this topic and explore the answer to it.
Why Do You Need to Reinstall Graphics Drivers
The graphics driver is the mediator between the system and the graphics card. Without the necessary GPU software for the PC, you may encounter issues like crashes, screen flickering, stuttering, frame drops, and even artifacts on the monitor.
Besides, GPU drivers are prone to bugs due to frequent updates. Outdated or corrupted GPU drivers result in errors like Nvlddmkm.sys BSOD and NVIDIA settings are not available. Under these circumstances, you need to reinstall graphics drivers.
However, many people wonder that do I need to uninstall old graphics drivers before installing a new card. Well, the section below will explain that for you.
Also read: How to Check If Drivers Are up to Date? Here Are Details
Do You Have to Uninstall Graphics Drivers before Installing New Ones
Do I have to uninstall old graphics drivers? Yes, you’d better to uninstall the old GPU drivers when you buy a new GPU. If you don’t uninstall old graphics drivers, you may encounter driver conflicts after installing the new drivers.
In addition to that, it is very likely that your new GPU won’t work properly because of the old drivers. You are recommended to uninstall old graphics drivers before installing new in the following two cases.
- The graphics drivers aren’t updated for quite a long period of time.
- The new GPU is pretty new and the previous GPU is very old not even in the market for sale.
Also read: Here Are 4 Solutions to the MHW Graphics Device Crashed Error
How to Reinstall Graphics Drivers Correctly
Here’s the step-by-step tutorial on how to reinstall graphics drivers correctly.
Stage 1: Check the Specs of Your Graphics Card
To get the new GPU properly work in your computer, you should get a compatible one. For that, you need to check the specs of the current GPU before buying a new GPU. By doing so, you can ensure the new GPU fits your computer.
You can find the specs of your graphics card via these steps.
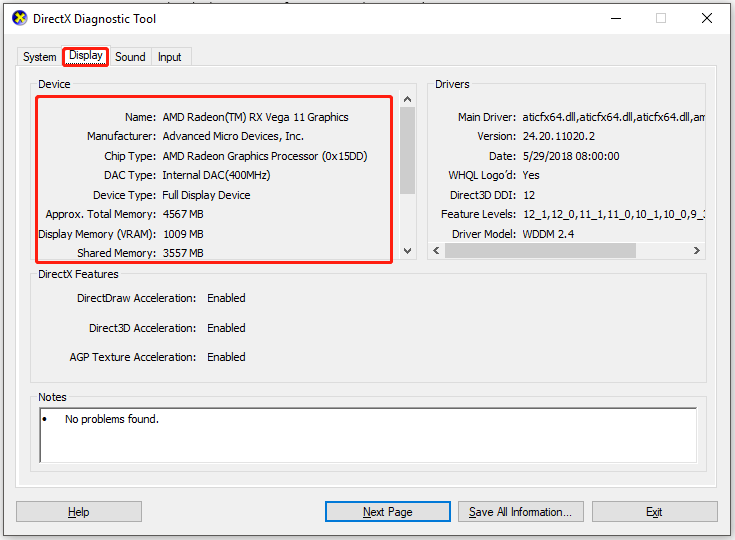
Step 1: Open the Run window by pressing Windows and R keys, and then type dxdiag and hit Enter.

Step 2: In the DirectX Diagnostic Tool window, navigate to the Display tab. Then you can view all the information about your graphics card.
Stage 2: Uninstall Old Graphics Drivers
You are recommended to uninstall old graphics drivers before putting the new graphics card in your computer. Though you can skip this step technically, it sometimes could cause some issues while installing the new card.
These steps show you how to uninstall graphics drivers.
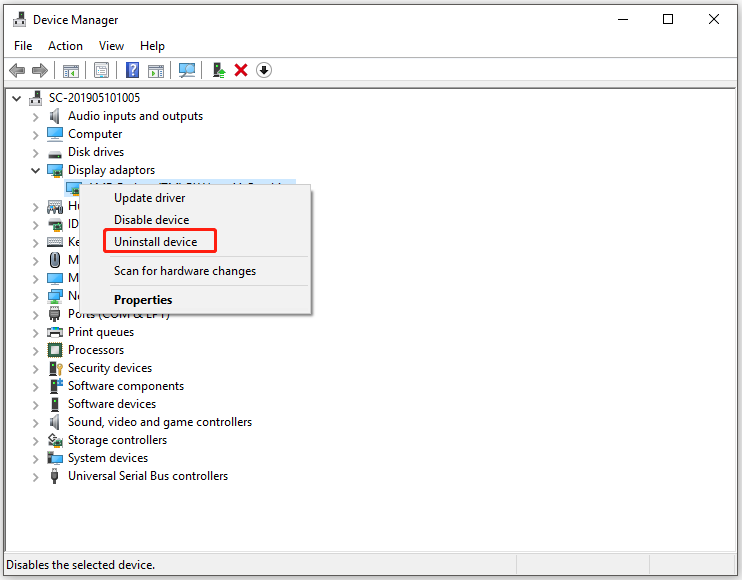
Step 1: Right-click on the Windows icon on the desktop and click Device Manager.
Step 2: Double-click Display adaptors to expand it. Then right-click on your graphics driver and click Uninstall device.
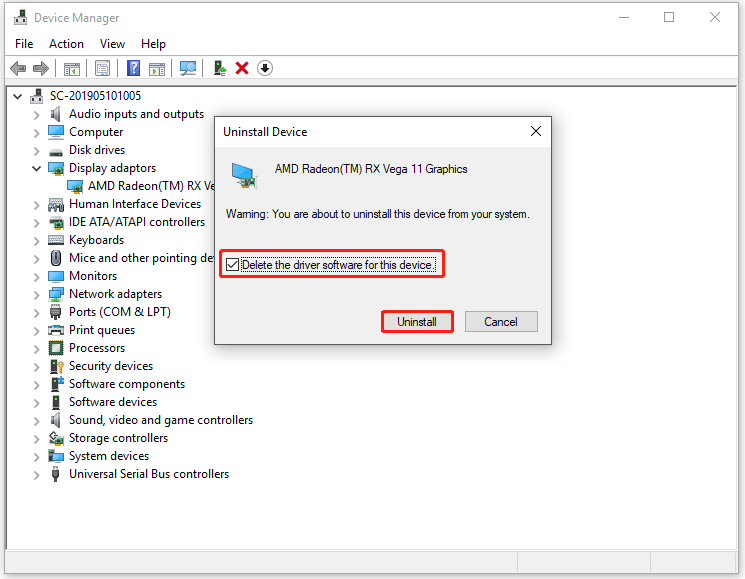
Step 3: In the prompted window, check the delete the driver software for the device checkbox and click Uninstall to confirm the operation.
Step 4: Then follow the on-screen instruction to finish the process.
Stage 3: Install the New Graphics Card
Now, you can install the new graphics card to your PC. To do that, you can refer to these steps.
Step 1: Turn off the computer and detach all the power cables.
Step 2: Open the case of your PC with a screw.
Step 3: Turn the computer on its side to make the motherboard face upwards.
Step 4: Disconnect power cables to the graphics card. Look the back of the computer and then you will see that the graphics card is screwed into the case. Remove screws and put them at a safe place.
Step 5: Remove the graphics card.
Step 6: Take out the new graphics card and remove all packaging including plastic sheets stuck to the main body.
Step 7: Slot the new graphics card into the unoccupied PCI-E slot. Usually, you will hear another click after it is slotted in.
Step 8: Reclaim the screws and fasten the graphics card. Then plug int the power cables to the graphics card.
Step 9: Reattach the case and put your computer upright. Connect power cables to the power source and turn on PC.
Stage 4: Download and Install New Graphics Drivers
After your computer boots up, the graphics card can run on basic drivers offered by Windows 10. To get the optimal performance, download Nvidia or AMD drivers from their official websites and then follow the on-screen instruction to install.
Do I need to uninstall old graphics drivers before installing a new card? This post has made a reply. You can check the answer and follow the given guide to upgrade your graphics drivers.
User Comments :