When you try to access a network drive, you may receive the error “the local device name is already in use”. What causes the error? How to fix it? This article from MiniTool will show you how to fix it with some reliable solutions.
When users try to access a mapped drive on their computer, they may receive the following error message on their computer:
Microsoft Windows Network: The local device name is already in use.
This connection has not been restored.
The error is associated with the network drive mapping feature of some operating systems, including Microsoft Windows.
However, not many people know what causes the error. Here, I have summarized several major reasons that may cause “The local device name is already in use” error on Windows 10 after analyzing several posts. Let’s have a look together.
What Causes “The Local Device Name Is Already in Use” Error
It’s important to know the reasons for the error “The local device name is already in use”, so that you can fix the problem effectively. The following are some possible causes:
- Problems occurred during network drive mapping process.
- The File and Printer Sharing is disabled.
- Some drives have incorrect or missing drive letters.
- There is not enough Disk Space on the network server
How to solve the Microsoft Windows network the local device name is already in use error? If you don’t know how to fix the error on Windows 10/8/7, you can try the following solutions one by one.
Solution 1. Remap the Network Drive
Microsoft recommends users to remap the Network drive if they encounter the “The local device name is already in use” error. So you can try the official solution first, which is said to be an effective fix. Here are detailed steps for you to remap the network drive.
Step 1. Type cmd in the Windows 10 search box and right click the best match Command Prompt to select Run as administrator.
Step 2. Copy and paste the following command into the Command Prompt window and hit Enter.
net use * /delete
Step 3. When the operation is completed successfully, run the following command and hit Enter.
net use Z: \servershare /user:username password
Step 4. After it is finished, you can check if the error “The local device name is already in use” gets fixed.
If this solution doesn’t help, you can try the next solution.
Solution 2. Enable File and Printer Sharing
If the File and Printer Sharing is disabled in your Firewall, you may come across problems with shared drives such as error the local device name is already in use. If you are using the Windows Defender Firewall, you can follow the steps below to enable File and Printer Sharing.
Here are detailed steps.
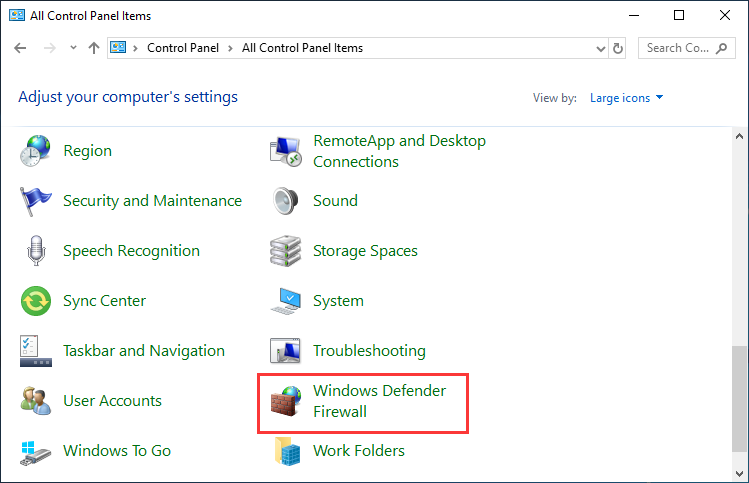
Step 1. Type Control Panel in the Windows search box and click the best match to open Control Panel.
Step 2. On the Control Panel window, set view by Large icons and navigate to the Windows Defender Firewall and click on it.
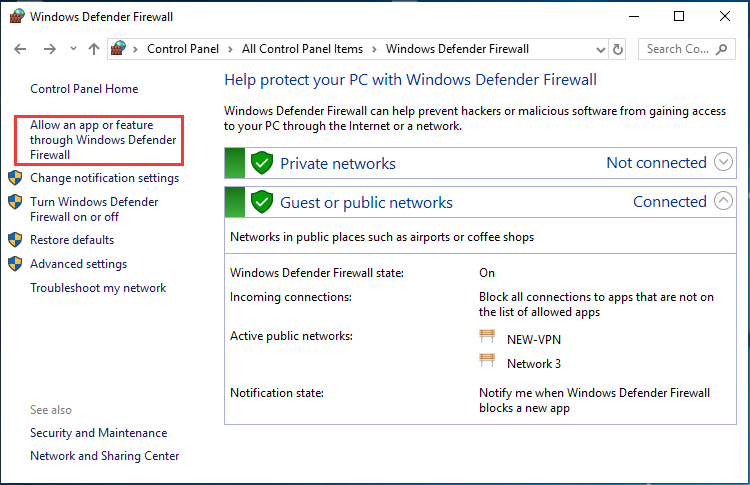
Step 3. On the Windows Defender Firewall window, click on the Allow an app or feature through Windows Firewall option from the left side list of options.
Step 4. Click the Change settings button at the top right part of the window and provide administrator permissions if needed.
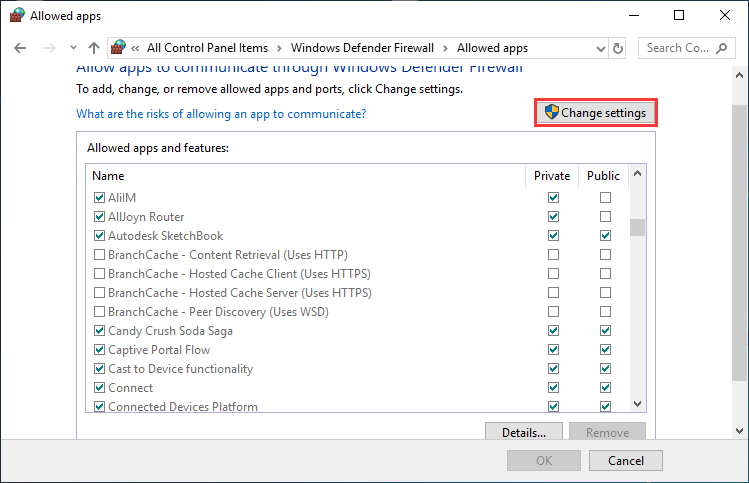
Step 5. Locate to the File and Printer Sharing option and check the box next to it.
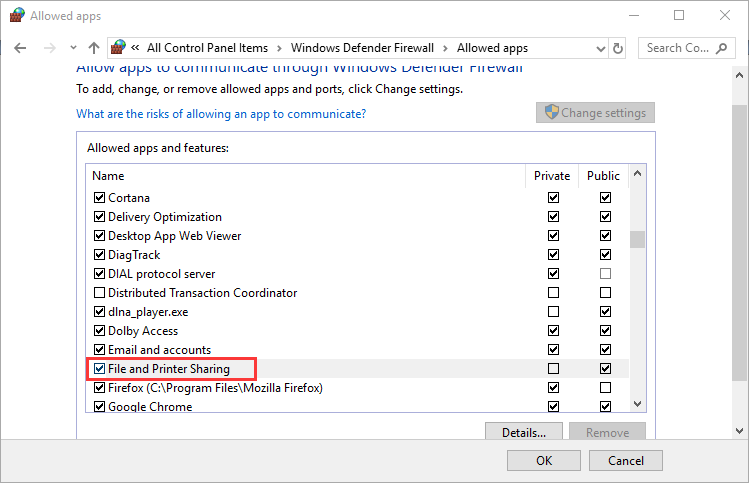
Step 6. Click OK to apply the change. Then restart your PC and check if the error disappears.
Solution 3. Assign Drive Letter
If there is a drive without a drive letter in Disk Management, it may be mapped as the problematic drive letter during the networking process. In this case, you need to assign it a drive letter manually.
You can follow the steps below to assign drive letter with Windows built-in Disk Management or third-party partition manager MiniTool Partition Wizard Free Edition.
Assign Drive Letter with Disk Management
Windows built-in Disk Management can help perform some disk management operations. If you want to change drive letter or assign a drive letter for a certain drive, you can follow the steps below.
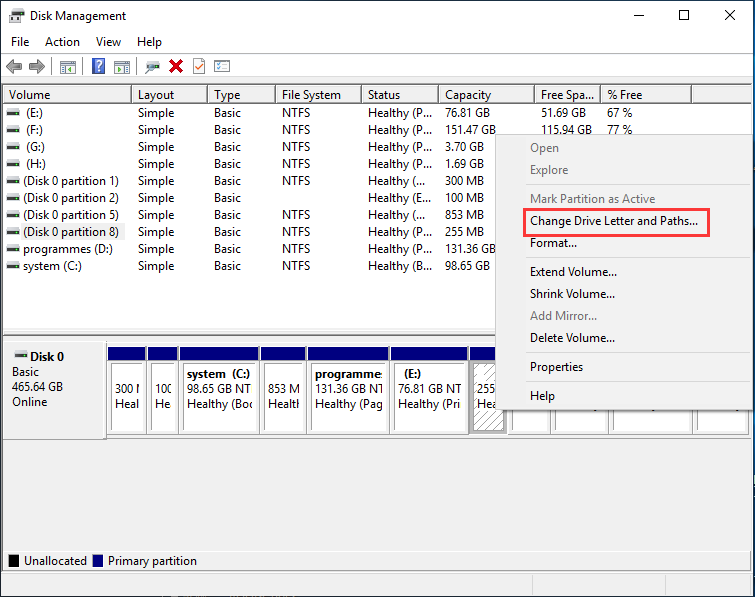
Step 1. Press Windows +R keys on the keyboard to bring up the Run box. Type diskmgmt.msc in the box and hit Enter to open Disk Management Windows 10.
Step 2. Right-click the partition without a drive letter and choose the Change Drive Letter and Paths.
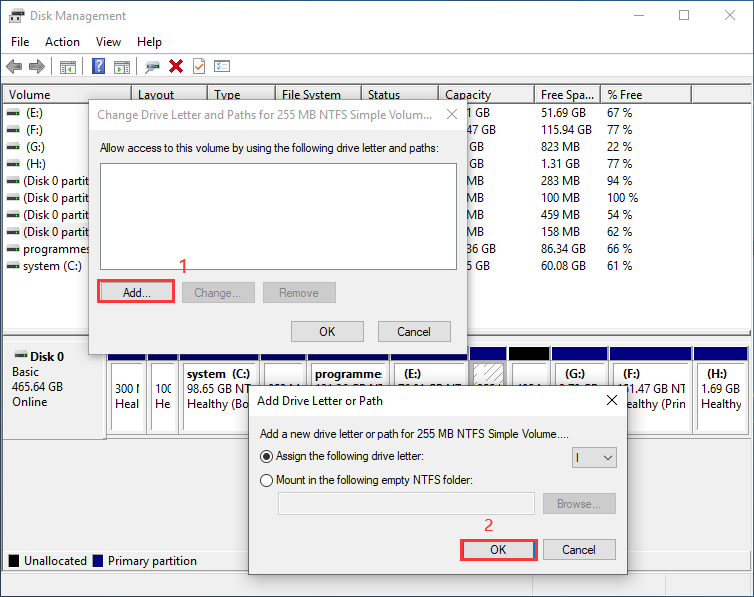
Step 3. Click Add button from the pop-up window, then select a drive letter from the list of available drive letters. Then click OK.
Assign Drive Letter with MiniTool Partition Wizard Free Edition
MiniTool Partition Wizard Free Edition is an all-in-one partition manager. It possesses more advanced features than Disk Management in respect of disk and partition management. And it has simpler procedures when performing tasks.
You can utilize MiniTool Partition Wizard Free Edition to move/resize partition, extend partition, migrate OS to SSD/HD, Format partition, convert MBR to GPT without data loss, copy disk/partition, wipe disk/partition, etc. To change drive letter with MiniTool Partition Wizard Free Edition, you can follow the steps below.
Step 1. Download MiniTool Partition Wizard Free Edition by clicking the following button. Install it on your computer and launch it to get the main interface.
MiniTool Partition Wizard FreeClick to Download100%Clean & Safe
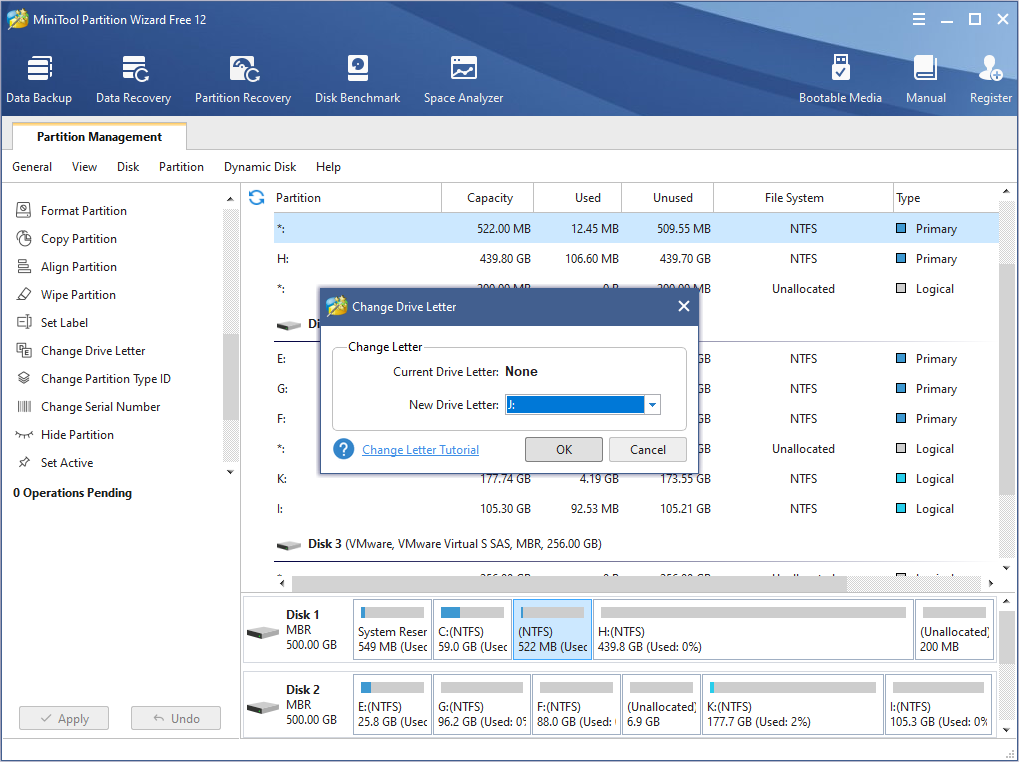
Step 2. Select the target partition, and then choose Change Drive Letter feature from the left action pane.
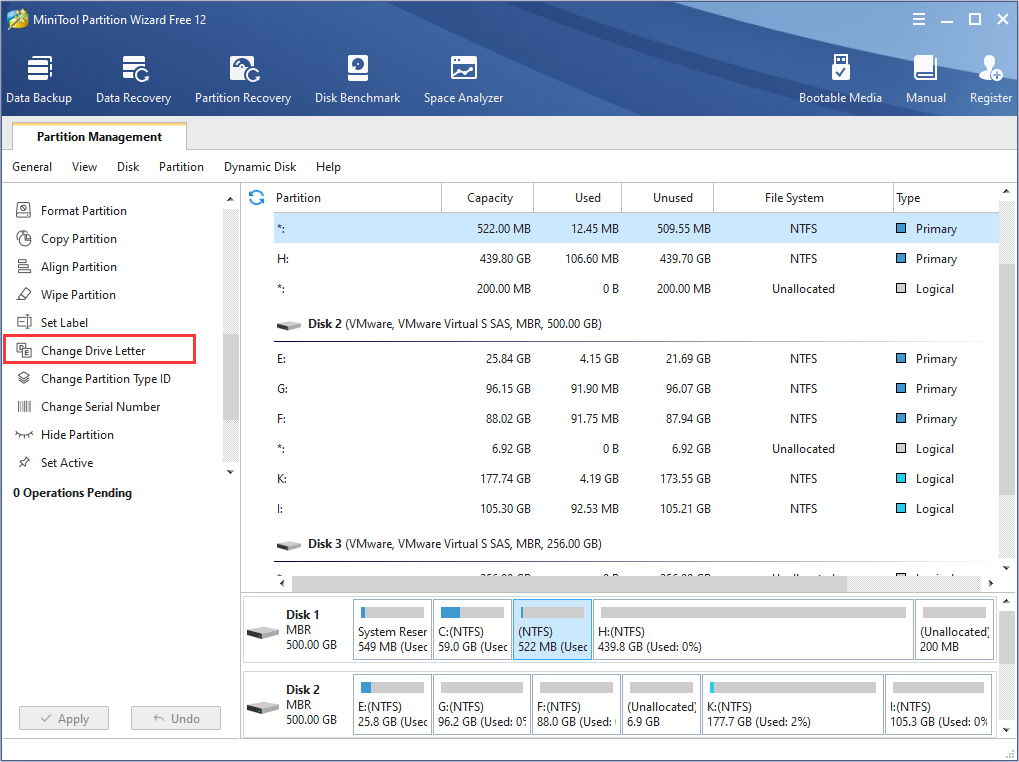
Step 2. Then choose a drive letter from the list. Click OK to go back to the main interface.
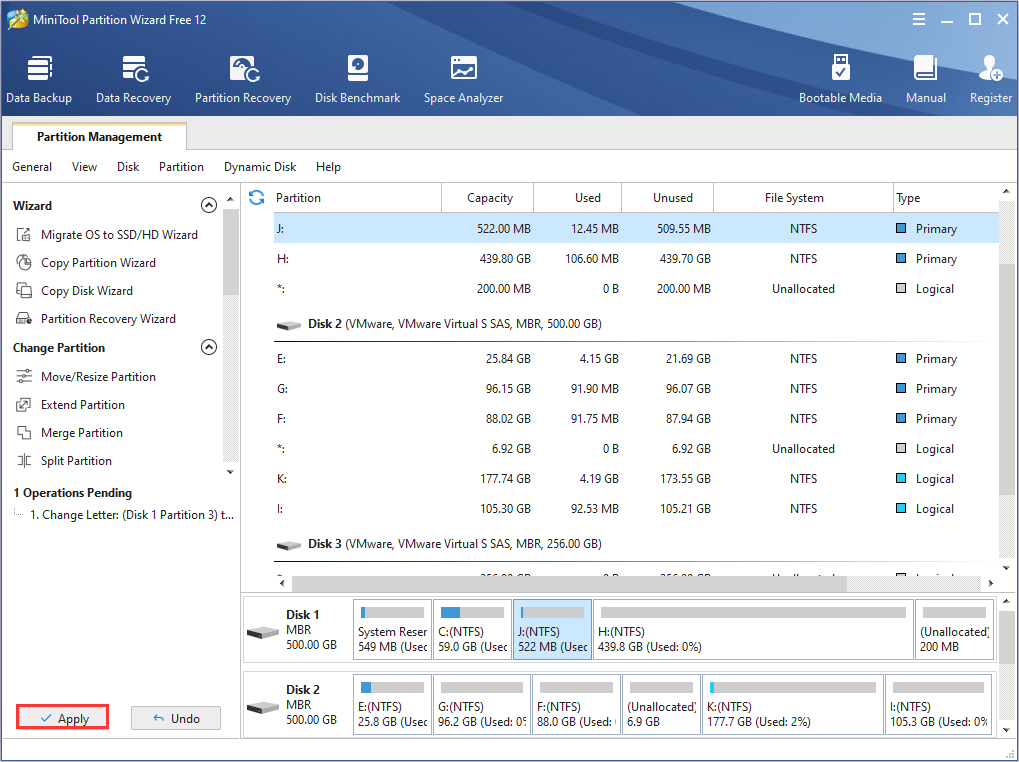
Step 3. Click Apply button to perform this operation.
After assigning the drive a drive letter, you can check if the local device name is already in use Windows 10 error gets fixed.
Solution 4. Modify Registry
You can fix the local device name is already in use Windows 10 error by modifying Registry. More specifically, you need to delete a certain registry key that may be the cause of the problem. If the above fixes cannot help you fix the problem, you can try this method.
If you are not familiar with the Registry Editor, you’d better backup the whole registry on your PC to avoid unexpected problems. Then you can safely delete the key that may cause the error “The local device name is already in use”.
Backup Registry
Step 1. Type regedit in the Windows search bar and click the best match Registry Editor to open it.
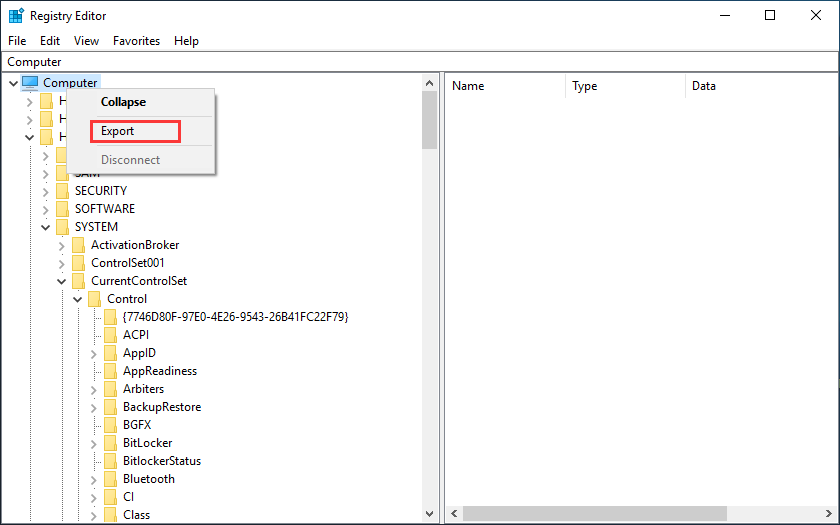
Step 2. In the left pane of the Registry Editor, right click on Computer and choose Export from the menu.
Step 3. Name the registry backup file and select a drive to store the backup file.
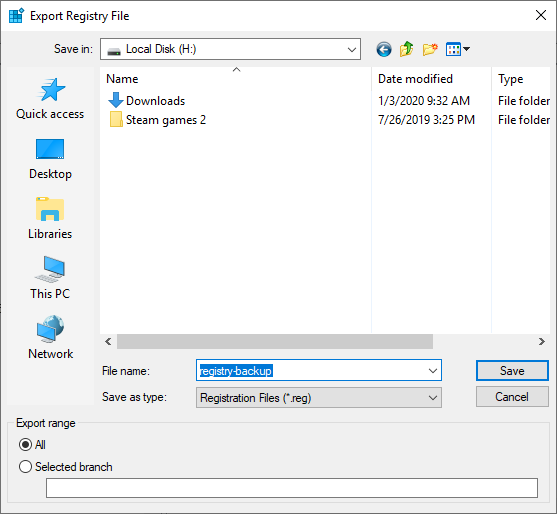
Then a backup of the entire Registry will be created. If you just want to backup a specific Registry key, you can export the specific Registry key instead.
After creating the registry backup, you can delete the key that may give rise to “The local device name is already in use” error with ease. Here are detailed steps for you to delete the key.
Delete the Key Named MountPoints2
Step 1. Type regedit in the Windows search bar and click the best match Registry Editor to open it.
Step 2. Then navigate to the following key in your registry.
HKEY_CURRENT_USERSoftwareMicrosoftWindowsCurrentVersionExplorer
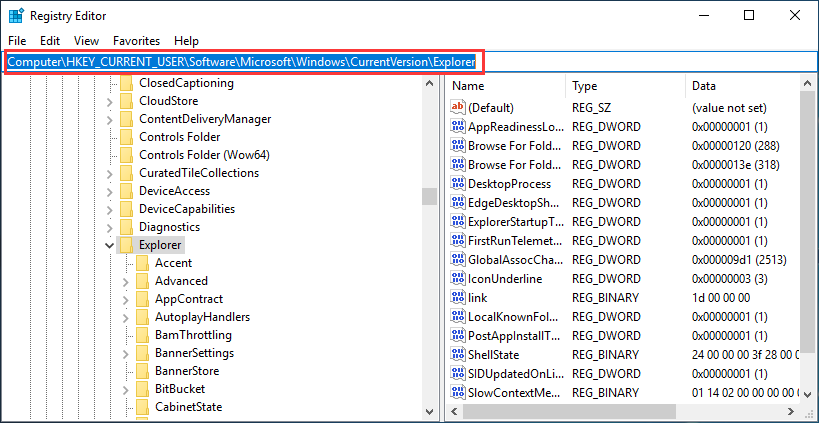
Step 3. Locate the key named MountPoints2 inside the Explorer key. Right-click on it, and choose the Delete option from the context menu.
Step 4. Restart your computer.
After restarting, check if “The local device name is already in use” error gets fixed on your PC.
Solution 5. Check If There Is Enough Space on the Server
If there is not enough space on the network server computer, you may receive the error “The local device name is already in use”. So you’d better check if there is enough space on the network server computer. If you can access the server computer of your network, you can extend the root drive of the server to allocate it more free space or delete some unnecessary files on the drive.
MiniTool Partition Wizard Server Edition can help you extend partition on a server computer by taking some free space from another partition or unallocated space. If you need to extend partition with MiniTool Partition Wizard Server, you can follow the steps below.
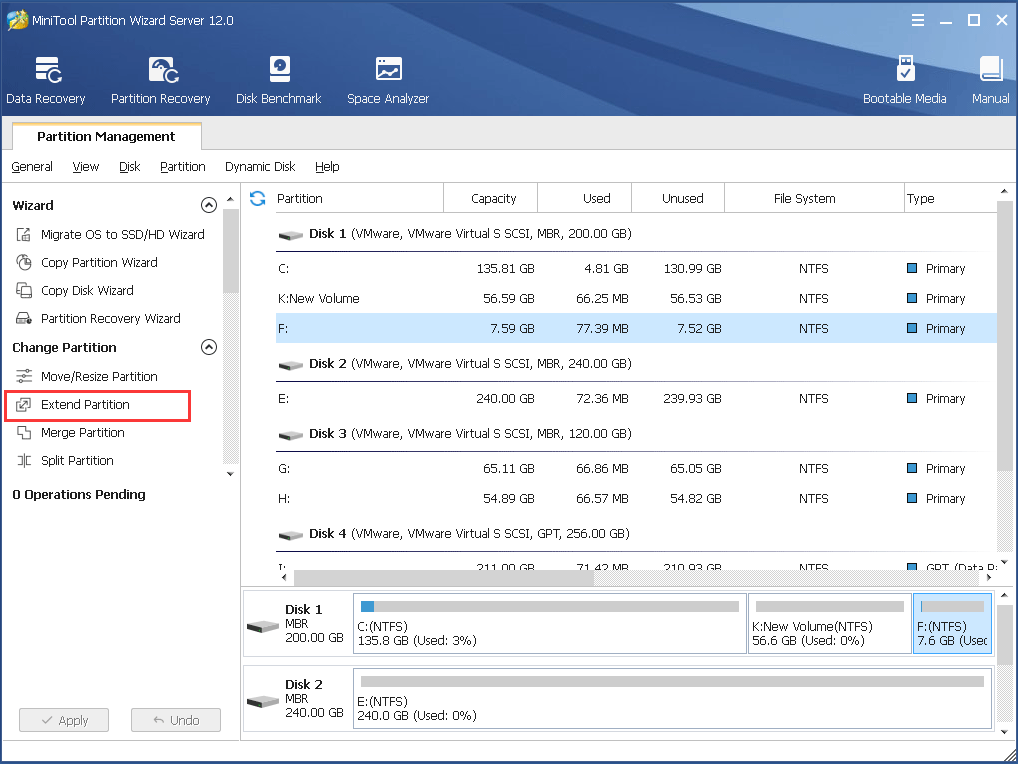
Extend Partition
Step 1. Get MiniTool Partition Wizard Server by clicking the following button. Install and launch the program to get its main interface.
Step 2. Select the partition which needs to be extended and choose Extend Partition from the left action panel.
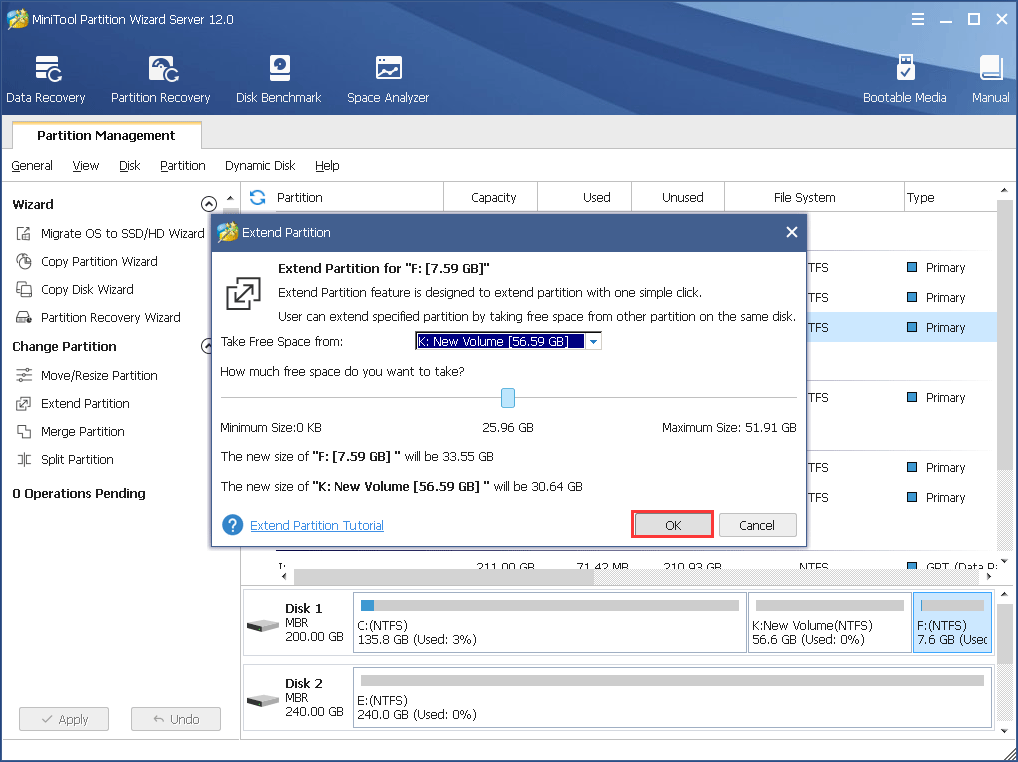
Step 3. Then click the drop-down menu of Take Free Space from and choose a partition or unallocated space to take free space. You can drag the sliding handle leftwards or rightwards to decide how much space to take and click OK to continue.
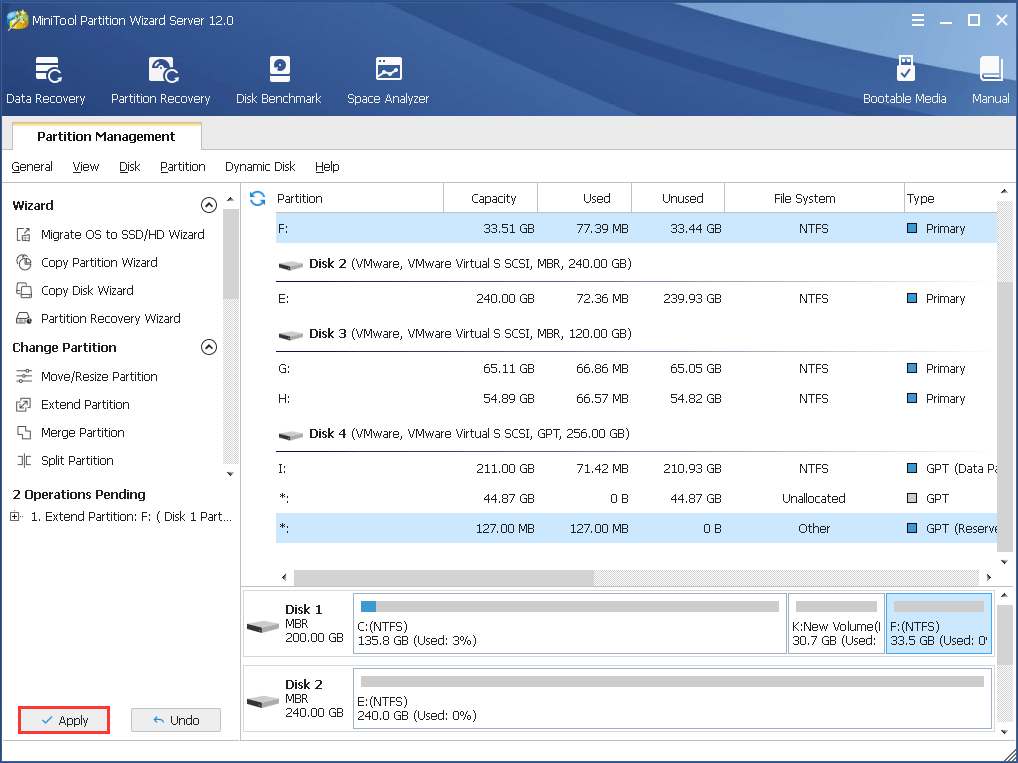
Step 4. At last, click Apply button on the top left corner to apply the pending operation.
Besides extending partition, you can also utilize the Space Analyzer on MiniTool Partition Wizard Server to find large files or some unnecessary files and delete them. You can follow the steps below to run Space Analyzer on MiniTool Partition Wizard Server Edition.
Space Analyzer
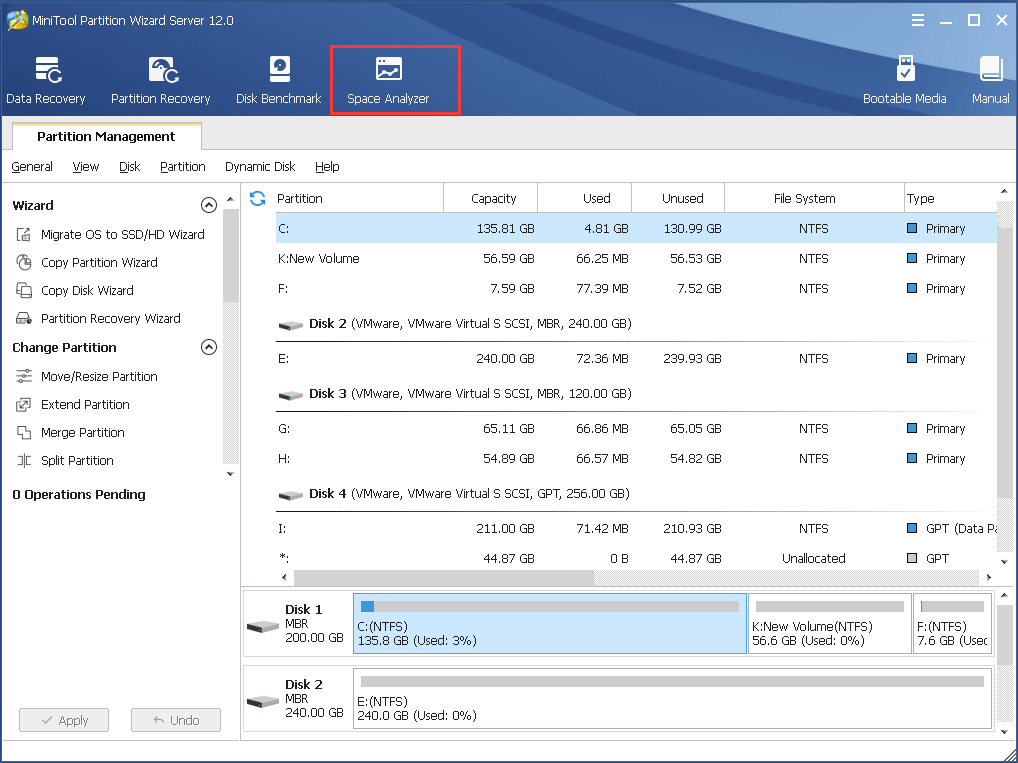
Step 1. Select the Space Analyzer feature on the main interface of MiniTool Partition Wizard Server.
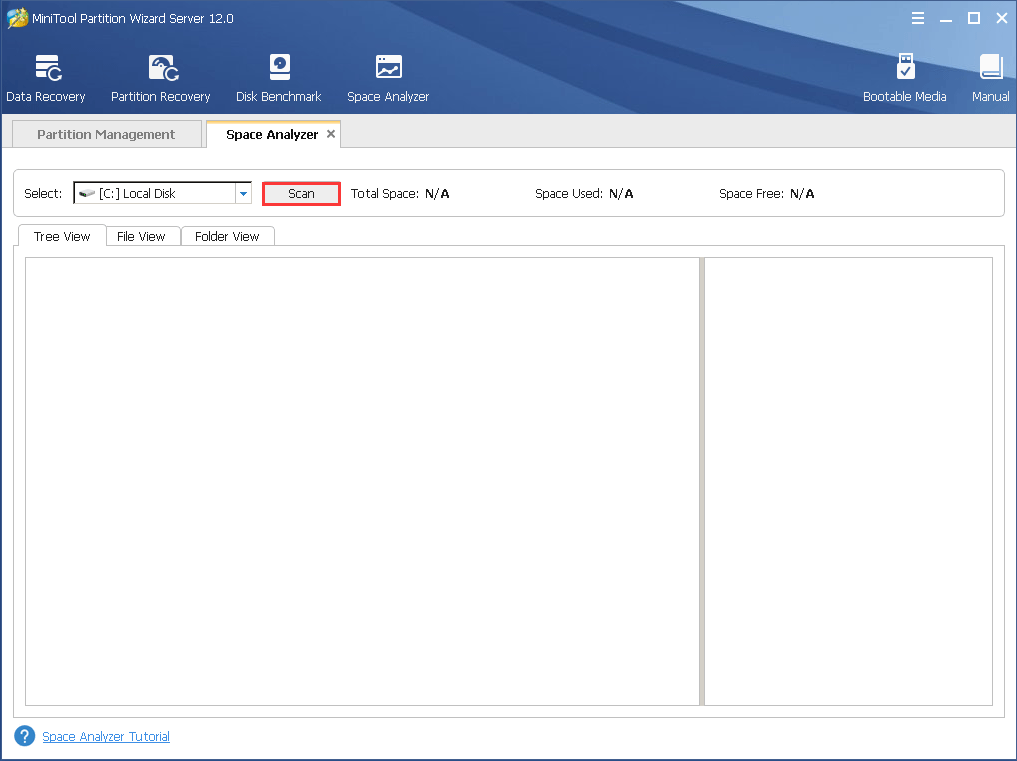
Step 2. Choose a partition to scan by clicking the drop-down menu and click the Scan button.
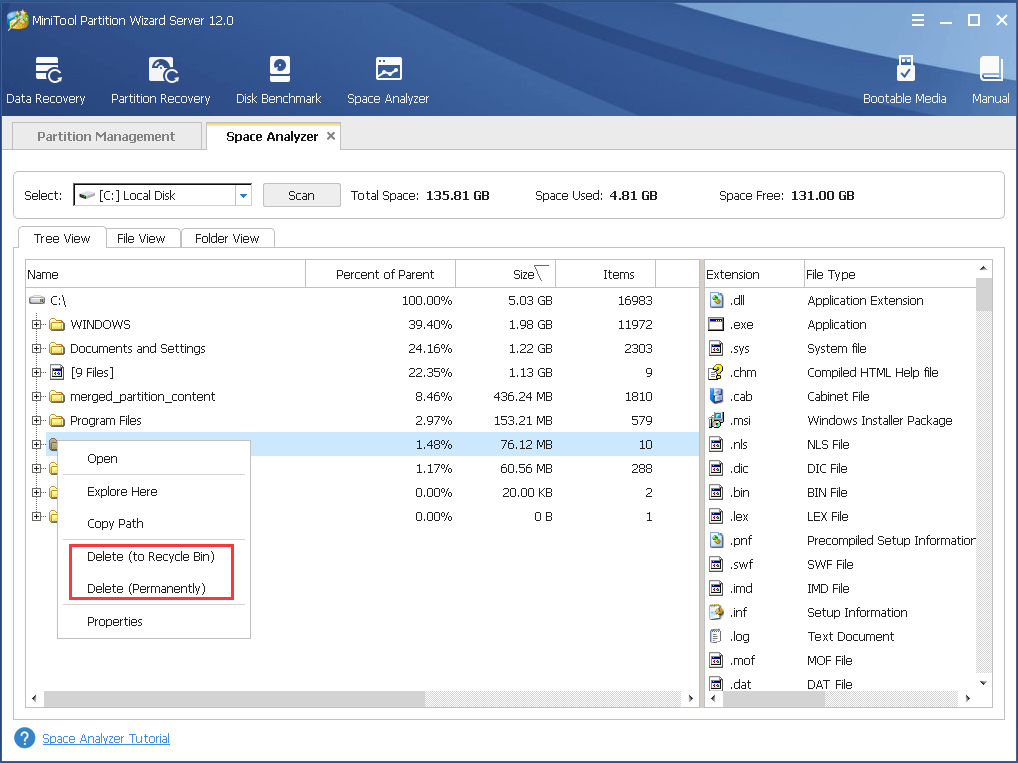
Step 3. After the scanning is completed, right-click the unnecessary file or folder and choose Delete (Permanently).
After extending partition or deleting unnecessary files on the drive, then you can check if the Windows error “The local device name is already in use” has gone. If you want to have a try, get MiniTool Partition Wizard Server Edition now.
Bottom Line
After reading this post, you should know how to fix the “The local device name is already in use” error on a Windows PC. Which method works for you? We are glad to have you share it with us.
If you have any question about how to fix “The local device name is already in use” error or if you have other better solutions, you can leave a message in the following comment zone and we will reply as soon as possible. If you need any help when using MiniTool software, you may contact us via [email protected].
User Comments :