If you have changed the amount of RAM on your Dell computer, you will receive the error message “The amount of system memory has changed. If you did not change your memory… To resolve this issue, try to reseat the memory. “
For example, you have 4 GB of RAM on your computer, but you think it is not enough for you. So, you decide to upgrade it by adding another 4GB of RAM to the second RAM slot.
After that, you will receive the error message “the amount of system memory has changed” on your computer when you open it. And you will also receive the same error message if you reduce your RAM.
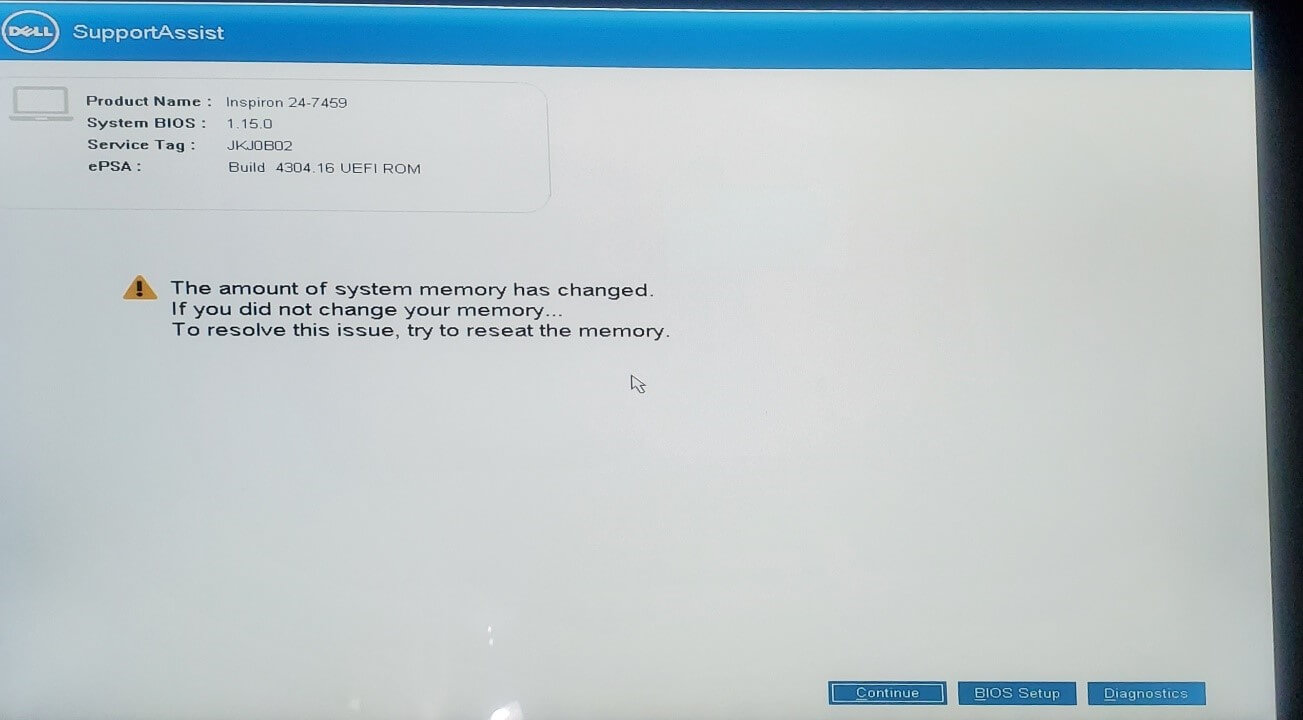
However, the error message “the amount of system memory has changed” can also show up on your computer when you haven’t made any changes to your RAM. According to the users’ reports, it may be related to the SupportAssist.
Don’t worry! I will introduce some useful solutions below to help you solve it successfully.
Solution 1. Disable SupportAssist OS Recovery From BIOS
If you see this error message “the amount of system memory has changed” on your computer’s screen each time you turn it on, you can try disabling the SupportAssist OS Recovery from BIOS to solve this issue. Here’s the guide:
- Turn off your computer.
- Press the Power button to turn on your computer. During this process, press F2 to enter the BIOS menu.
- Navigate to the Advanced tab and scroll down to the SupportAssist System Resolution option.
- Click it and then press the Enter key.
- On the new page, you will see the SupportAssist OS Recovery option.
- Verify that this option is still set to Disabled.
- Then, press F10 to save the changes and exit the BIOS menu.
- Once done, your computer will restart. You need to check if the error is fixed.

Solution 2. Run Hardware Diagnostic
There is a built-in hardware diagnostic on Dell computers. So, if you see the error message “the amount of system memory has changed” on your computer, you can follow the steps below to run the hardware diagnostic to fix it.
- Turn off your computer.
- Press the Power button to turn on your computer. When the Dell logo shows on your screen, press the F12 key several times until the One Time Boot Menu appears.
- On the One Time Boot Menu, select the Diagnostics option and press Enter.
- Then the diagnostic test begins. (On the Dell laptops, the user must respond during the LCD test.)
- If any problems occur, the process will notify you. You just need to take action according to the finding.
Solution 3. Reinstall RAM
This error message is mostly related to RAM. So, you can try reinstalling RAM to solve this issue. Here’s the way:
- Remove the back of your PC to reveal the RAM, which is held in place by clips inside the slot.
- Next, unlock the clips by tapping them and removing the RAM from the slot.
- After that, you need to reseat the RAM into the slot again. Then, screw up the back cover.
- Restart your computer to see if the error has been resolved.
Solution 4. Uninstall the SupportAssist
Some users have reported that the error message “the amount of system memory has changed” can also be caused by the conflict between Windows and SupportAssist.
So, if you don’t need SupportAssist, you can just have a try to uninstall SupportAssist to solve this issue. But for those that do use it, a fix is still needed.
![[Solved] The Amount of System Memory Has Changed](https://images.minitool.com/partitionwizard.com/images/uploads/2022/08/the-amount-of-system-menory-has-changed-thumbnail.jpg)
Bottom Line
In this post, you can find some helpful solutions for the error message “The amount of system memory has change”.
If you are interested in MiniTool Partition Wizard and want to know more about it, you can visit MiniTool Partition Wizard’s official website by clicking the hyperlink. MiniTool Partition Wizard is an all-in-one partition manager and can be used for data recovery and disk diagnosis.
About The Author

Position: Columnist
Charlotte is a technology columnist with a strong focus on the Windows operating system, specializing in disk management, backup, and data recovery. She is passionate about analyzing computer errors, identifying root causes, and delivering practical solutions. In her free time, she stays updated on the latest developments in computer systems and hardware while continuously learning new technologies to broaden her expertise. Her writing style is clear and easy to understand, making complex technical topics accessible even to users with limited computer knowledge.
User Comments :