If you want to be able to access the eShop and play your cartridge games online with the official Firmware set up, you have to set up EmuMMC/EmuNAND on Nintendo Switch. That is because that if you go online in a customer firmware you may get banned. You will get a full guide to set up EmuMMC/EmuNAND from MiniTool.
About EmuMMC/EmuNAND
The emuMMC (or EmuNAND) refers to the copy of Switch’s internal storage, which is saved on SD card. The copy includes all the content that is required for running Switch, including firmware, data storage, system settings and games that are installed to internal storage.
Therefore, you can have multiple separate installations of Switch’s operating system. Besides, any changes made to an emuMMC like WiFi settings, installed games will not affect other emuMMCs or sysMMC.
Read here, you may raise a question “how to set up EmuMMC/EmuNAND” like most people. Since the whole EmuMMC/EmuNAND setup operation is complicated, the post will divide it into several phases. Please follow me to walk through the article now.
5 Phases to Set up EmuMMC/EmuNAND
- Check your serial number
- Prepare a Micro SD card/Install a new Switch system
- Enter the Homebrew SD Setup
- Enter the Recovery Mode
- Set up EmuMMC/EmuNAND
Phase 1: Check Your Serial Number
The first phase of setting up EmuMMC/EmuNAND is to check whether you have the access to set it. Go to a website called Is My Switch Patched and fill in your serial number and the prefix. Then you will know if your console is patched or not.
If it says that your Switch is unpatched then you are good to go to follow this guide and you should be able to get the MU MMC setup correctly. On the contrary, if it says that your Nintendo switch is patched then you cannot follow this tutorial. If you have the access, please enter the next phase.
Phase 2: Prepare a Micro SD Card/ Install a New Switch System
Here, you have two options. You can either prepare a Micro SD card or install a new Switch system. I will illustrate them for you one by one.
The Guide for Preparing a Micro SD Card
Now, you need to prepare a Micro SD card – either an exFAT or FAT32 is OK. You need to secret two partitions on the Micro SD card. One partition is dedicated for the emuMMC partition with a minimum size of 32 gigabytes, while another partition is dedicated to the custom firmware files.
Therefore, it is recommended that you pick up a Micro SD card of at least 64 gigabytes because a 32 gigabytes card won’t really work for the setting up EmuMMC/EmuNAND operation.
You may be interested in this: TF Card vs Micro SD Card & How to Format It
Now, grab your micro SD card and plug it into a Micro SD adapter, and then insert it into your PC. Then you need to download and install a tool called MiniTool Partition Wizard Free Edition on your computer to wipe your Micro SD card and recreate partitions.
The Delete All Partitions and Wipe Disk features can help you clean your Micro SD card. Then utilize the Create Partition feature of this software to create partitions. Here, you can click the button below to download it directly.
MiniTool Partition Wizard FreeClick to Download100%Clean & Safe
After finishing download and installing MiniTool Partition Wizard, launch it to enter its main interface. Then follow the steps below to carry out the delete all partitions on the Micro SD card operation.
Delete All Partitions
Step 1: Select the whole Micro SD card, and then choose the Delete All Partitions feature in the left action panel. Alternatively, you can right click the Micro SD card, and then choose Delete All Partitions in the pop-up menu.
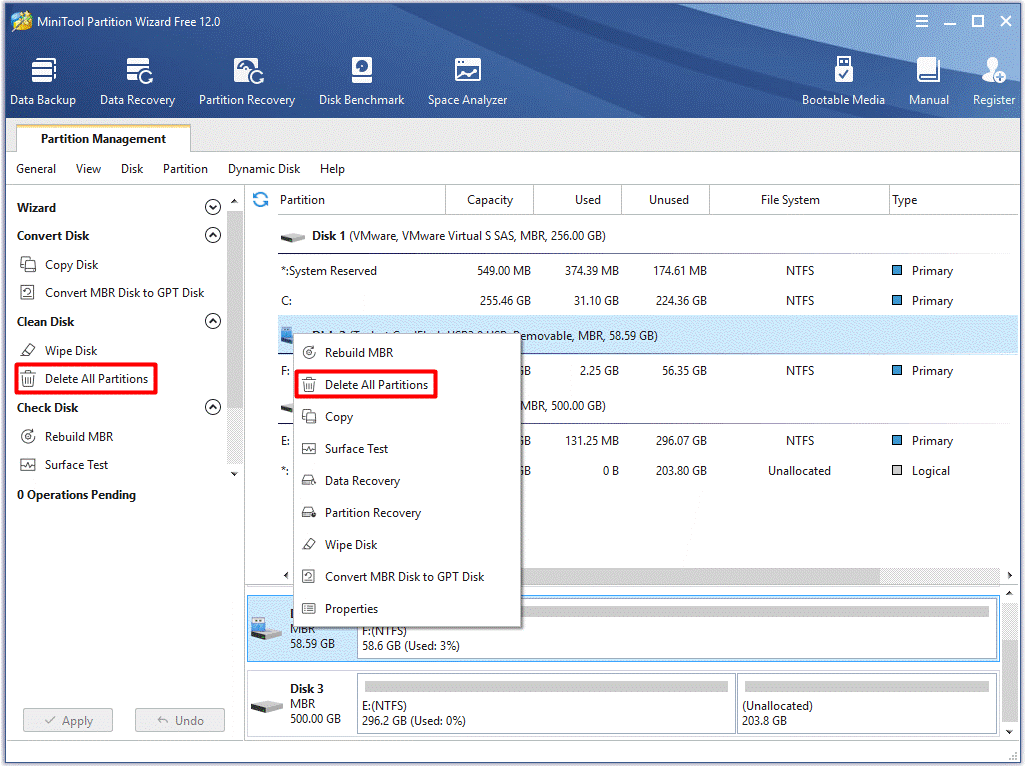
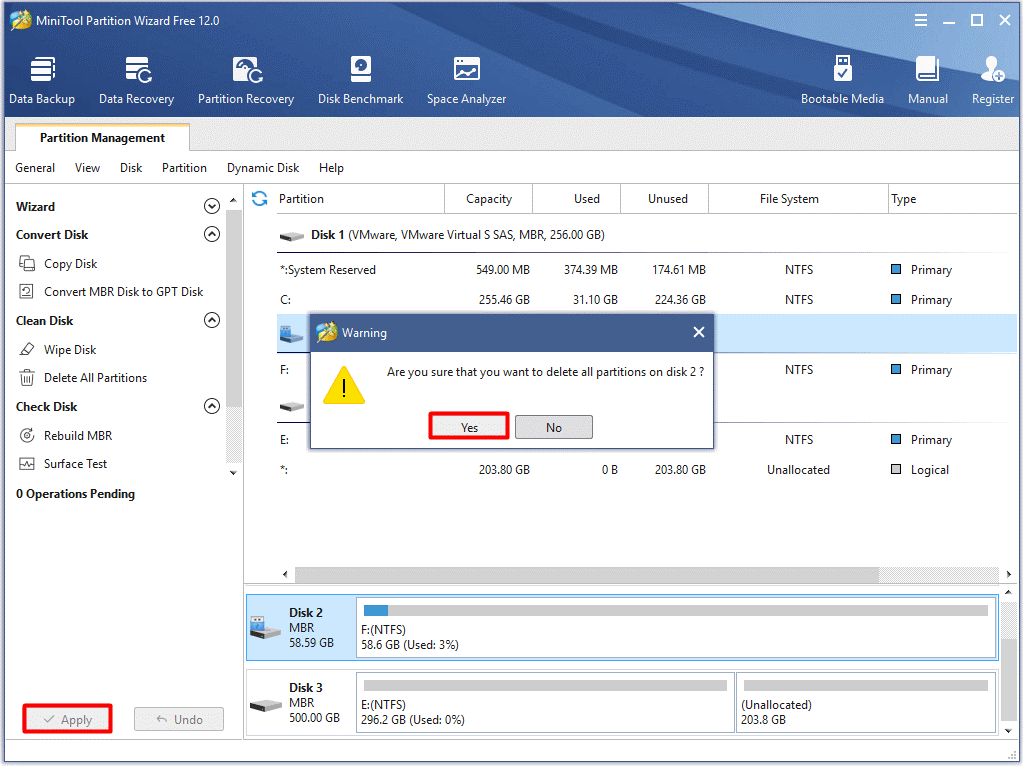
Step 2: Click Yes in the warning window, and then click on Apply to execute the operation. Then partitions on the Micro SD card will be deleted automatically.
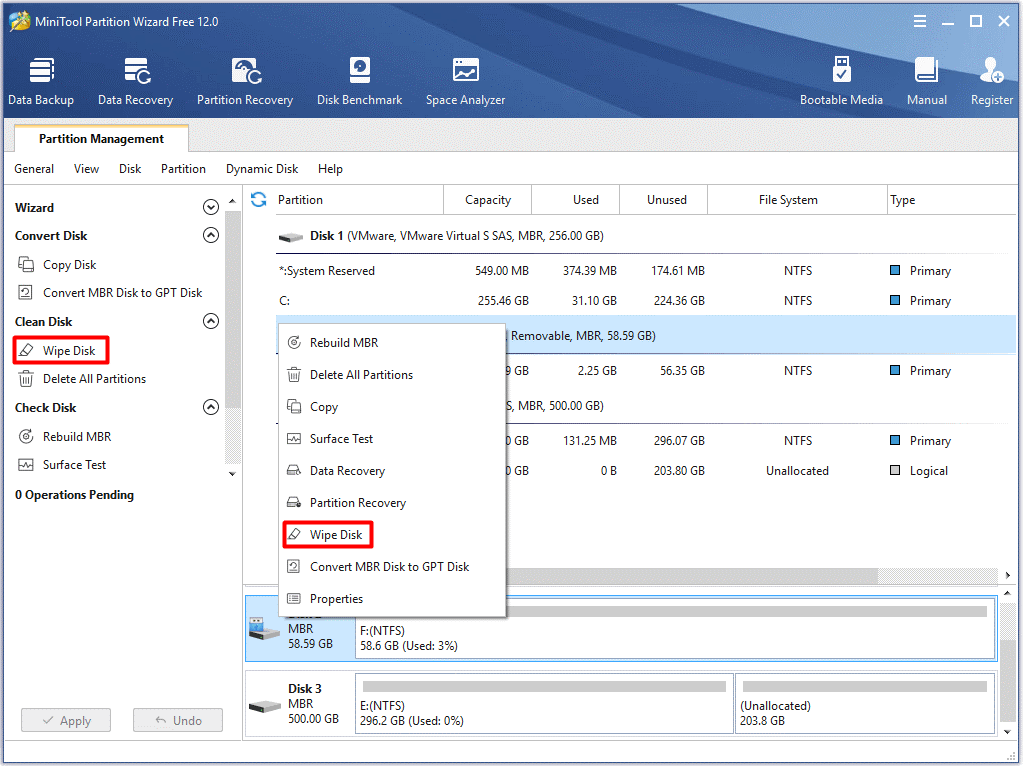
In addition to the Delete All Partitions feature, the Wipe Disk feature can also help you clean the data on the Micro SD card.
Wipe Disk
Step 1: After selecting the SD card, click Wipe Disk in the action panel to continue. As an alternative, you can also right click the SD card and then choose the Wipe Disk option in the pop-up menu.
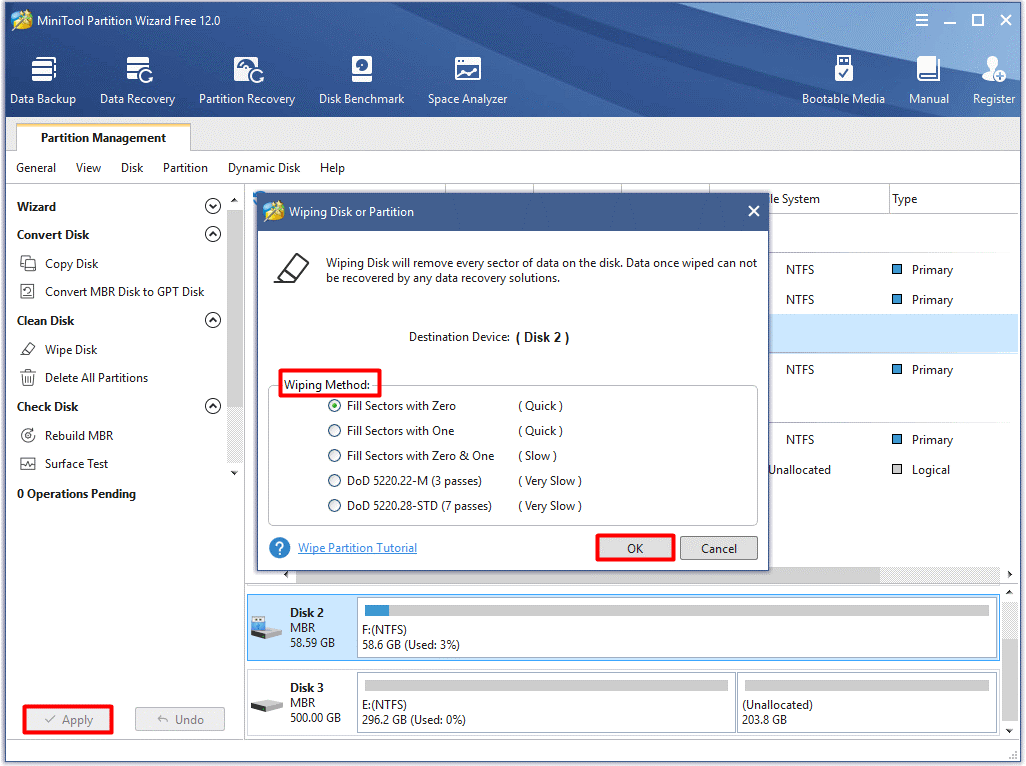
Step 2: Select a wiping method from the given options and click on OK to save the changes. Then, click Apply to carry out the pending operation.
Top recommendation: 6 Effective and Reliable Methods to Delete Files Permanently
Now, you can create the required two partitions on the Micro SD card.
Create Partitions on the Micro SD Card
Step 1: After clicking the Micro SD card, choose the Create Partition option in the left action panel.
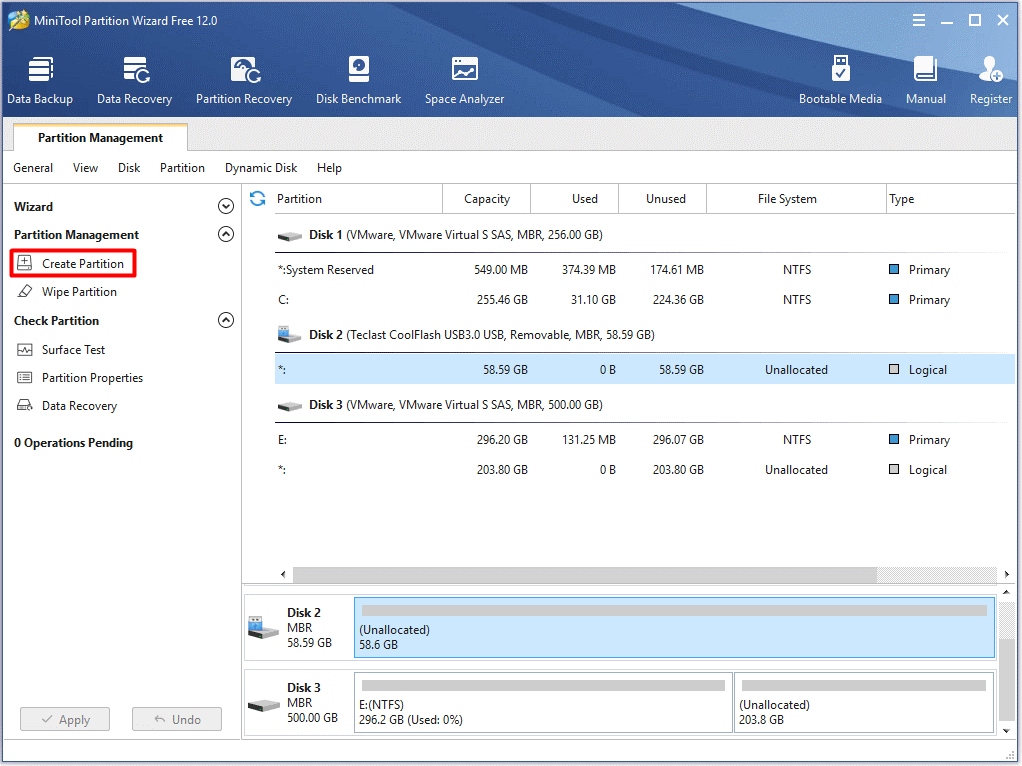
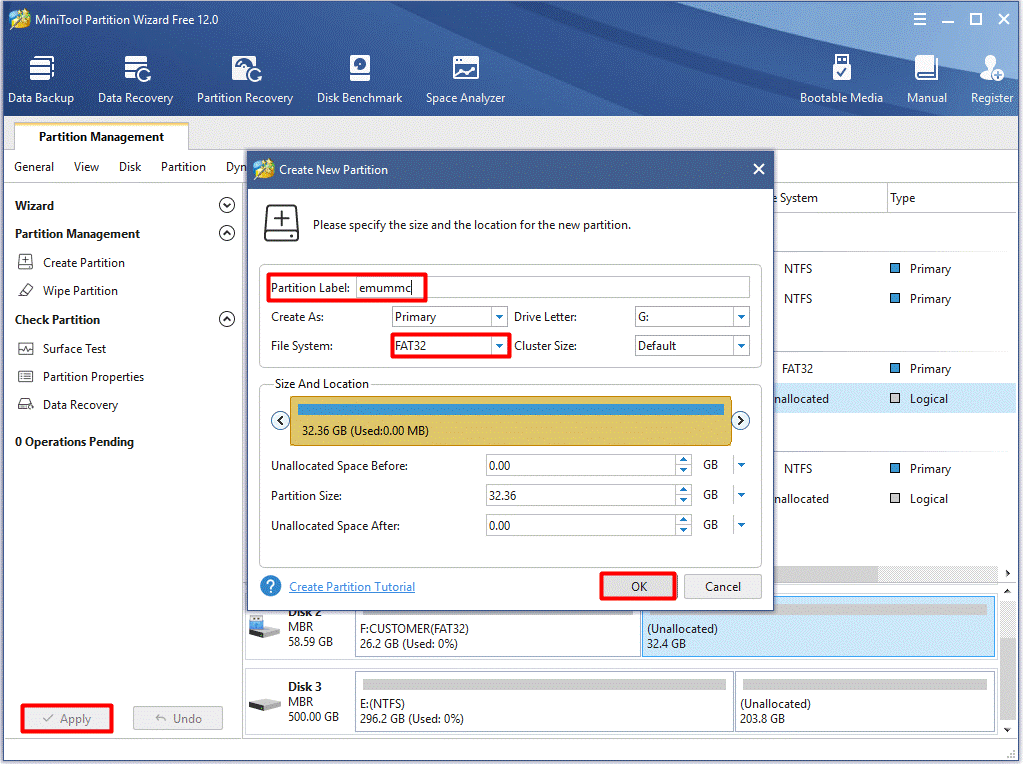
Step 2: You can set partition label, file system, partition size in the pop-up window. After that, click OK to save the changes. Finally, click the Apply button to carry out the operation.
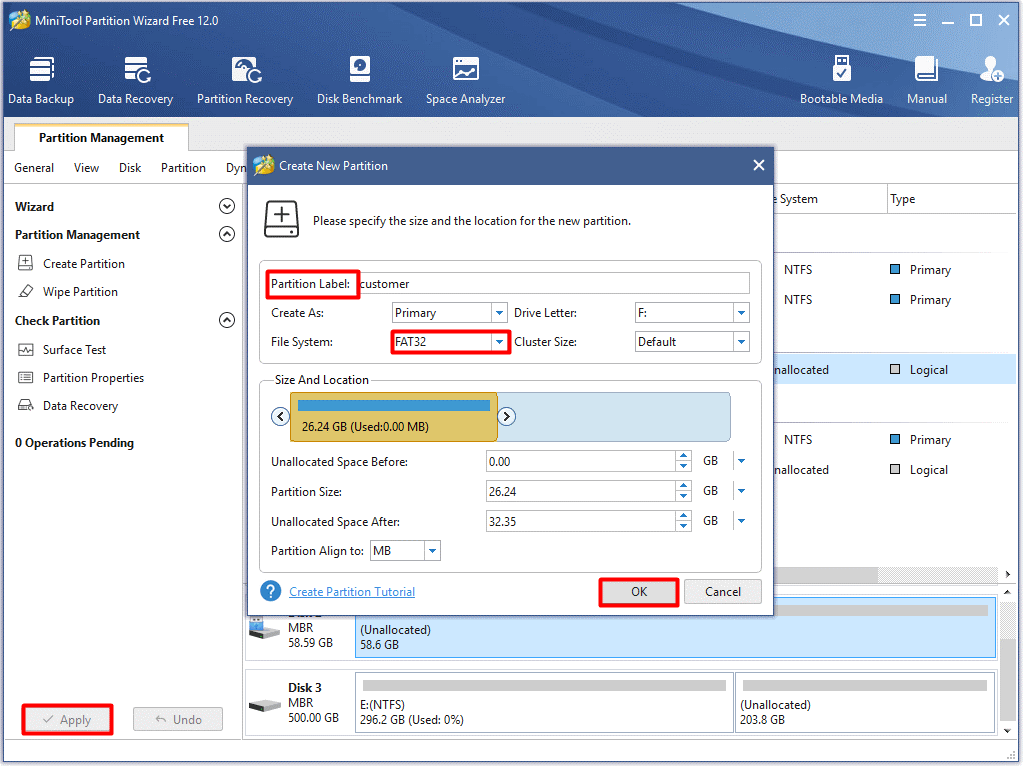
You are allowed to create either a FAT32 or exFAT file system partition. However, to avoid SD card corruptions and get maximum compatibility, it is recommended that you choose FAT32 file system.
To get more details about the differences between FAT32 and exFAT, please read this post: NTFS vs. FAT32 vs. exFAT – Difference and How to Format It
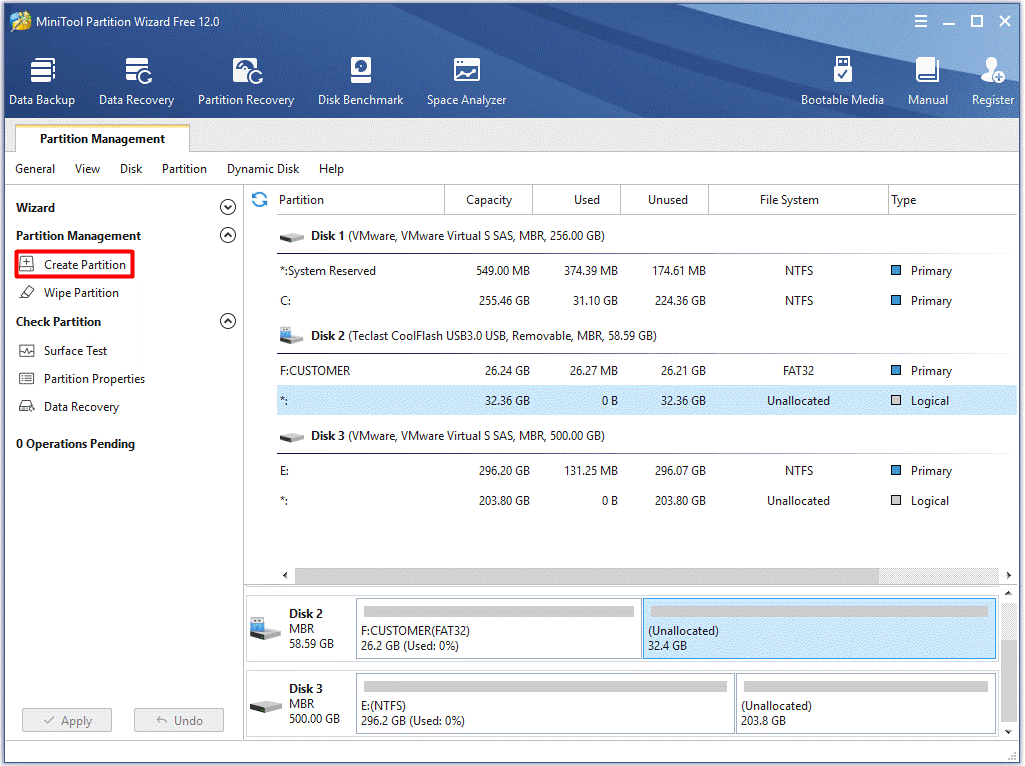
Step 3: After clicking on the unallocated space, click the Create option in the left action panel.
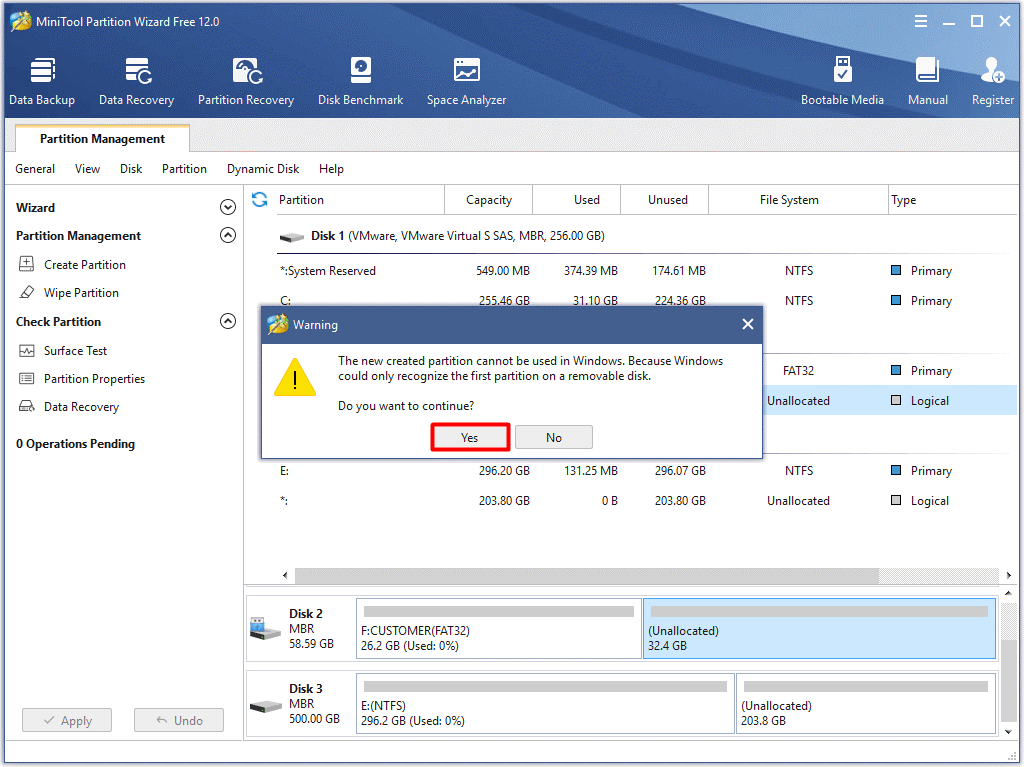
Step 4: Then you will receive a warning – the new created partition cannot be used on Windows. Here, you can skip the warning and click Yes.
Step 5: Here you should set the file system as FAT32 and rename the partition as emummc. After that, click OK and exit the current window. Click Apply on the main page to finish the operation.
The Guide for Installing a New Switch System
If you haven’t used an access format Micro SD card before or an internal switch, you may have to update the system and install an update that allows exFAT SD card to be accepted by Nintendo Switch. When it fails to work, you can also use the FAT 32 partition on the Micro SD card.
To do so, you need to turn off the Nintendo Switch and built it to the recovery mode. The mode allows you to run the exploit and access the Hekate to create a backup and load the first partition. To get the detailed information about updating Switch system, you can take this as your reference.
Phase 3: Enter the Homebrew SD Setup
Then you need to go to Homebrew SD setup. Grab the latest custom firmware files so that you can choose to use for cosmos. Here, you can see an available pre-configured SD card package.
Step 1: Select the Minimal option. It is enough to get atmosphere customer and hungry running with no extras, so you can customize it for yourself now.
Step 2: Scroll down the page to locate to Customize your CFWs. In this section, check the signature patches (allow NSP installations). Of course, you can get some other system modules too. If you just hover over the options, you can see what they mean and then you can decide whether to choose them.
Step 3: Drop down the page to the Select your Homebrew part, pick Checkpoint as your game files and back them up.
Step 4: Certainly, now you can also use some other files right here. Here, it is suggested that you use Hekate for payloads. Besides, Hekate is also needed to create the emuMMC partition. The last two that you will need is Tegra RCM, so go to select your extras tech RAR cm GUI.
You can actually inject faculty turn internal switch and start the MU MMC partition process by using this program. After selecting all the required files, click on the Download your zip option.
Step 5: After downloading all the required files, you can open them up. Here you can see payloads, PC and SD folders. Then copy these three files to your desktop.
Step 6: Go to the SD folder and copy all the files in the folder to your Micro SD card. Now, the Micro SD card is prepared and you are able to eject it from the PC.
Phase 4: Enter the Recovery Mode
To enter the recovery mode, you need to follow the steps below.
Step 1: Utilize Paper Clip or RCM Jig
Plug back the Micro SD card into the Nintendo Switch. Here you need either a paper clip or RCM jig to work. The RCM jig is highly recommended because it shortens the pins 1 and 10 together easily. If you have those pins connected and hold down the volume and the power button. Then you can access the recovery menu.
If you are in America, you can buy the RCM jig from here. If you are in U.K., click here to buy it.
Alternatively, you are able to bend a paper clip by yourself but that’s just really annoying to do, because you have to be very precise and it can actually damage the Nintendo Switch. It is recommended that you choose the RCM jig even though it is very expensive. You should type the RCM jig in the right side of Orphanage Nintendo switch.
Step 2: Use a USB Type-c Cable
Hold down the volume and the Power button and wait for a while. Your screen should stay black. Now, go to character Switch to your PC and then you can run the exploit.
Then you need to grab yourself a USB type-c cable and plug it in your Nintendo Switch connecting to your PC. The screen should still stay black and your Switch now in your recovery mode.
Step 3: Use Tegra RCM
1: Go back to your PC and open up the PC folder. Then click Tegra RCM and go into it.
2: In general, it will say RCM OK. If not, you need to divide GUI first and then click Settings to install driver.
Then, you are able to slack the payload by clicking the search icon. Go to the full curled payloads open it up. Then you can get the Heakate and open it up. After injecting this payload, you will boot your Switch int the hacky recovery menu. Then you can unplug the Switch from the PC.
Phase 5: Set up emuMMC/ EmuNAND
When you are inside Hackett or go to emuMMC, you can create an emuMMC partition.
You can one SD partition from the two newly created partitions. However, the first partition is preferred, it seems that it is faster. Then you can continue as the prompts required.
If you go ahead, it will copy the full internal storage to Micro SD card, together with custom firmware files that you’ve just placed on the card.
Run Switch in Official Firmware or Customer Firmware
You are able to run your Switch in both official firmware and customer firmware. After comparing the two situations, choose one that you preferred.
Run Switch in Official Firmware
You should be able to have the official firmware and accustomed framework completely separate from each other. Besides, you ought to run them both on a Nintendo Switch where you can use the official firmware to connect to the Internet and access the eShop and play two-player games online.
If you don’t want to run a customer firmware, and then make sure to size castle firmware emuMMC right here.
Besides, don’t select custom firmness system here, because that will load the customer only internal storage, which may get you banned. Then if you don’t want that, you have to restore your backup.
Run Switch in Customer Firmware
You will in the official firmware when turning on a Nintendo Switch normally. Then you can play your games online, access the eShop and play your favorite games using internal online services.
The custom firmware can be used for homebrew applications. Hence, the emuMMC partition creating process depends on the speed of your Micro SD card. The whole process may take you 10 to 30 minutes, so just be patient. If you run 11 battery just like a Nintendo switch and leave it alone for a while.
When the process finishes, close this menu. If you access the emuMMC partition and find it is disabled, you can change its status. If you see that the emuMMC NFC configuration is saved to the SD card, it should say that the MU MMC is enabled as the raw partition. This is an ideal result for you.
Next, close the page. You can launch both or stock system and from Haggerty or custom firmware.
If you want to access customer firmware on your microSD card, select customer firmware emuMMC. If you want to run completely stock nest like stock right here or paraffin internals which completely and empowered normally, you would have done before the hack.
In this case, you can let the customer firmware file on the emuMMC partition like this second option right here. It gives the cosmos splash screen that is very short.
If you see this dark atmosphere logo that means it’s loading the emuMMC partition, you can slide on the right joy con right here. Then wait to boot to the customer firmware.
Like the operation conducted in the official firmware, don’t connect to Internet, which may get you banned.
Conclusion
That’s the whole process to set up EmuMMC/EmuNAND on Nintendo Switch. If you are seeking answers to how to set up EmuMMC/EmuNAND on Atmosphere CFW, please read the text carefully.
All the steps and necessary tools are told in the post. You can buy them by clicking the given button or on the shopping website. If you have any questions or doubt about the EmuMMC/EmuNAND creating process or MiniTool software, please leave your words in the comment area or write an email to us via [email protected].
User Comments :