Resetting Windows 10 Start menu is a good way to fix issues with it. If you don’t want to lose Start menu layout while resetting it, read this post now! Here, MiniTool offers you steps to back up and reset Windows 10 Start menu.
Back up Start Menu Layout Before Resetting It
The Start Menu will be reset to the default configuration after you reset it. If necessary, you should back up your Start menu before resetting it. Besides, this operation involves changing the Windows Registry settings, so you’d better back up the Registry or create a restore point on your computer in advance.
With these steps, you can back up the Start menu layout via Registry Editor.
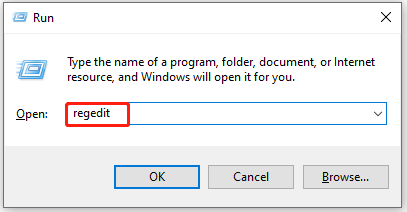
Step 1: Open the Run window by pressing Windows and R keys.
Step 2: Type regedit in the Run window and hit Enter.
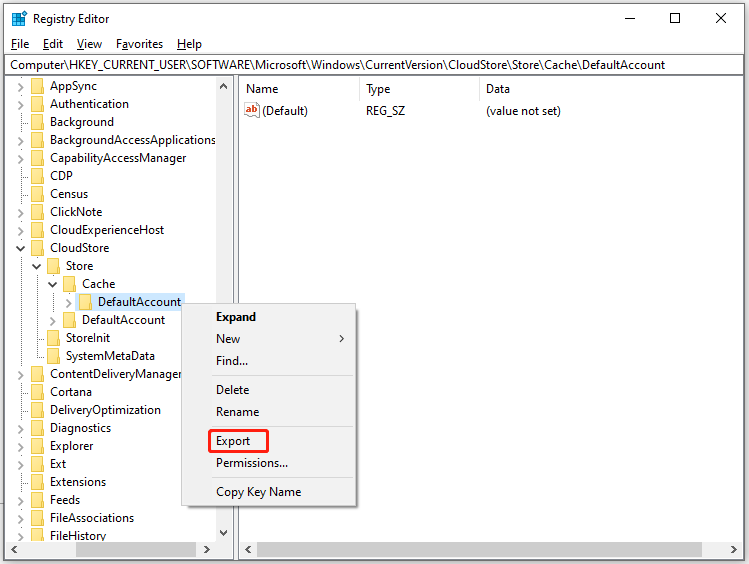
Step 3: Navigate to the destination by following the path below.
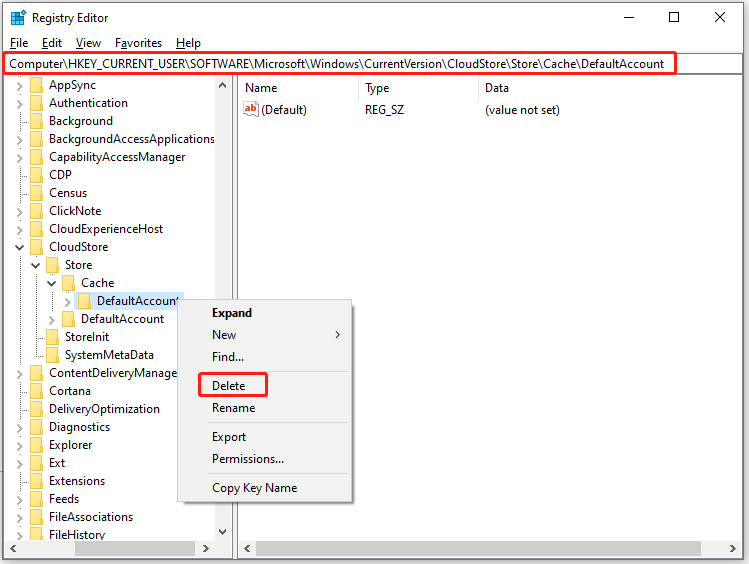
HKEY_Current_User > Software > Microsoft > Windows > CurrentVersion > CloudStore > Store > Cache > DefaultAccount
Step 4: Right-click DefaultAccount and click Export.
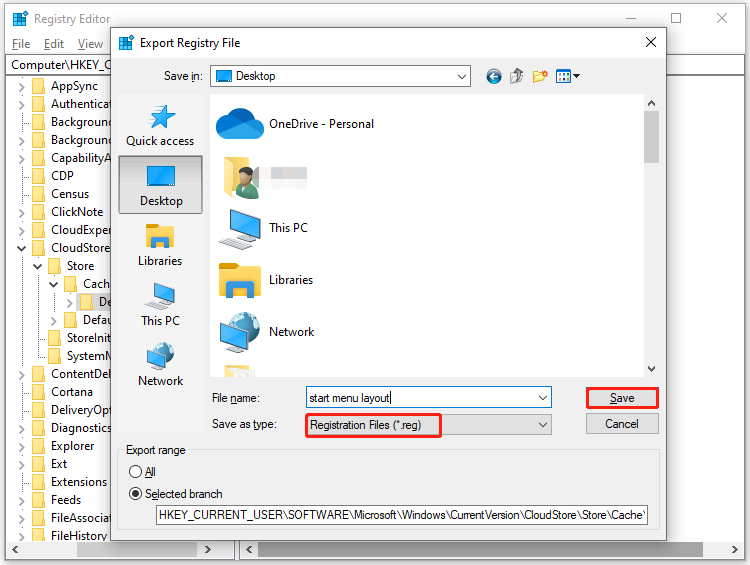
Step 5: In the pop-up window, choose a place for the saved file, type a name for the file, and set the type as .reg. Then click Save to confirm the operation.
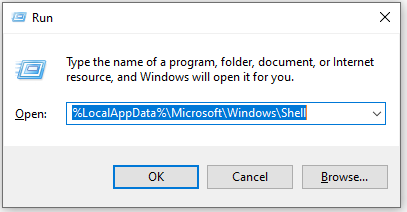
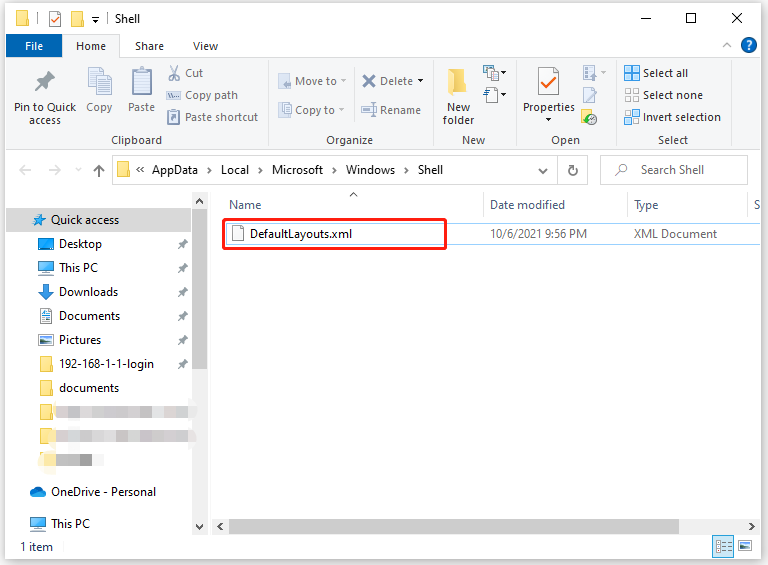
Step 6: Open the Run window again, copy and paste the path below, and then press Enter.
%LocalAppData%MicrosoftWindowsShell
Step 7: Copy the DefaultLayouts.xml file in the prompted window to the same folder where you store the .reg file. Then the Start menu layout backup process finishes.
After you back up the Start menu, you can let Windows 10 reset Start menu now! There are two methods to restore Start menu Windows 10. Pick one as you like.

Reset Windows 10 Start Menu via Registry Editor
To restore Start menu Windows 10 via Registry Editor, simply follow the steps below.
Step 1: Navigate to DefaultAccount like what you do above.
Step 2: Right-click DefaultAccount in the left pane and then click Delete from the context menu to remove it.
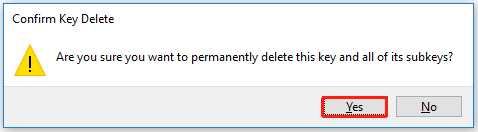
Step 3: In the prompted window, click Yes to confirm the operation.
Step 4: Exit Registry Editor and restart File Explorer to ensure that changes are made to the System Registry without restarting the PC.
Step 5: You will find that all the tiles have been reset to their default settings after you open the Start menu again.

Reset Windows 10 Start Menu via Local User Account
As Microsoft has deprecated the TileDataLayer model in Windows 10 1703 Creators Update, you can only reset Start menu Windows 10 via Local User Account if your system version is older than that. Before starting the process, create a new local account and enable the built-in Administrator account on your computer.
After that, follow the steps below to reset Start menu Windows 10.
Step 1: Sign in to the newly created local account to create its profile. After that, sign out from the new local account.
Step 2: Sign into the Administrator account with your login information.
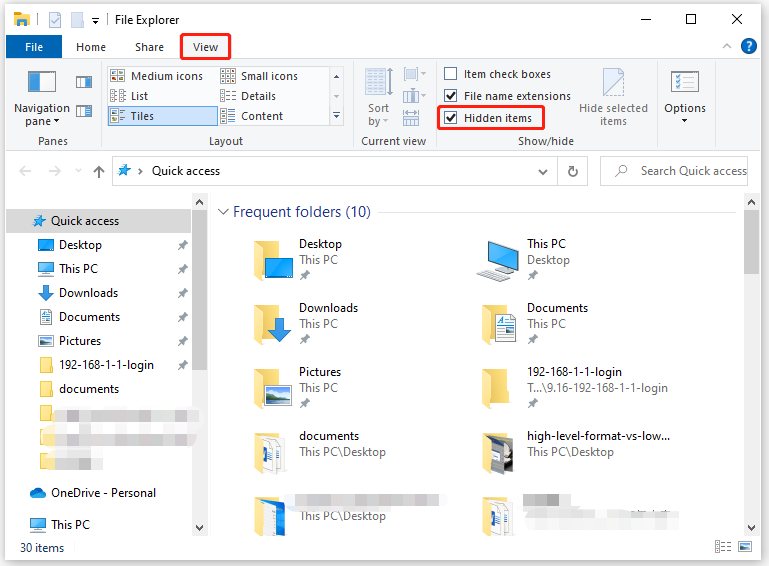
Step 3: Press Windows and E keys to open File Explorer.
Step 4: Navigate to the View tab and check Hidden items to show hidden files and folders.
Step 5: Then follow the path below to go to the destination.
You should replace “BROKEN-START-USER-NAME” with the user account’s name whose Start menu works improperly.
C:UsersBROKEN-START-USER-NAMEAppDataLocalTileDataLayer
Step 6: Right-click on the Database folder that contains all the layout setting of Start menu. Then choose Rename.
Step 7: Rename the folder as Database.bak and press Enter.
Step 8: Navigate to the TileDataLayer folder in the newly created account with the path used above.
Step 9: Open the TileDataLayer folder, and then right-click the Database folder and choose Copy.
Step 10: Paste the folder to the place where the Database.bak folder locates.
Step 11: Sign out of the Administrator account and sign in to your original user account.
Likewise, if you want to reset Windows 10 without losing data, you should back up Windows to a safe place first. To do that, you just need to use the Copy Disk or Migrate OS to SSD/HDD feature of MiniTool Partition Wizard. Actually, you’d better make a backup for your computer for the sake of safety.
MiniTool Partition Wizard DemoClick to Download100%Clean & Safe
Get this software now and then use it to back up your PC!
User Comments :