Kindle provides great convenience for users. It can be used to browse, download, and buy numerous e-books. However, a lot of users complain about Kindle not showing up on PC. Are you also struggling to resolve it? Today, MiniTool will share you with many effective troubleshooting methods.
Preliminary Fixes
Kindle doesn’t show up on PC after it’s upgraded to the latest build. The Kindle connectivity issue can be caused by various factors such as USB cable, incorrect connection, corrupt drivers, etc. When you encounter Kindle not showing up on PC, you can try the following preliminary fixes first.
- Use a different USB cable or computer. Usually, Kindle is connected to the Windows PC via a USB cable. Once the USB cable gets damaged, you may encounter Kindle fire not showing up on PC. To check if functionality, you can try connecting the USB cable to a different device. If your PC can recognize the device, the USB cable is functional. Also, you can connect the Kindle to a different computer.
- Charge your Kindle for a longer time. Some users reported that they fixed Kindle not showing up on Windows 10 by charging for a longer time. Here you’d better charge it for more than 30 minutes and then hard reset Kindle.
- Connect Kindle as camera. When your Kindle fire not showing up on PC, you can try connecting it to the PC as a camera. To do so, plug the device to your computer, and then open the Notification bar, select the Connection Options, and set the Connect as a camera
If the above simple fixes can help you fix the Kindle not showing up on PC issue, don worry. Here are some other useful tips for you.
Fix 1. Perform a Hard Reset
Hard resetting Kindle enables users to clear the memory of the device and clean install the operating system, which can help fix the Kindle charging but not recognized issue. To hard reset your Kindle, you can follow the steps below:
Step 1. Plug your Kindle to the computer.
Step 2. Hold the Power button on your Kindle for about 40 seconds and the Kindle will restart automatically.
Step 3. When your device restarts, release the Power button. If your Kindle can’t restart automatically, press the Power button to turn it on.
Fix 2. Install Kindle as an MTP Device
If your Kindle is not correctly installed, Windows can’t detect the type of the device and installing the default driver for. To fix Kindle not showing up on PC, you can try installing the Kindle as an MTP device.
Step 1. Right-click the Start menu and select Device Manager from the context menu.
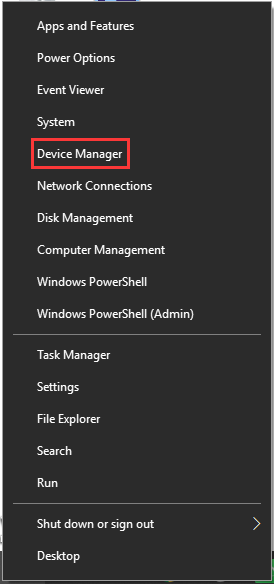
Step 2. Expand the Portable device category in the Device Manager window, and then right-click the Kindle driver and select Update Driver.
Step 3. Select the second option Browse my computer for driver software.
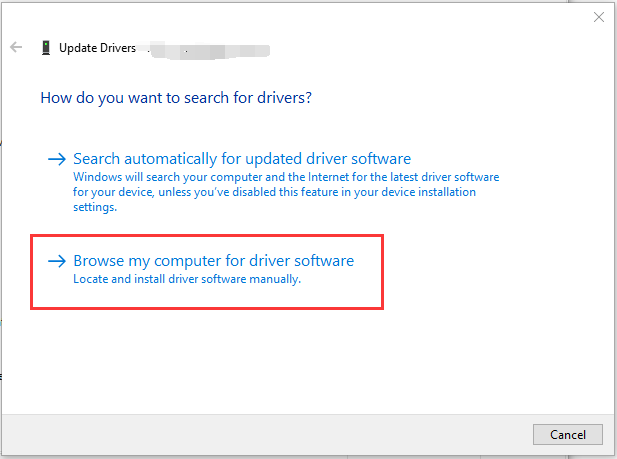
Step 4. Click on Let me pick from a list of available drivers for my computer in the pop-up window.
Step 5. Select the Portable Devices option and select the MTP USB Device from the listed drivers, click on Next.
Step 6. Click on Yes in the Update Driver warning window. Then Windows will install the compatible device driver for your Kindle.
Now, you can restart your computer and see if Kindle not showing up on Windows 10 has been fixed.
Fix 3. Use Calibre to Connect Kindle
If Kindle doesn’t show up on PC by using the USB cable, you can try using Calibre to connect Kindle to your PC. To use Calibre, you can turn off the PC and Kindle first. Then unplug all the cables attached. Once your computer is turned back on, open Calibre and connect Kindle to PC. After that, you can turn on Kindle and check if the Kindle fire not showing up on PC issue still persists.
Fix 4. Enable ADB
In addition to the above methods, you can try enabling the Android Debug Bridge (ADB) feature on Kindle. If this feature has been activated on your device, you can disable it first and see if it can fix the Kindle not showing up on PC issue. If not, you can enable it again. To do so, you can navigate to the Settings and select the Device, and then turn ADB on or off.
Fix 5. Disable the USB Selective Suspend Feature
The USB selective suspend feature allows the hub driver to suspend an individual port without affecting other ports on the hub. It can help conserve power and prolong battery life. However, this feature can cause some connectivity issues.
So, you can try disabling the feature. Here’s how:
Step 1. Open your Control Panel, and then change the View by type to Category and select the Hardware and Sound option.
Step 2. Click on Power Options, and then navigate to the Power Plan that you have selected and click on Change plan settings.
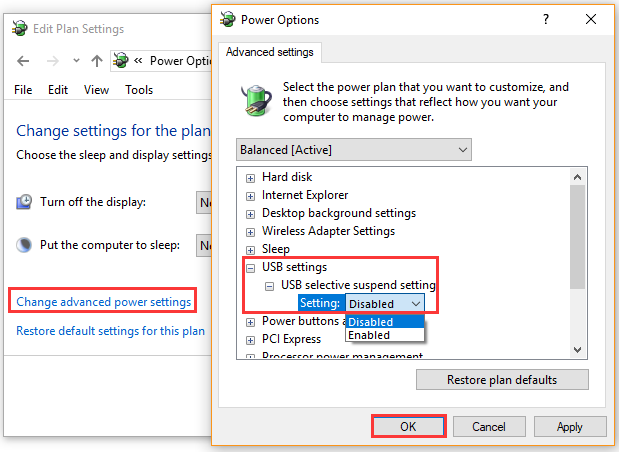
Step 3. Click on Change advanced power settings and expand the USB Settings category.
Step 4. Click on USB selective suspend setting and select Disabled from the drop-down menu.
Step 5. Click on OK and Apply to execute the changes.

User Comments :