Are you still confused by the keyboard not working in BIOS issue? Well, you can enable keyboard in BIOS setup with given methods. And then try the troubleshooting methods provided by MiniTool to get the keyboard working again in BIOS.
Causes for Keyboard Not Working in BIOS Setup
Multiple factors can lead to keyboard not working in BIOS setup. For instance, keyboard drivers are not initialized/recognized, USB ports not initialized, keyboard drivers not supported on BIOS, or the USB port is faulty.
Among various causes, keyboard not enabled is a primary one. When you receive the laptop keyboard not working in BIOS error, you can check if the keyboard is enabled first.
Ways to Enable Keyboards in BIOS
Here are 4 ways to enable keyboard in BIOS. You can have a try!
Way 1: Enable USB Support
When the integrated peripherals/default peripherals are not enabled in BIOS, keyboard doesn’t work in BIOS. If so, you need to enable USB support with these steps.
Step 1: Restart your computer and then keep holding a BIOS key while the loading screen appears to enter the BIOS setup.
Step 2: After entering the BIOS setup, navigate to the Advanced tab by moving your mouse. Then enable the Legacy USB Support option.
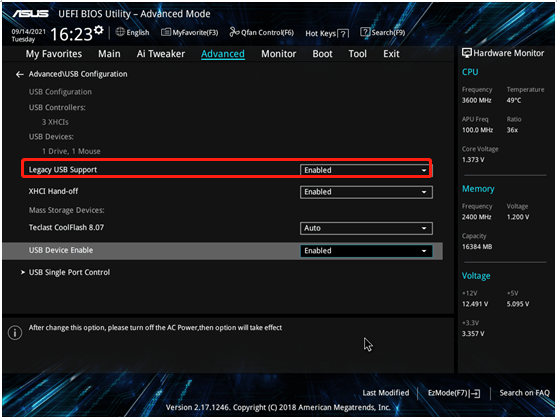
Step 3: Click on the Save changes & Reset option after clicking Exit.

Way 2: Disable USB 3.0 on Boot
USB 3.0 is used during boot on newer motherboards, which causes some keyboards not working properly. In this case, disable USB 3.0.
Step 1: Enter the BIOS setup of your computer.
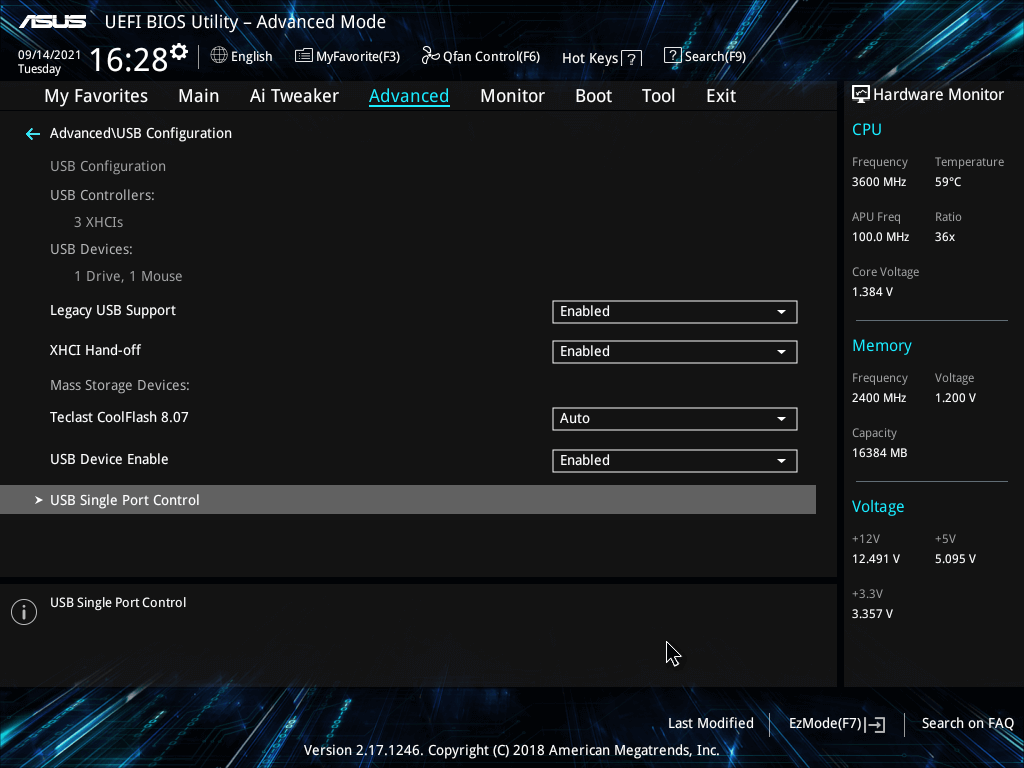
Step 2: Navigate to the Advanced tab and then click on USB Single Port Control.
Step 3: Find USB 3.0 and pick Disabled option from its drop-down menu.
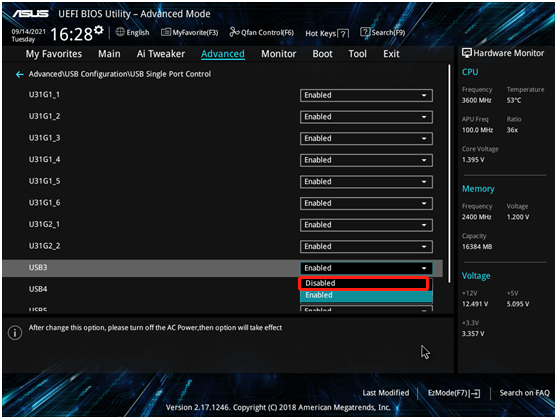
Step 4: Likewise, save the changes and exit the operation.
Way 3: Disable Fast Boot
Fast Boot causes USB devices to load after OS boot and not before the BIOS loads. Hence, if the Fast Boot option is enabled, you may encounter the laptop keyboard not working in BIOS issue. For that, you need to disable Fast Boot.
Here are detailed steps.
Step 1: Likewise, enter BIOS first.
Step 2: Move to the Boot tab.
Step 3: Choose Disabled from the drop-down menu of Fast Boot.
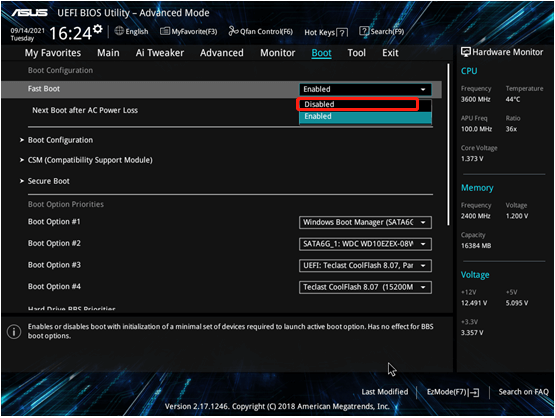
Step 4: Save the changes and turn off the computer. Then enter the BIOS again.
Way 4: Clear CMOS
Clearing CMOS means that your BIOS will be reset to default settings, which may enable your keyboard to work properly. To get more details, you can refer to this tutorial: How to Clear CMOS? Focus on 2 Ways
Solutions to Keyboard Not Working in BIOS
As mentioned earlier, keyboard doesn’t work in BIOS due to many factors. If you have enabled keyboard with above methods but the keyboard not working in BIOS issue still persists, you can fix it with the following approaches.
Solution 1: Restart the Computer
A simple method to troubleshoot the keyboard not working in BIOS issue is to restart the computer. To do that, you just need to click on the Windows icon on the desktop and then click the Power icon. Finally, choose the Restart option.
Solution 2: Modify Keyboard Settings
Though some software settings are intended to be beneficial, they sometimes can sparkle the keyboard not working in BIOS setup issue. To be specific, if you find that keyboard’s repeat delay setting is too short, you can fix it with these steps.
Step 1: Open Control Panel.
Step 2: Find and tap Keyboard in the Control Panel window.
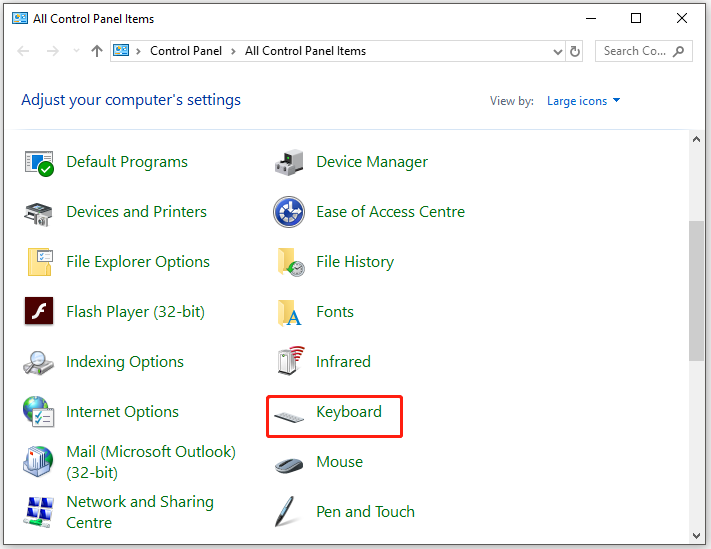
Step 3: Click the link in the prompted window.

Step 4: Then follow the on-screen instruction to finish the process.
Solution 3: Reinstall Keyboard Driver
You can also try reinstalling keyboard driver to repair the keyboard not working in BIOS error. Here’s the tutorial.
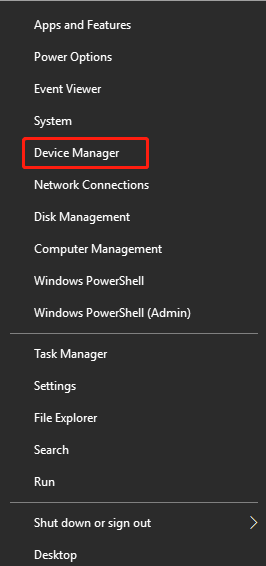
Step 1: Right-click on the Windows icon and choose Device Manager.
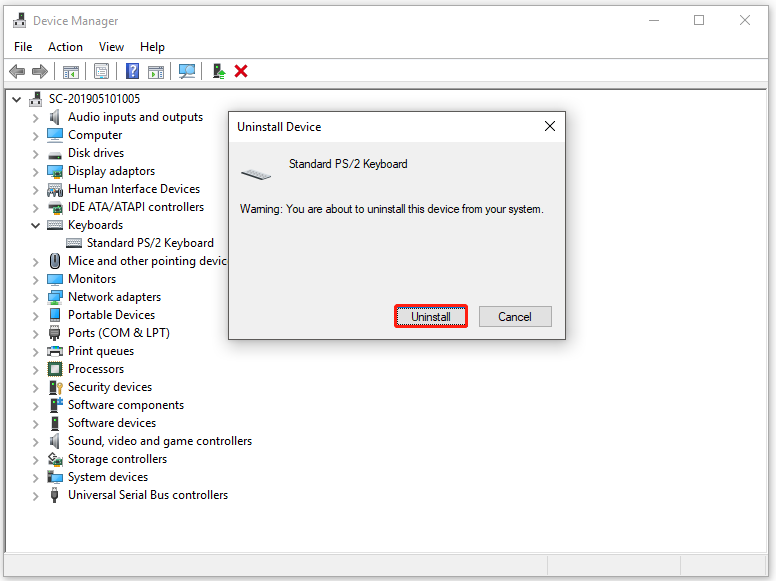
Step 2: Double-click Keyboards to expand it. Right-click on your keyboard driver from the expanded list and click Uninstall device.

Step 3: In the next window, click Uninstall to confirm the operation.
Step 4: Then reboot your computer. When the PC boots again, Windows will automatically grab the generic drivers for your keyboard. Then keyboard will work properly. If not, visit the laptop manufacturer’s support page and install the latest drivers for the keyboard.
User Comments :