Most personal PCs can work well through an integrated graphics card. Sometimes, however, you may need to use a dedicated graphics card for gaming or video editing. Here comes a new question: how to use dedicated graphics card instead of integrated. Let’s keep reading the following contents.
![[Tutorial] How to Download & Install Windows 10 Updates Manually](https://images.minitool.com/partitionwizard.com/images/uploads/2022/01/download-windows-10-updates-manually-thumbnail.jpg)
What’s Difference Between Integrated and Dedicated Graphics Card
The integrated graphics card is also known as a shared graphics card that shares memory with the main system memory. So, the integrated card needs the support of system memory to generate graphics. The dedicated graphics card is also called a video card/discrete graphics card which is a piece of hardware used to manage a computer’s graphics performance. It doesn’t share system memory and is easy to upgrade.
Compared with Integrated graphics, a dedicated graphics card has better graphics performance. That’s why so many people want to switch graphic card to dedicated GPU. However, many people don’t know how to use dedicated graphics card instead of integrated. Don’ worry. We will walk you through detailed steps.
How to Use Dedicated Graphics Card Instead of Integrated
How to change from integrated graphics to graphic card? Here we provide the guide based on the most common dedicated graphics cards: Intel, NVidia, and AMD. Before you proceed with the following operation, make sure you have installed the dedicated graphics card properly.
# 1. Switch Graphic Card for Intel
First of all, we will show you how to change which graphics card is used on Intel. Let’s follow the steps below carefully.
Step 1. Right-click on your desktop and select Graphics Properties or Intel Graphics Settings.
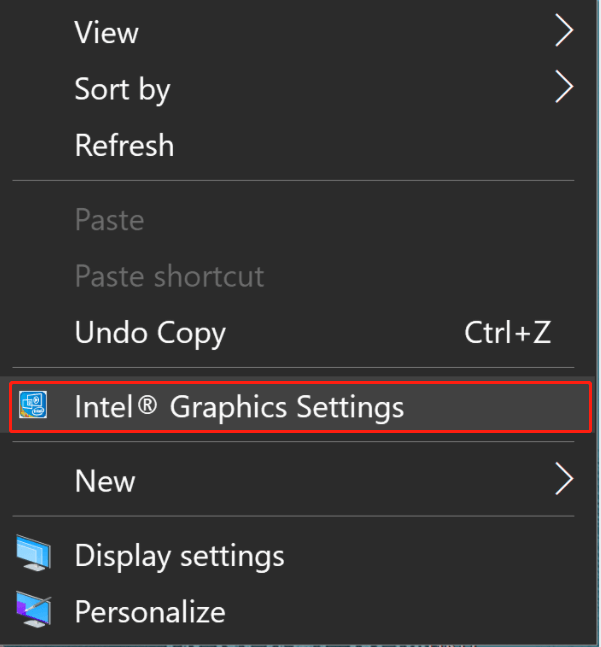
Step 2. In the Intel Graphics and Media Control Panel window, select Advanced Mode and click on OK.
Step 3. Navigate to the 3D section from the left pane and set the 3D Preference to Performance.
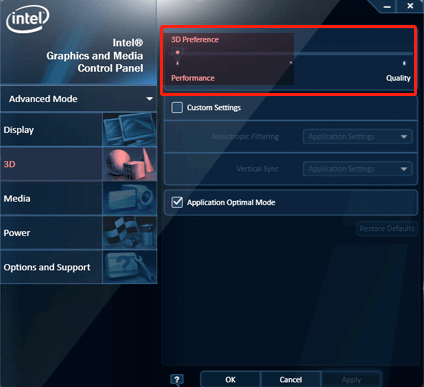
–image from support.serato
Step 4. Go to the Power section and set the Power Plans to Maximum Performance.
Step 5. Click on OK to save these changes and close the Control Panel.
Step 6. Right-click your desktop again and select the control panel for your dedicated GPU.
# 2. Switch Graphic Card for NVidia
In this part, we will show you how to switch from integrated graphics to graphics card NVidia.
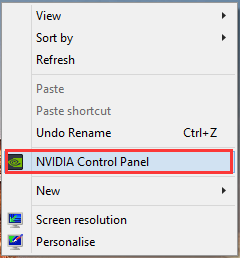
Step 1. Right-click on your desktop and select NVidia Control Panel.
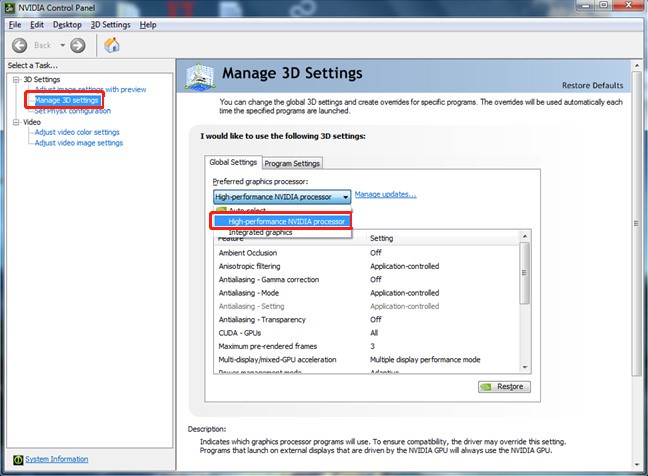
Step 2. Expand the 3D Settings category from the left vertical panel and select Manage 3D Settings.
Step 3. In the Manage 3D Settings panel, go to the Global Settings tab and select High-performance NVidia processor as your preferred graphics processor.
Step 4. Go to the Program Settings tab and select the program you want to use the dedicated graphics card for from the drop-down menu. Similarly, select the High-performance NVIDIA processor as the preferred graphics processor for this program.
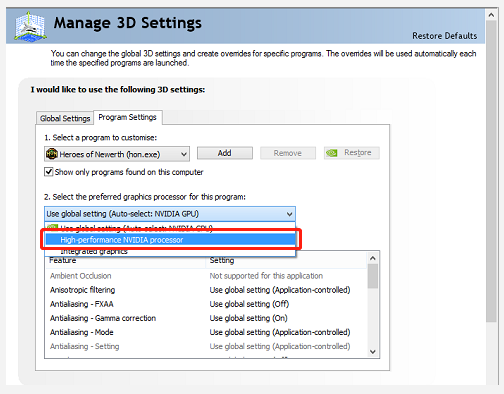
Step 5. Click on Apply to save these changes.
# 3. Switch Graphic Card for AMD
If you are using an ATI/AMD Radeon graphics card, you can change graphic card laptop via the AMD Catalyst Control Center panel. Since there is a big variation in different versions of the program, we provide a general guideline for you.
Step 1. Right-click the empty space on your desktop and choose the AMD Catalyst Control Center and go to the Graphics section.
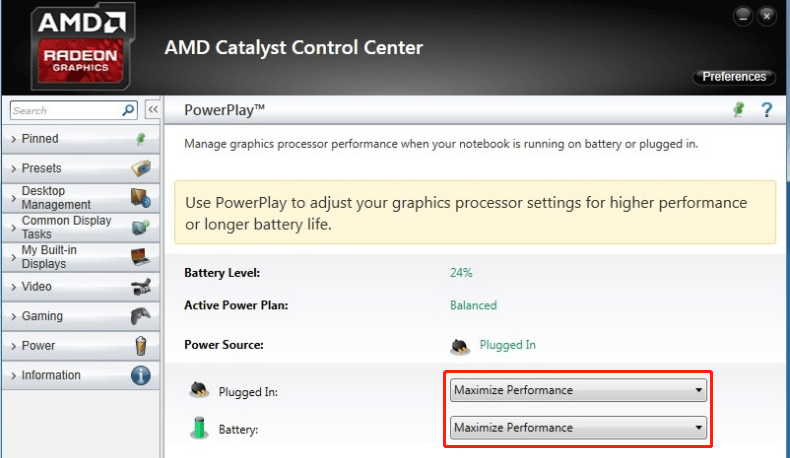
Step 2. Select Power from the left pane, and then set the Plugged In type and Battery to Maximize Performance in the PowerPlay panel.
Step 3. Expand the Gaming category and select 3D Application Settings from the left panel, and then move the slider across to Performance to get optimal performance.
Step 4. Click on Apply to save the changes.
How to use dedicated graphics card instead of integrated? The top 3 cases have been discussed in this post. Now, you can choose one based on your situation.
![How to Change Default Graphics Card Windows 10 [Full Guide]](https://images.minitool.com/partitionwizard.com/images/uploads/2020/09/how-to-change-default-graphics-card-win10-thumbnail.jpg)
User Comments :