The Settings application in Windows serves as the central hub for customizing the operating system. If something goes wrong with your PC, you can try to reset the Settings app in Windows 10/11 can sometimes fix the problem. Please read this article from MiniTool Partition Wizard to know more details.
The Settings application in Windows serves as the central hub for customizing the operating system. Here you can perform any customization you want, such as changing system settings, managing user accounts, enhancing your privacy, linking your phone with your PC, changing language, time, network, and internet settings, and even updating your operating system.
Microsoft allows you to reset the Settings app, but it’s not easily accessible. In this post, we’ll show you how to reset the settings to default to get it working.
When Should You Reset the Settings App?
If the Settings app frequently crashes or refuses to open, or if some features in the app don’t work, you should reset the Settings app.
Just like resetting any other app, when you reset the Settings app, it deletes various settings and restores them to their defaults. This can fix bugs and other issues caused by your custom settings.
How to Reset the Settings App?
Here are three ways to reset the Settings app. You can do this by resetting the Settings app in a few easy steps.
Reset the Settings App via the Start Menu
To reset the Settings app in Windows 10/11 to default, follow these steps:
Step 1: Open the Start menu and search for Settings.
Step 2: Right-click the app in the result and select App settings.
Step 3: In the Settings window, scroll down to the Reset button and click Reset.
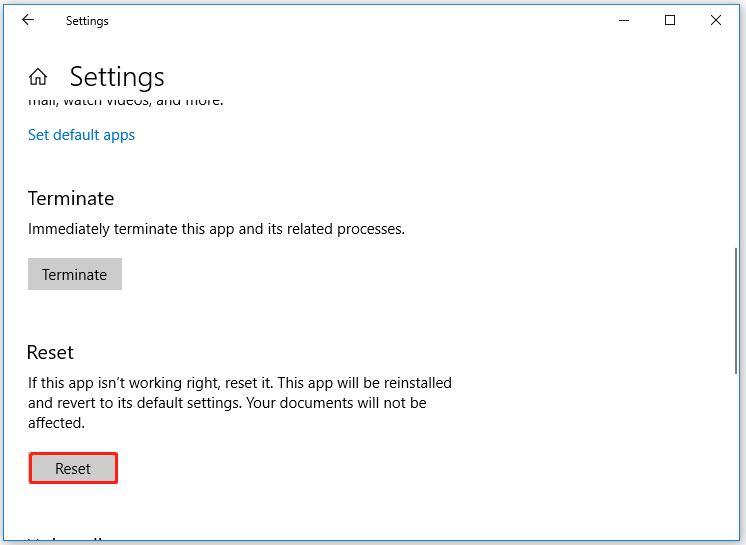
When you press the reset button, it will permanently delete app data on this device, including your preferences and login details.
Reset the Settings App via PowerShell
You can also run a command in Windows PowerShell to reset the Settings app. But to do this, you must be running Windows 10 build 20175 or later. In other words, you need Windows 10 version 21H2 or later.
To check your computer version, read this article: What Version of Windows Do I Have? Check Version and Build Number
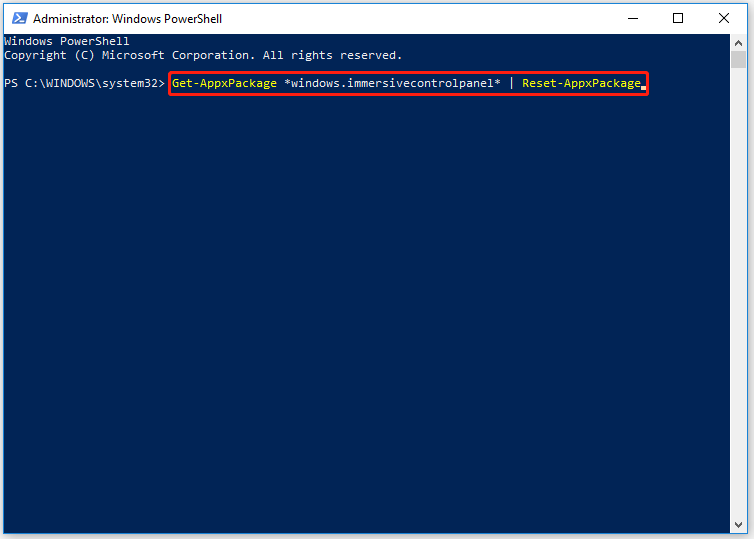
Step 1: Press Win + X on your keyboard and select Windows PowerShell (Admin) from the popup list.
Step 2: In the PowerShell window, copy-paste this command and press Enter:
Get-AppxPackage *windows.immersivecontrolpanel* | Reset-AppxPackage
Reset the Settings App via Command Prompt
You can also reset the Settings app using Command Prompt. However, you will need to run Windows 10 build 20175 or later.
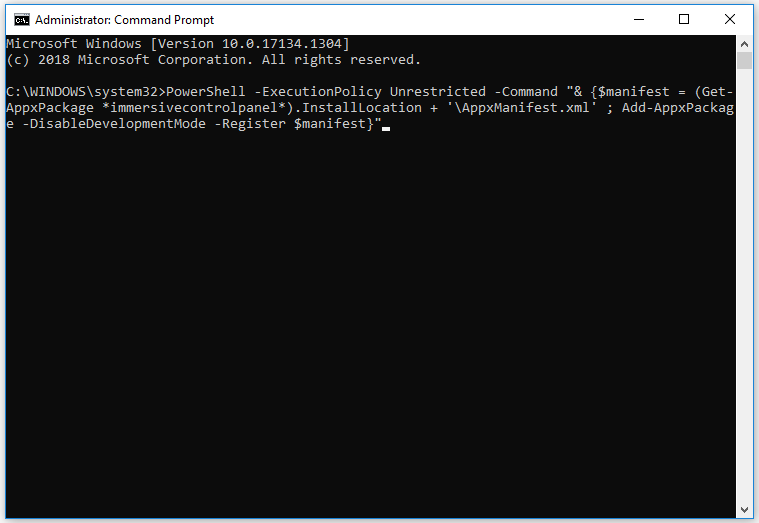
Step 1: Open the Start menu and search for Command Prompt.
Step 2: Right-click it and select Run as administrator. Then click Yes in the User Account Control prompt.
Step 3: In the Command Prompt window, copy-paste this command and press Enter:
PowerShell -ExecutionPolicy Unrestricted -Command “& {$manifest = (Get-AppxPackage *immersivecontrolpanel*).InstallLocation + ‘AppxManifest.xml’ ; Add-AppxPackage -DisableDevelopmentMode -Register $manifest}”
![[Solved] Set Time Zone Automatically Greyed Out in Windows 11](https://images.minitool.com/partitionwizard.com/images/uploads/2022/10/set-time-zone-automatically-greyed-out-in-win-11-thumbnail.png)
Bottom Line
In conclusion, the above content introduces you to how to reset the Settings app in Windows 10/11. Hope it helps you. If you have any questions or suggestions, welcome to leave a message below. Or write your idea in an email and we will try to answer them as soon as possible.
About The Author

Position: Columnist
Vega enjoys helping people with computer problems, including disk management, data recovery, data backup, and more. She is constantly expanding her knowledge in related fields. And she will continue to bring more easy-to-understand professional articles to help people solve various problems on the PC.
User Comments :