Since the release of version 2.0.0, Minecraft offers the ability to adjust RAM in the Minecraft Launcher, which makes the process of allocating more RAM to Minecraft become simple. The following will show you how to allocate more RAM to Minecraft. Before I show you the detailed steps, please update your Minecraft to the latest version first.
MiniTool System Booster TrialClick to Download100%Clean & Safe
After that, please follow the steps below.
How to Allocate More RAM to Minecraft
Here are two methods for you if you don’t know how to allocate more RAM to Minecraft.
Method 1. Allocate More RAM in Minecraft Launcher
Step 1. Check the available RAM on your PC
- Right click Windows Start menu and choose Settings.
- In the setting window, choose System.
- Locate to the About section and note down the number of Installed RAM under Device specifications.

Step 2. Toggle on the JVM arguments switch
- Start the Minecraft Launcher by double-clicking the Minecraft icon on your PC.
- Select the Launch Options tab.
- Make sure the Advanced settings is turned on.
- Select the profile you’d like to edit.
- Make sure that the JVM arguments are turned on.
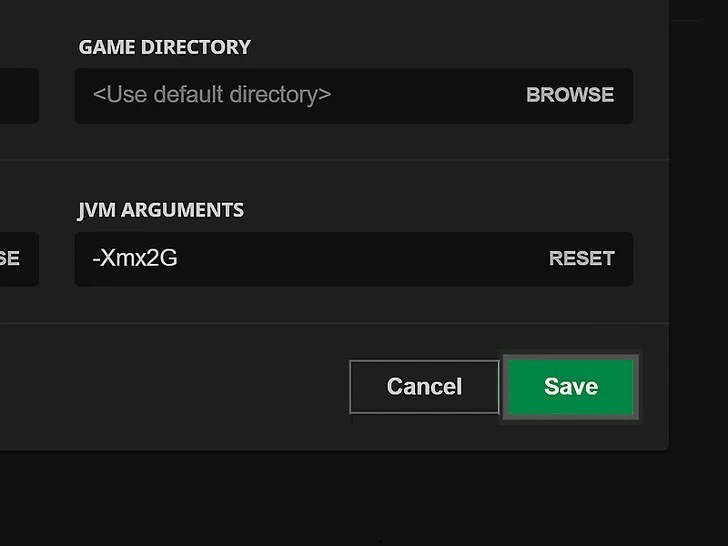
Step 3. Adjust RAM for Minecraft
- Then you should see a line of text like -Xmx1G. Change the 1 to the number of gigabytes of RAM that you’d like to allocate to Minecraft.
- At last, click the Save button to save the change.
After that, Minecraft will use your allocated amount of RAM for the profile you selected.

Mehtod 2. Allocate More RAM in a Minecraft Server
This part will show you how to allocate more RAM to Minecraft server.
Step 1. Check the RAM on your PC
- Right click Windows Start menu and choose Settings.
- In the setting window, choose System.
- Locate to the About section and note down the number of Installed RAM under Device specifications.
Step 2. Open Minecraft server directory
This folder contains Minecraft_server.exe file that you launch the Minecraft server with. You can search for “Minecraft_server” on your PC to find its location.
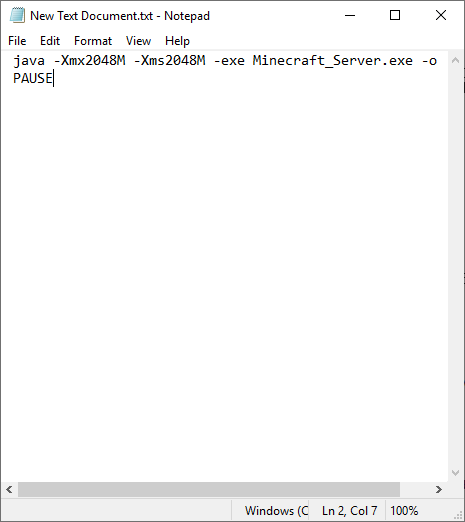
Step 3. Allocate more RAM by creating a new document
1. Create a new text document in the server directory.
2. Paste the following code to the new text document.
java -Xmx####M -Xms####M -exe Minecraft_Server.exe -o true
PAUSE
3. Click File and select Save As…. Change the file extension from “.txt” to “.bat”. This requires you to enable file extensions on Windows if they are not shown up.

4. The file you create will be the new launcher for your Minecraft server. Run the new file to start Minecraft and it will automatically allocate a specified amount of RAM.
Conclusion
After reading this post, you should know how to allocate more RAM to Minecraft. If you need to allocate more RAM to Minecraft, you can follow the steps in this post.
User Comments :