File Explorer (also Windows Explorer) is the file management utility in your Windows computer. It offers a search box to help you find specific files in the current folder and even in the computer. You just need to input the keyword and press Enter. This is a rather useful tool when you forget the specific location of the file or folder, or there are too many files in the selected folder.
However, many users complain that there’s no items match the search when they use the search utility in File Explorer. If you are bothered by the same problem, you are at the right place! Here are 10 feasible and easy ways to help you fix File Explorer search not working.
How to Fix File Explorer Search Not Working
- Restart File Explorer
- Make sure Windows Search Service is enabled
- Change the search options
- Allow Files to Have Contents Indexed
- Rebuild search index
- Run Search and Indexing Troubleshooting
- Add system permission to a file/folder
- Restart and re-register your Cortana
- Repair corrupted system files
- Create a new administrator user account
Fix 1: Restart File Explorer
If you encounter File Explorer search not responding, the first thing you can do is restarting your File Explorer.
To do that, just press Windows + X and select Task Manager from the menu. In the pop-up windows, find and select Windows Explorer process, and click Restart button.
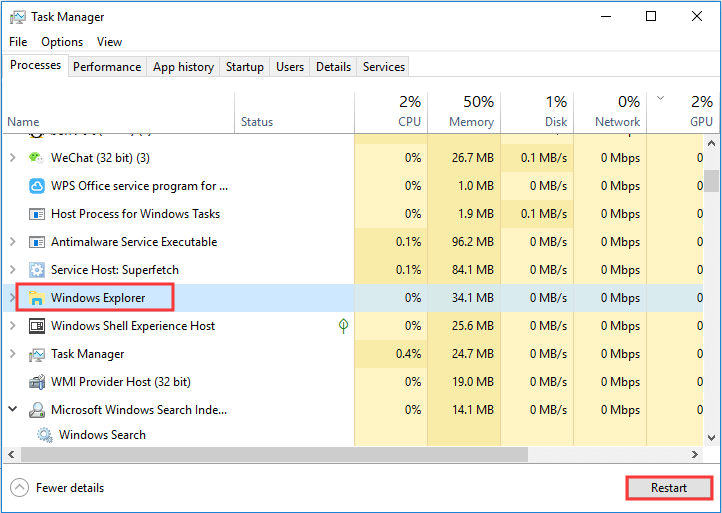
Besides, some users have fixed the issue by restart the Windows process SearchUI.exe that controls the search element. Just go to Details tab in Task Manager, right-click the process and click End task. Then, this process will be restarted automatically.
Now, you can search files again to see if File Explorer search not working is fixed.
Fix 2: Make Sure Windows Search Service Is Enabled
The problem might appear if the Windows Search service is disabled. So, you need to make sure the service is enabled and here’s how to do it.
Step 1: Press Windows + R to open Run window.
Step 2: Input services.msc in the box and click OK to open the Services app.
Step 3: Locate Windows Search service in the Name column. Double-click the service to open its Properties window.
Step 4: Make sure the Startup type is Automatic. If not, choose Automatic from the drop-down menu. The Service status should be Running. Otherwise, click Start button to run the service.
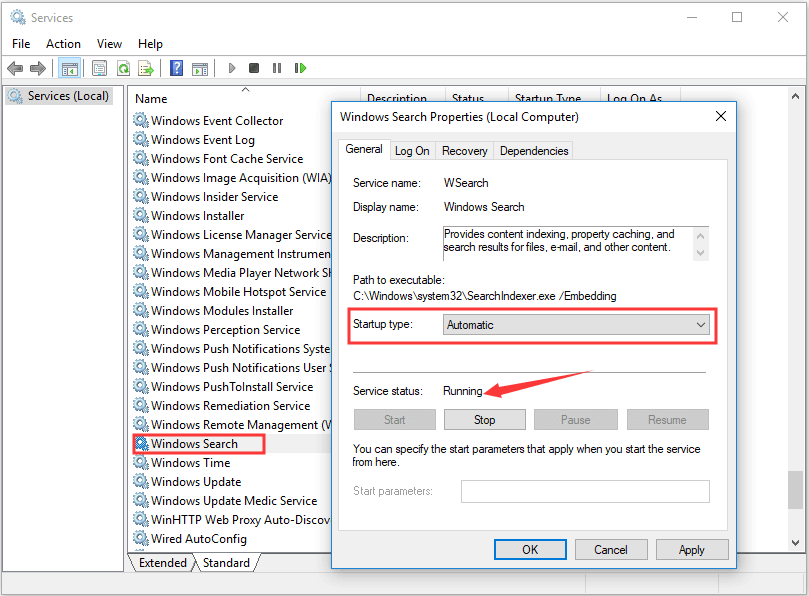
Step 5: Click Apply and OK to save the changes.
Now, you can check if the problem of File Explorer search not working is resolved.
Fix 3: Change the Search Options
If you cannot find your files or folders by searching in File Explorer, perhaps the search options are not set properly. Just follow the steps below to make changes for it.
Step 1: Press Windows + E to open your File Explorer.
Step 2: Click View tab in the upper tool bar.
Step 3: Choose Options to change folder and search options.
Step 4: In the Folder Options window, switch to Search tab and check Always search file names and contents option.
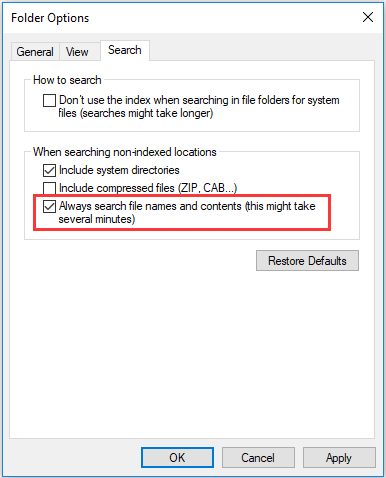
Step 5: Click Apply and OK button.
Then, restart your computer to take effect the changes. This method works for most of the uses who are facing the problem. But it fails to fix the issue for you, try the next solution.
Fix 4: Allow Files to Have Contents Indexed
Sometimes, there might be no search results because the involved drive doesn’t allow indexing file contents. If this is applicable to your case, you can try changing the setting to fix the issue.
Just navigate to This PC in your File Explorer. Then, right-click the involved drive under Devices and drives section and choose Properties. When you get the following interface, make sure the option Allow files on this drive to have contents indexed in addition to file properties is check, and click Apply and OK to save the change.
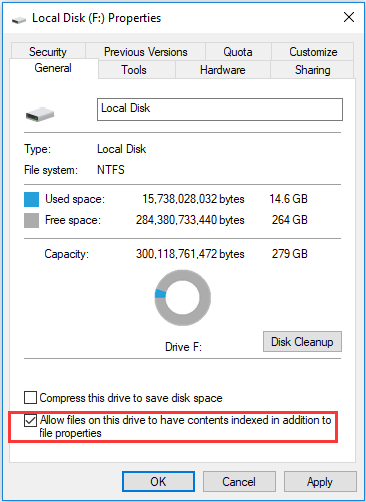
If you have no idea about which drive the target files are stored on, you’d better repeat the same operation to all your drives. Once it’s done, reboot your device and the File Explorer search should work without any problems.
Fix 5: Rebuild Search Index
According to the reports of some users, they have fixed File Explorer search not working by rebuilding search index. So, you can have a try.
Step 1: Open Control Panel and choose to view by Small icons.
Step 2: Find and click the Indexing Options item.
Step 3: In the pop-up window, click Advanced button.
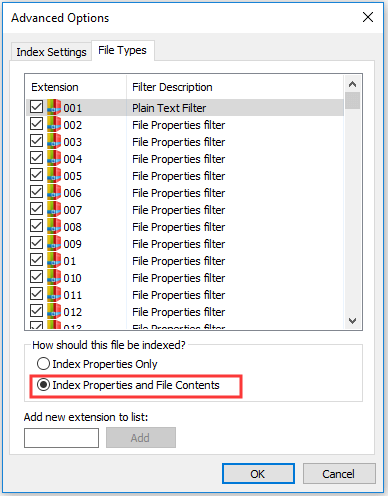
Step 4: Switch to File Types tab in the Advanced Options window and check Index Properties and File Contents, and then click OK.
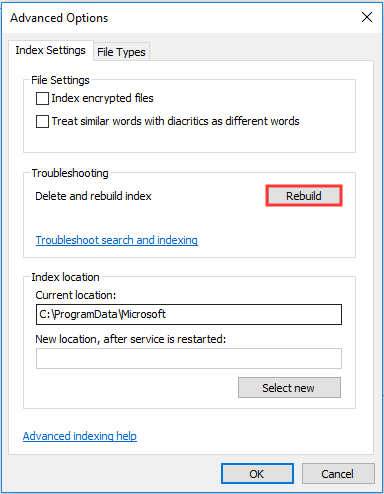
Step 5: Open Advanced Options window again. Under Index Settings tab, click Rebuild button in Troubleshooting section, and then click OK in the confirmation window.
Once it’s done, your File Explorer search should work properly again.
Fix 6: Run Search and Indexing Troubleshooter
You can also employ Windows Troubleshoot to fix the problem.
Step 1: Right-click the Start button and select Settings from the lists.
Step 2: Go ahead to Update & Security > Troubleshoot.
Step 3: In the right pane, scroll down to locate Search and Indexing. Click it and hit Run the troubleshooter button.

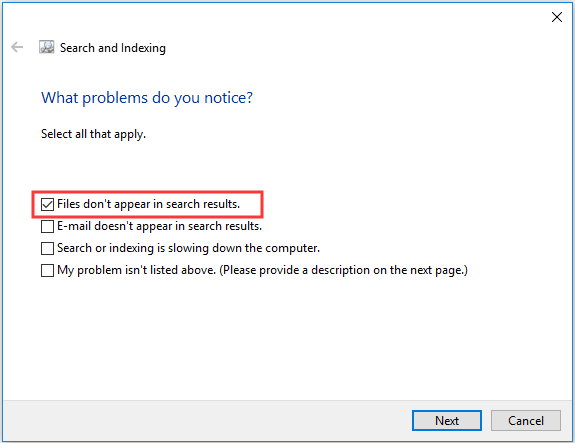
Step 4: Then, you will get the following interface. Check Files don’t appear in search results option and click Next button.
Step 5: You will be asked for administrative privilege to perform the operation. Just click Try troubleshooting as an administrator.
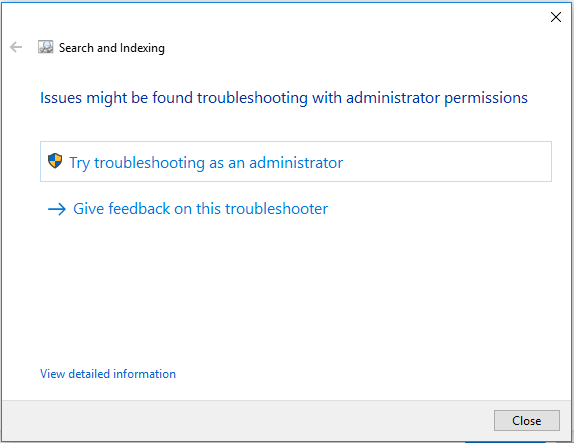
You just need to follow the onscreen instructions to complete the process. Now, you can use the search tool again. If the error still exists, try the next solution.
Fix 7: Add System Permission to A File/Folder
Sometimes, File Explorer search not working occurs only when searching for a specific file/folder. In this case, perhaps the file/folder doesn’t have the system permission.
If you can find the file or folder manually, you can add the system permission to this file/folder. In this way, you can find it more quickly by using File Explorer search tool next time.
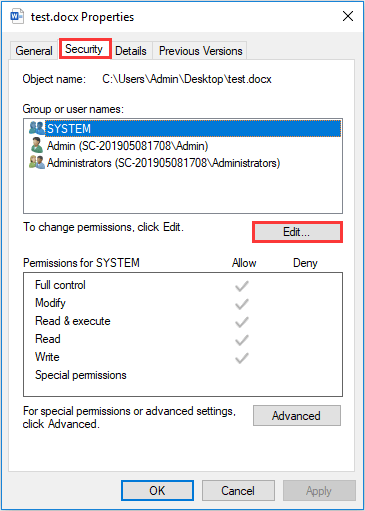
Step 1: Right-click the problematic file or folder and choose Properties.
Step 2: In the pop-up window, go to Security tab. There should be SYSTEM in the box of Group or user names. If not, click Edit.
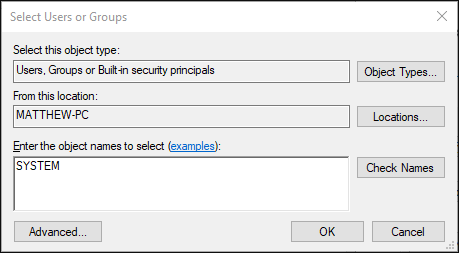
Step 3: Click Add button and you will get the following window. Then, input SYSTEM in the empty box and click Check Names, and hit OK button.
Step 4: Click Apply to save the change and click OK to exit.
In this way, you should be able to search the specific file/folder with File Explorer search utility.

Fix 8: Restart and Re-register Your Cortana
It is reported that the Cortana application has something to do File Explorer search not responding issue. To resolve the error, you are recommended to end the process of Cortana in Task Manager and restart it. If this fail to work, go to re-register your Cortana according to the given steps.
Step 1: Right-click the Start button and choose Windows PowerShell (Admin) to run PowerShell as administrator.
Step 2: Copy and paste the following command to the PowerShell window and press Enter:
Get-AppXPackage -Name Microsoft.Windows.Cortana | Foreach {Add-AppxPackage -DisableDevelopmentMode -Register “$($_.InstallLocation)AppXManifest.xml”}
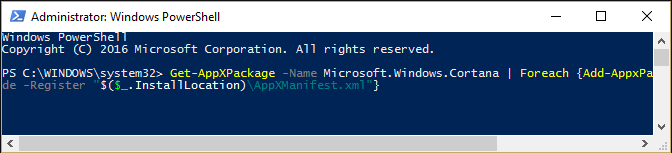
Step 3: Wait patiently until the command has finished re-registering Cortana and then restart your computer.
Fix 9: Repair Corrupted System Files
It is true that the corrupted system files can also lead to File Explorer search not responding. Therefore, it is worthwhile to take action to repair corrupted system files. Here’s a simple guide for you:
Step 1: Type cmd in Run dialog and press Ctrl + Shift + Enter to run Command Prompt as administrator.
Step 2: Input the command DISM.exe /Online /Cleanup-Image /RestoreHealth and press Enter.
Step 3: Wait for the process to complete and then use System File Checker tool. Just type sfc /scannow and hit Enter key.
Once the scanning process is 100% completed, restart your device and check if the issue is fixed.
Fix 10: Create A New Administrator User Account
If your File Explorer search stops working and all above methods fail to resolve the issue for you, you can try creating a new administrator user account. This operation is a little complicated but you can make it referring to the tutorial below.
Step 1: Press Windows + I to open Settings.
Step 2: Go ahead to Accounts > Family & other people and click Add someone else to this PC from the right pane.
Step 3: Choose I don’t have this person’s sign-in information.
Step 4: Click Add a user without a Microsoft account.
Step 5: Enter the username and password (if desired) for the new account and then click Next button.
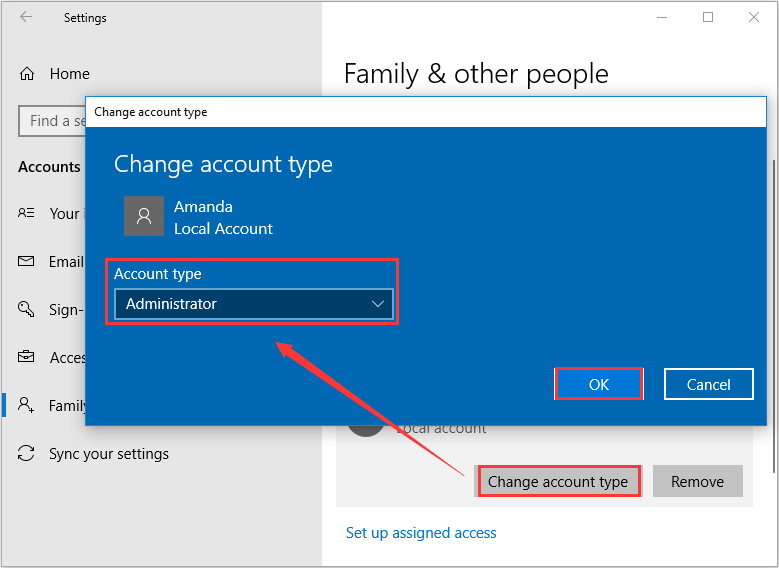
Step 6: Then, you will go back to the Accounts setting. Just choose the new account and click Change account type. Choose Administrator as the account type and click OK.
Step 7: Now, you can use this new account to fix the search issue. Just sign into the new account, open your File Explorer. Then, go to the following path: C:Users<original-accountAppDataLocalPackagesMicrosoft.Windows.Cortana_cw5n1h2txyewy and rename the target folder as Microsoft.Windows.Cortana_cw5n1h2txyewy.old.
Step 8: Restart your computer, sign into the original account. Then, input the following command in PowerShell and press Enter to execute it: Add-AppxPackage -Path “C:WindowsSystemAppsMicrosoft.Windows.Cortana_cw5n1h2txyewyAppxmanifest.xml” -DisableDevelopmentMode -Register
Once it’s done, restart your PC one more time and the File Explorer search not working should be resolved completely.
An Alternate Method of File Explorer Search
If you don’t want to spend too much time fixing File Explorer search not working issue, perhaps you can ask third-party software for help to find files or folders quickly. MiniTool Partition Wizard could be a nice choice for you.
It can scan the files and folders on a certain drive and allow you to search from all the existing items, just as File Explorer search works. It is also a professional partition manager that can help you back up your computer and recover lost data. So, it’s worthwhile for you to download this tool to have a try.
MiniTool Partition Wizard FreeClick to Download100%Clean & Safe
Step 1: After installing MiniTool Partition Wizard, launch it to get the main interface.
Step 2: Click Space Analyzer from the upper tool bar to activate the feature.
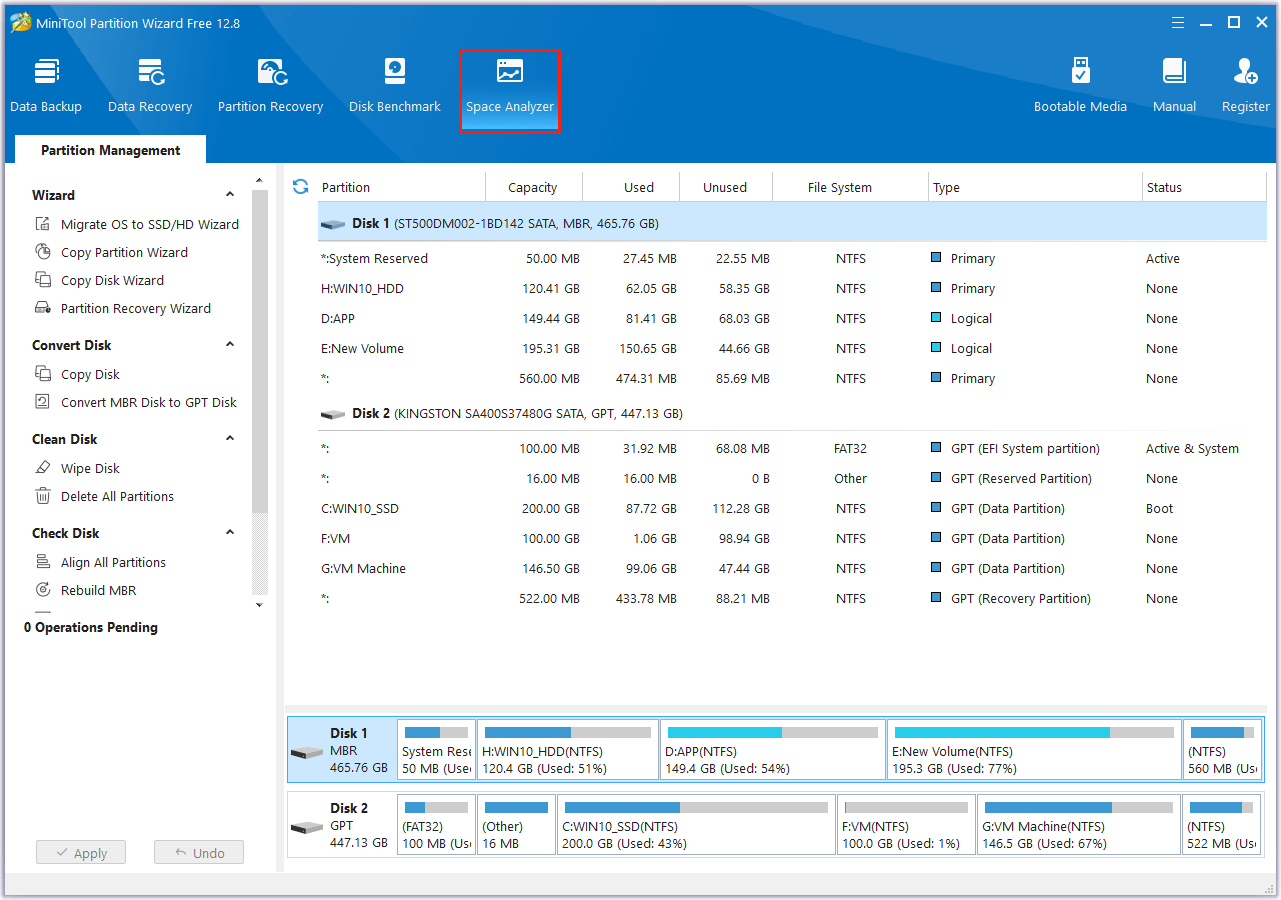
Step 3: In the pop-up window, select the target drive and click Scan button to start scanning the files and folders in the drive.
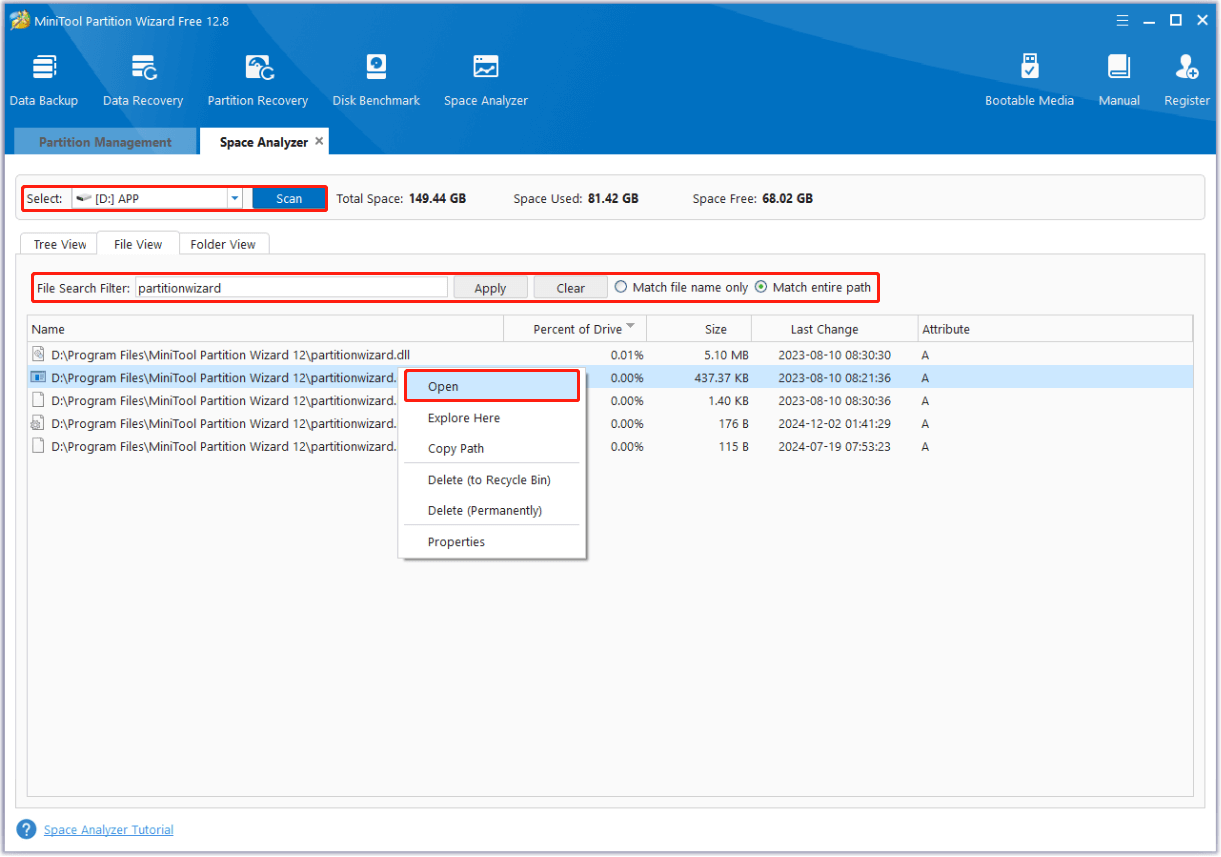
Step 4: All the items in this drive will be listed, including the files and folders hidden in Explorer which are displayed in grey here. To find a certain file or folder, go to File View tab and search it. Once you find the desired item, you can right-click it and choose Open to open it directly.
Bottom Line
Have you resolved File Explorer search not working with the methods introduced above? Do you have any other good solutions to this issue? Please tell us in the comment zone below. You can also send an email to our support team via [email protected].
File Explore Search Not Working FAQ
Here are some methods you can take to fix Windows Explorer search:
- Restart File Explorer
- Make sure Windows Search Service is enabled
- Change the search options
- Allow Files to Have Contents Indexed
- Rebuild search index
- Run Search and Indexing Troubleshooting
- Add system permission to a file/folder
- …
About The Author

Position: Columnist
Charlotte is a technology columnist with a strong focus on the Windows operating system, specializing in disk management, backup, and data recovery. She is passionate about analyzing computer errors, identifying root causes, and delivering practical solutions. In her free time, she stays updated on the latest developments in computer systems and hardware while continuously learning new technologies to broaden her expertise. Her writing style is clear and easy to understand, making complex technical topics accessible even to users with limited computer knowledge.
User Comments :