Do you know how to track the movement of mouse cursor to make it easier to see? To do that, you should enable mouse pointer trails. What is it? How to enable it? Read the post in which MiniTool tells the answers.
What is mouse pointer trails? It is an accessibility feature on Windows 10. Once the feature is enabled, you will find that there is a trail behind the mouse pointer. In other words, enabling this feature can improve the visibility of the mouse cursor.
How to enable mouse pointer trails? There are two workarounds to complete that. Keep reading and figure out what they are.
# 1. Enable Mouse Pointer Trails via Mouse Properties
It is very convenient to enable mouse pointer trails via Mouse Properties. The detailed tutorial is displayed below.
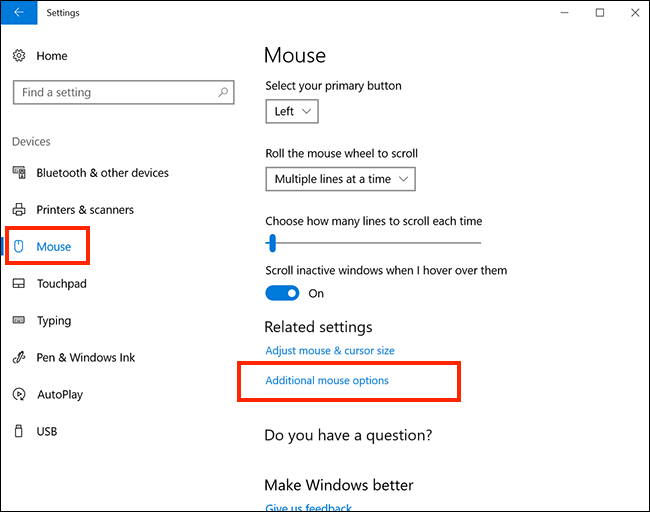
Step 1: Hit the Windows icon and then select the Settings icon from the Start menu.
Step 2: On the Settings window, click Devices.
Step 3: Click the Mouse option on the left pane and then look at the right pane. Find and click Additional mouse options under the Related settings section.
Step 4: On the Mouse Properties window, switch to the Pointer Options tab and then scroll to do the Visibility section.
Step 5: In the Visibility section, check the Display pointer trails setting to enable mouse pointer trails and then move the slider to adjust the track length.
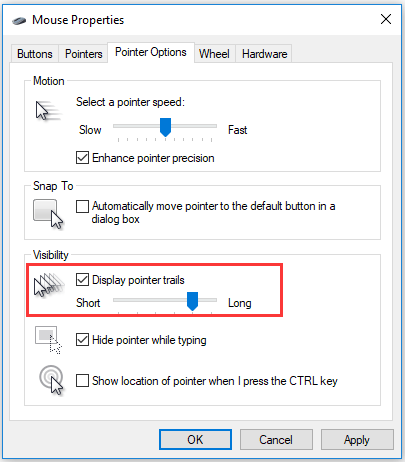
Step 6: After checking the option, you will see that your mouse cursor is different. Click Apply > OK to confirm this change if you satisfy the track length.
To restore your mouse cursor to its original state, just uncheck the Display pointer trails option.

# 2. Enable Mouse Pointer Trails via Registry Editor
Apart from enabling mouse pointer trails by checking the Display pointer trails option, you can also modify the specific entry in Registry Editor.
Step 1: Open Registry Editor.
- Press Windows + R to call out the Run
- On the Run window, type regedit and then click OK.
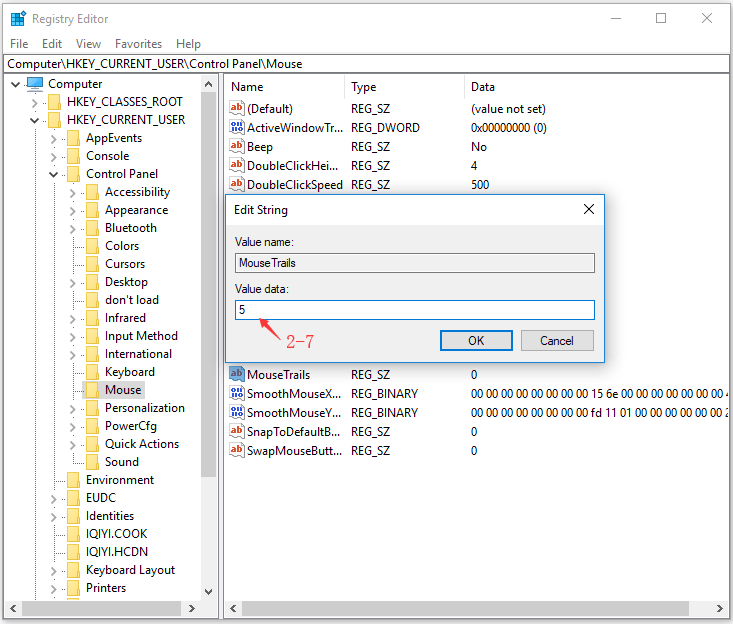
Step 2: On the Registry Editor window, navigate to the following path.
HKEY_CURRENT_USERControl PanelMouse
Step 3: Expand the Mouse folder and then double-click the MouseTrails on the right pane. On the new window, change its value data to a number (2-7) that refers to the trail length and then click OK to confirm this change.
Step 4: To make all the changes take effect, please restart your computer.
After restarting your computer, you should see the difference of your mouse cursor on the computer screen when moving your mouse. If you don’t make the pointer trails invisible, you can set the value data of the MouseTrails entry to 0.

Bottom Line
To make the mouse cursor easier to see, it is worth trying the above tutorials. Have you successfully enabled mouse pointer trails when finishing the two tutorials? If not, please leave your issue in the following comment zone. We will reply to you as soon as possible.
User Comments :