After upgrading to Windows 10, you might receive the “driver WudfRd failed to load” error. The causes of this error are not complicated and it can be fixed easily. MiniTool will show you how to remove this problem with simple methods in this post.
About Driver WudfRd Failed to Load
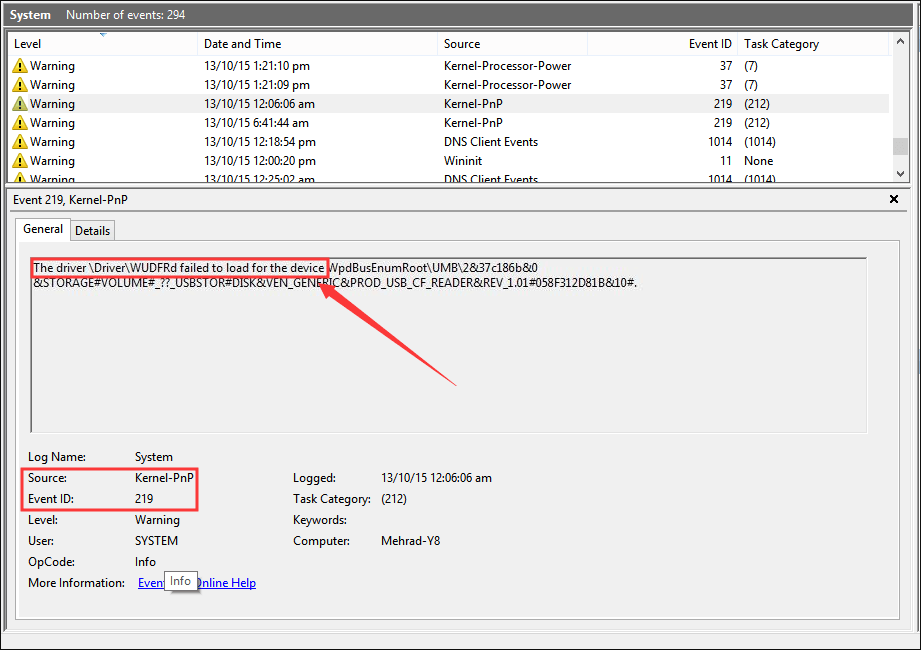
“Driver WudfRd failed to load” error has been reported by most users who have upgrade their computers to Windows 10. The error has an Event ID 219 and its Source is Kernel-PnP. So, this issue is also known as error 219.
Once this error occurs, you will get a warning in System Log every time you boot your computer. Just as the following screenshot shows, you can see the description of the error 219 in the Event Viewer: The driver Driver WudfRd failed to load for the device.
Why does this error appear? When you upgrade to Windows 10, your drivers will also be updated. This will lead to a conflict between the drivers and hardware, and thus cause the error 219. Besides, even if you didn’t upgrade your computer to Windows 10, the issue could also occur when a certain service is disabled.
To fix the “driver WudfRd failed to load” error, you can try the solutions displayed below.
Method 1: Update Windows
Windows updates could also update your drivers, so you can try checking for new updates manually to resolve this problem.
Step 1: Press Windows + I to open Settings.
Step 2: Go ahead to Update & Security > Windows Update.
Step 3: In the right pane, click Check for updates and install all the pending updates.
After updating your Windows, restart your computer to check if it fixes the error 219.
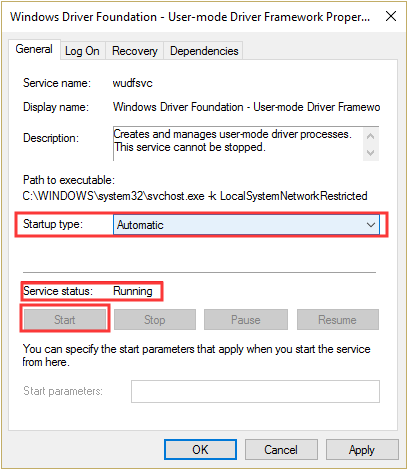
Method 2: Enable Windows Driver Foundation Service
Windows Driver Foundation is an essential service for drives. If the service is disabled, you might receive “driver WudfRd failed to load” error. Just follow the steps below to enable it.
Step 1: Press Windows + R to open Run window. Input services.msc in the dialog and click OK.
Step 2: In the main interface of Services, find Windows Driver Foundation – User-mode Driver Framework service and double-click it to open its Properties window.
Step 3: Under General tab, set the Startup type to Automatic. Make sure the Service status is Running. If not, you need click Start button to enable the service. Then, click Apply and OK to save the changes.
Now, you can reboot your computer and the error should have been removed.
Method 3: Disable Hard Disk Hibernation
Disabling hard disk hibernation is another proven solution and plenty of users have fixed the “driver WudfRd failed to load” error with it. So, you can take a shot at it.
Step 1: Press Windows + X and choose Power Options from the Start menu.
Step 2: Click Additional Power settings in the right pane and this will open Control Panel as the following picture shows. Then, click Change plan settings for your current power plan.

Step 3: Click Change advanced power settings in the new page.
Step 4: In the Power Options window, expand Hard disk and Turn off hard disk after. Set both the On battery and Plugged in to Never.
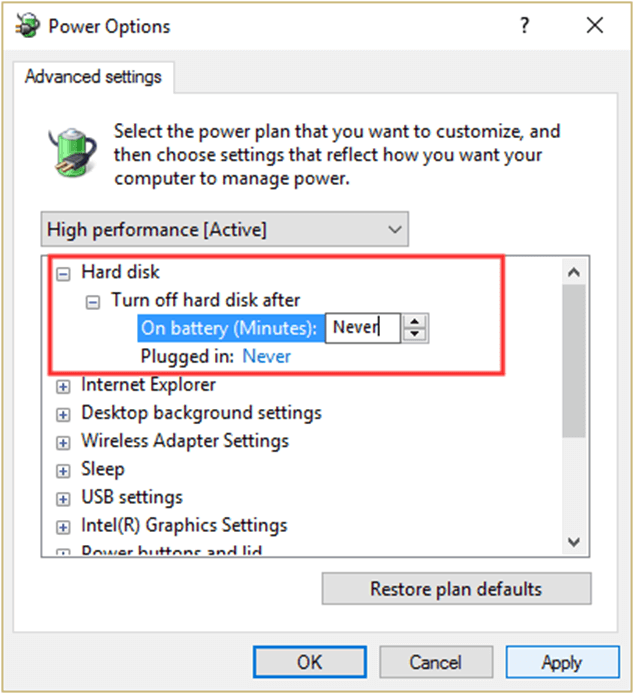
Step 5: Click Apply and OK
Once it’s done, restart your computer. Now you should be able to run your computer without the error 219.

Method 4: Update Incompatible Drivers
Alternatively, you can also try updating incompatible drivers to fix this issue. You can easily locate the incompatible drivers in Device Manager as there will be an exclamation mark beside them. If all your drivers are compatible, just skip this method. If any incompatible drivers exist, follow the instructions to update them.
Step 1: Input devmgmt.msc in the Run dialog and click OK to open Device Manager.
Step 2: Right-click the driver with an exclamation mark and select Update driver from the context menu.
Step 3: Choose Search automatically for updated driver software.
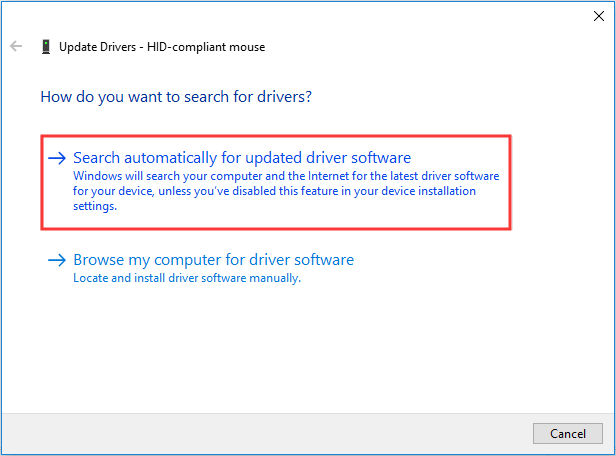
Then, follow the onscreen instruction to complete the driver update. If your Windows cannot find the latest driver software for your device, you can download the latest version from the official website of the driver and install it manually.
Finally, restart your computer to see if the error has been fixed.
Method 5: Reinstall USB Controllers
In most cases, USB drivers should be responsible for the “driver WudfRd failed to load” error. Therefore, if all the methods mentioned above fail to fix the problem, you can feel free to try reinstalling your USB controllers. Here are the detailed steps.
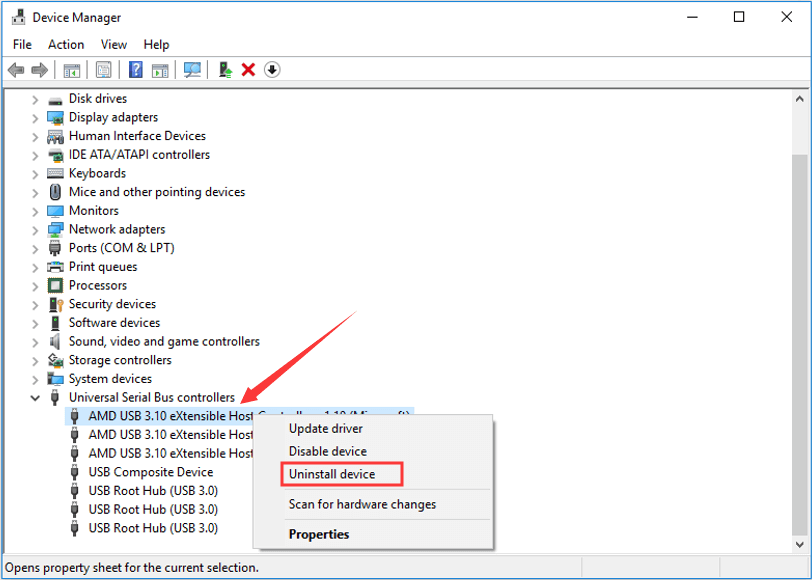
Step 1: Open Device Manager.
Step 2: Double-click Universal Serial Bus controllers to expand it.
Step 3: Right-click a USB controller and choose Uninstall device. In the confirmation window, click OK to continue. Then, perform the same operation to uninstall all the USB controllers.
Step 4: After uninstalling all the USB controllers, restart your computer. The Windows will automatically reinstall the USB controllers uninstalled just now.
That’s all about the solutions to resolving “driver WudfRd failed to load” error. Hope this post is of help for you.
User Comments :