Do you know how to configure Windows 10 so that you do not have to use the Safely Remove Hardware notification icon, to disconnect external devices, like a USB? This article will show you how to do that. By the way, MiniTool Partition Wizard is a useful partition manager for Windows 10.
Microsoft Ends Safely Remove Hardware
You may be told never to remove an external storage device, like a USB without clicking on the “safely removable hardware” notification. This is also a common practice you may do before pulling out an external device from Windows devices.
However, it is not something worthy of so much panic these days, because Microsoft has officially called Safely Remove Hardware quits on user’s requirements.
As part of a new update, the Redmond company has modified the way Windows 10 handles disconnecting USBs or Thunderbolt storage devices. This change applies to USB thumb drives, external hard drives, flash drives, and even data transfer connections between PCs and smartphones.
Until now, the default policy in Windows 10 and all previous versions of the operating system when inserting a USB device was Better Performance. With Windows 10 version 1809, however, Microsoft decided to make Quick removal the default instead.
With Quick removal, Windows 10 puts storage devices in a state where they can be disconnected without following the Safely Remove Hardware protocol.
There are downsides to this, of course, chief of which is speed. Since in this setting Windows will not cache disk writes, moving the data to external device might cost more time. But, to transfer data from your computer to an external hard drive, you can use MiniTool Software. To do that, please read the recommended article below.
Disable Safely Remove Hardware
The following content will show you how to disable Safely Remove hardware and eject media in Windows:
Step 1: Connect an external storage device to your Windows 10 computer.
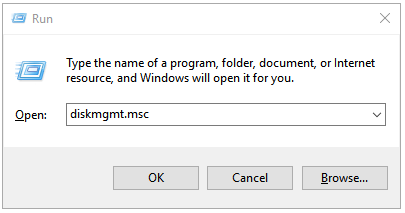
Step 2: Open the Disk Management program by pressing the Windows icon and the R key on the keyword, typing diskmgmt.msc in the Run box and clicking the OK button.
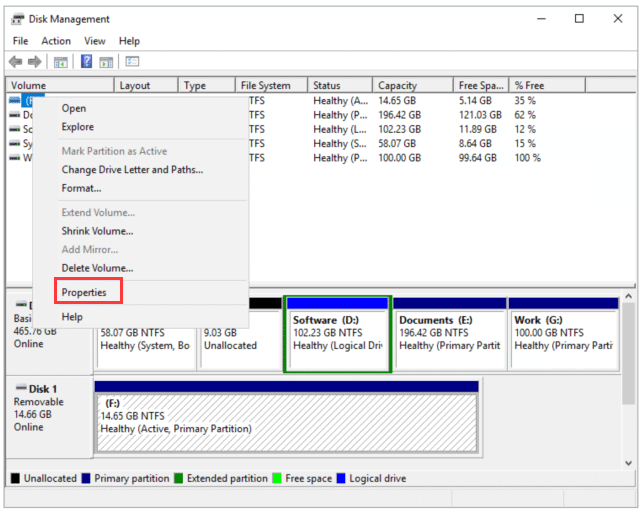
Step 3: Once get Disk Management window, right-click the external device’s name in panel at the bottom, and then select the Properties option. (Here I take partition F for example.)
Step 4: In the Properties window, please go to the Policies tab. Please note that two policies can be configured. But in this situation, you should select the Quick removal policy. This policy might already be selected. If not, select it and click the OK button.
Step 5: Once you have selected this policy, you will have to restart your computer to apply this policy.
Finishing the steps above lets you remove an external storage device without ejecting it.
If you try to eject it though, Windows 10 will stop it and allow you to remove it. In some cases, you may see a message telling you that the device cannot be stopped because it is in use. It is up to you to ignore the message if you want to remove the device anyway.
Conclusion
A conclusion can be made based on the results: it is OK to disable the use of the Safely Remove Hardware notification icon.
This removal means disabling write caching for your external devices and using the Quick removal setting instead of Better Performance.
The performance levels are almost identical between the two options, and you can earn the comfort of making fewer clicks to removal an external device.

User Comments :