What can do you if Destiny 2 servers are not available? In this article, MiniTool Software summarizes several feasible solutions from users to help you fix “Destiny 2 servers are not available” PC issue.
Some game lovers complain on the forum that they receive an error message that Destiny 2 servers are not available when they are trying to play the game. Why do gamers fail to connect to Destiny 2 servers? Here are some common reasons:
- There are too many gamers connecting to the Destiny 2 server at the same time.
- Your network connection is corrupted or not stable.
- There is something wrong with your network drivers.
If you are faced with Destiny 2 servers are not available PC issue as well, this post will be of great help for you. You just need to keep on your reading to get corresponding workarounds. The following solutions are in no particular order, you can try them one by one.
![[Solved] Destiny 2 Stuck on Initializing](https://images.minitool.com/partitionwizard.com/images/uploads/2020/02/destiny-2-stuck-on-initializing-thumbnail.jpg)
Fix 1: Disable DHCP
DHCP (Dynamic Host Configuration Protocol) is reported to be able to interfere with the Destiny 2 server connection. So, if your Destiny 2 servers are not available, you can try disabling the DHCP. Here’s how to do it:
Step 1: Right-click the Network icon at the bottom right corner on your desktop and choose Open Network and Sharing settings.
Step 2: Click Change adapter options to open Network Connections window.
Step 3: Right-click the network you are using and choose Properties.
Step 4: In the pop-up window, check Internet Protocol Version 4 (TCP/IPv4) and click Properties button.
Step 5: Check Use the following IP address and Use the following DNS server addresses options. Then, enter IP address and DNS server address manually and click OK button to save changes.

Once it’s done, you can restart your computer and try launching your Destiny 2 again to check if the issue has been resolved. If Destiny 2 servers are not available still, just move on to the next fix.
Fix 2: Reset TCP/IP Address
If your network gets corrupted, you might also encounter Destiny 2 servers unavailable issue. In this case, you can try resetting your TCP/IP address to fix the problem.
Step 1: Press Windows + R to open Run dialog.
Step 2: Input cmd and press Ctrl + Shift + Enter to run Command Prompt as administrator.
Step 3: Type the command netsh winsock reset and press Enter to reset TCP/IP address.
Then, you need to restart your device for the change to take effect and check if you can connect Destiny 2 servers successfully.
Fix 3: Update Network Driver
As corrupted or outdated network driver could lead to Destiny 2 servers are not available PC issue, it should be a nice solution to update your network driver. If you don’t know how to do that, here is a simple guide for you.
Step 1: Right-click the Start button and choose Device Manager.
Step 2: Expand the Network adapters category, right-click the adapter you are using and choose Update driver.
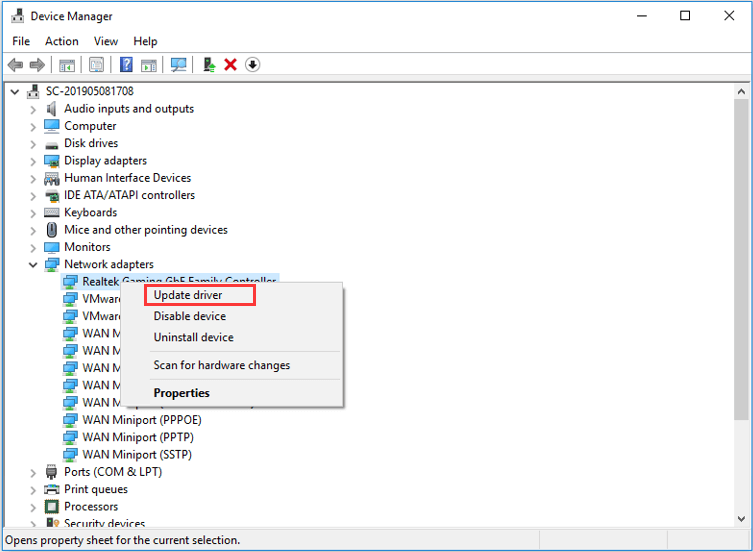
Step 3: Click Search automatically for updated driver software and follow the onscreen instructions to complete the process.
After installing the latest update of your network driver, restart your computer and launch Destiny 2 to check if this solution works to fix the problem.
Fix 4: Use Ethernet Connection
As you know, large-scale games like Destiny 2 require stable and fast network connection to ensure proper and smooth functioning. If your network cannot meet the requirement, you might experience various problem during gaming, including Destiny 2 servers not available in our case.
So, you are recommended to use Ethernet connection. If there’s no such connection available for you, you can force your device to connect via Wi-Fi by following the steps below.
Step 1: Go to Network Connections interface as the Fix 1 shows.
Step 2: Right-click the connection you are not using and choose Disable.
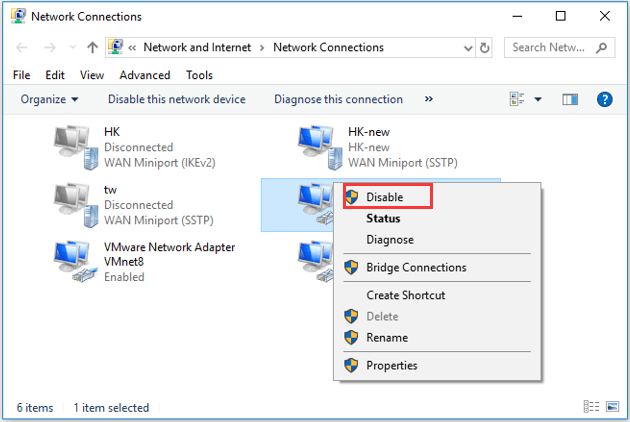
Step 3: Repeat the operation for any other connections that you’re not using.
By doing this, your computer will connect only via Wi-Fi. You can launch your Destiny 2 to check if the issue has fixed.
Fix 5: Turn on Network Discovery
Finally, some users have successfully gotten rid of this problem by turning on Network Discovery feature in Windows. So, if the above solutions fail to help you get over it, you can feel free to have a try. To make it, you need to:
Step 1: Open Control Panel and choose Network and Internet category.
Step 2: Click Network and Sharing Center.
Step 3: Choose Change advanced sharing settings in the left pane.
Step 4: Expand Private network profile and check Turn on network discovery in Network discovery section. Make sure the option Turn on automatic setup of network connected devices is checked.
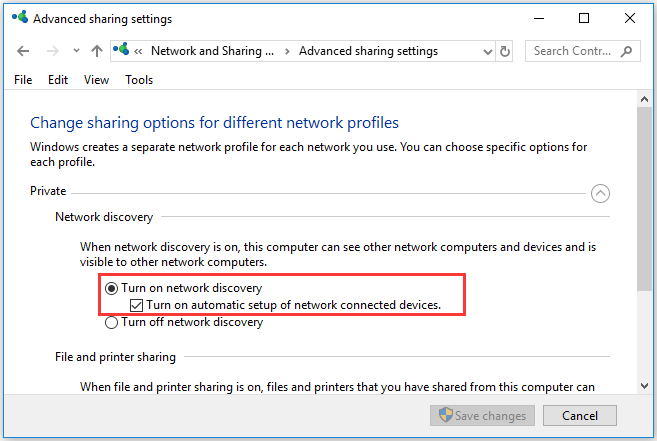
Step 5: Click Save changes button to confirm the operation.
That’s all about how to fix Destiny 2 servers are not available issue. Have you resolved it with the mentioned solutions in this post?
User Comments :