This article tells some basic knowledge on disk partition management. You can learn some propaedeutic knowledge like what is the default partition style for Windows 7 and how to get the best disk partition management for Windows 7.
What Is the Default Partition Style Used in Windows 7?
Part 1: About Partition Style (MBR and GPT)
What is the default partition style in Windows 7? Before giving my answer, it is necessary to make it clear what partition style is. Normally, a brand new hard disk cannot be put into use directly until we initialize it to either MBR (master boot record) or GPT (GUID partition table), and the proper nouns here – MBR and GPT – are two kinds of partition styles.
- MBR uses the standard BIOS partition table while the latter uses unified extensible firmware interface.
- The maximum addressable space MBR partition table supports is 2TB, while GPT disk can recognize up to 18EB space.
- On a MBR disk, we can create 4 primary partitions or 3 primary partitions plus 1 extended partition at most, while on a GPT disk we can create up to 128 partitions.
Now we know MBR and GPT are two partitions styles. But do you know what is the default partition style used in Windows 7? The answer is MBR. Why?Although GUID partition table is a more advanced partition style, not all Windows systems support this partitioning scheme:
- Operating systems earlier than Windows XP 32-bit cannot read, write, and boot from GPT disks. These OS can be Windows 2000, Windows NT 4, Windows 95, Windows 98, etc.
- Windows XP 64-bit can use GPT disks for data storage only.
- All versions of Windows Vista/7/8/8.1/10 and Windows Server2003/2008/2012 can use GPT disk for data storage. However, booting is only supported for 64-bit editions on UEFI-based systems.
Reading here, you know MBR is still more compatible with all operating systems than GPT does. Besides, the traditional ways of system installation is not suitable for GPT disk. What’s more, to boot Windows 7 from GPT disk, you must guarantee your computer motherboard supports booting from EFI mode and you are installing the 64-bit edition. Thus, the default partition style Windows 7 is MBR. Part 2: How to Convert Partition Style between MBR and GPT
Note: To convert system disk from MBR to GPT, please make sure that your mother board supports EFI mode, otherwise the system disk will fail to boot.
1. Why Do Conversions between MBR and GPT?
In the following situations, you may consider converting MBR to GPT:
- To create more partitions;
- To get large-capacity hard disk support.
- To solve “Windows Cannot Be Installed to This disk. The Selected Disk Has an MBR Partition Table“.
2. Convert Partition Style between MBR and GPT
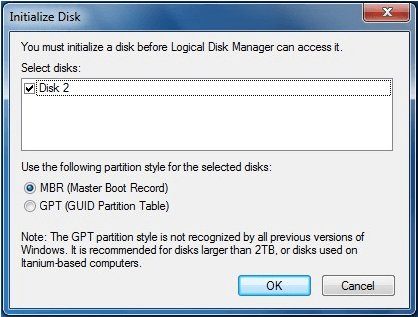
For a brand new hard disk, you can initialize it to MBR or GPT when you enter Windows Disk Management utility (image attached). But for a used disk, how can you make conversions between MBR and GPT disk?
Here we list 3 ways to help you.
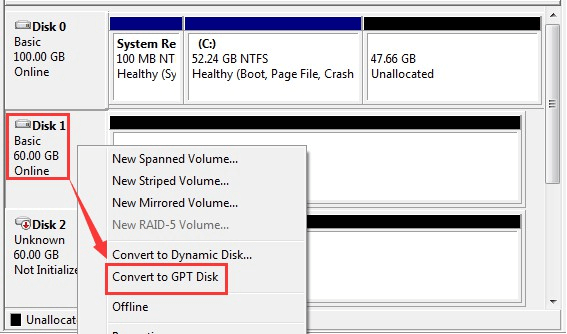
Way 1. Use Disk Management Utility
Convert to MBR Disk” or “Convert to GPT Disk“.
Way 2. Use Diskpart
Back up important data on the disk -> run CMD as administrator -> run Diskpart ->type the following commands: list disk – select disk [disk number] – clean – convert GPT (or MBR) -> type exit two times to leave Diskpart and CMD.

To be honest, both Way 1 and Way 2 work great to do conversions between MBR and GPT. However, neither of them can avoid data loss if no backup is made in advance. Here we would like to introduce Way 3 – a lossless way to do this conversion.
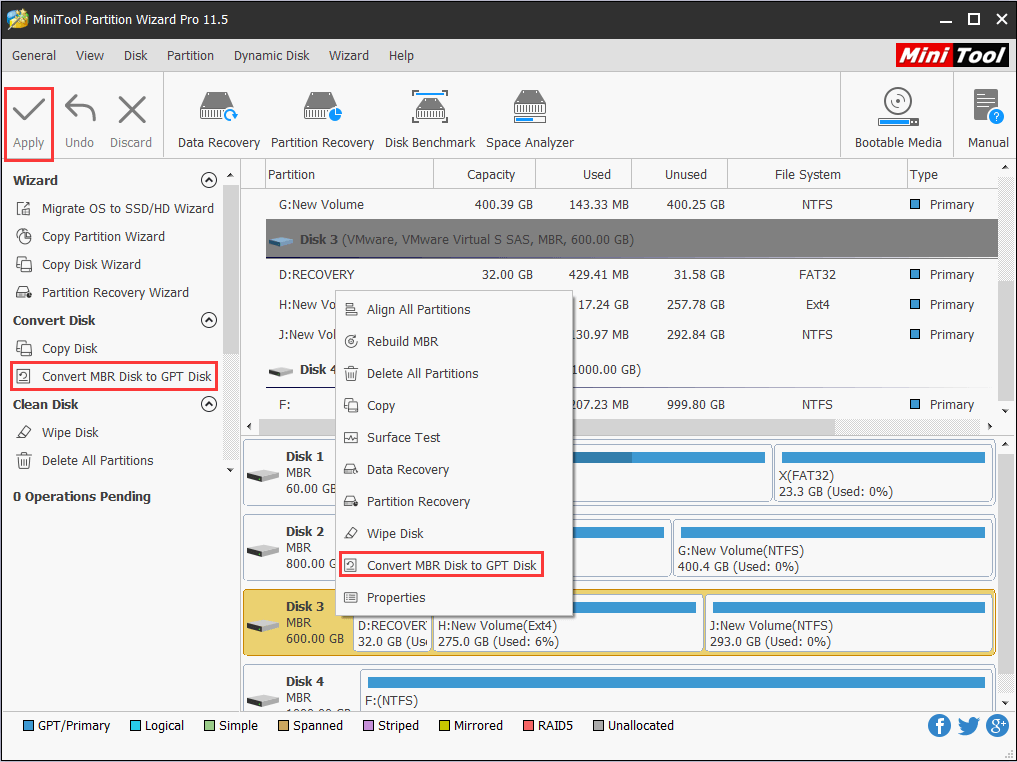
Way 3. Use MiniTool Partition Wizard
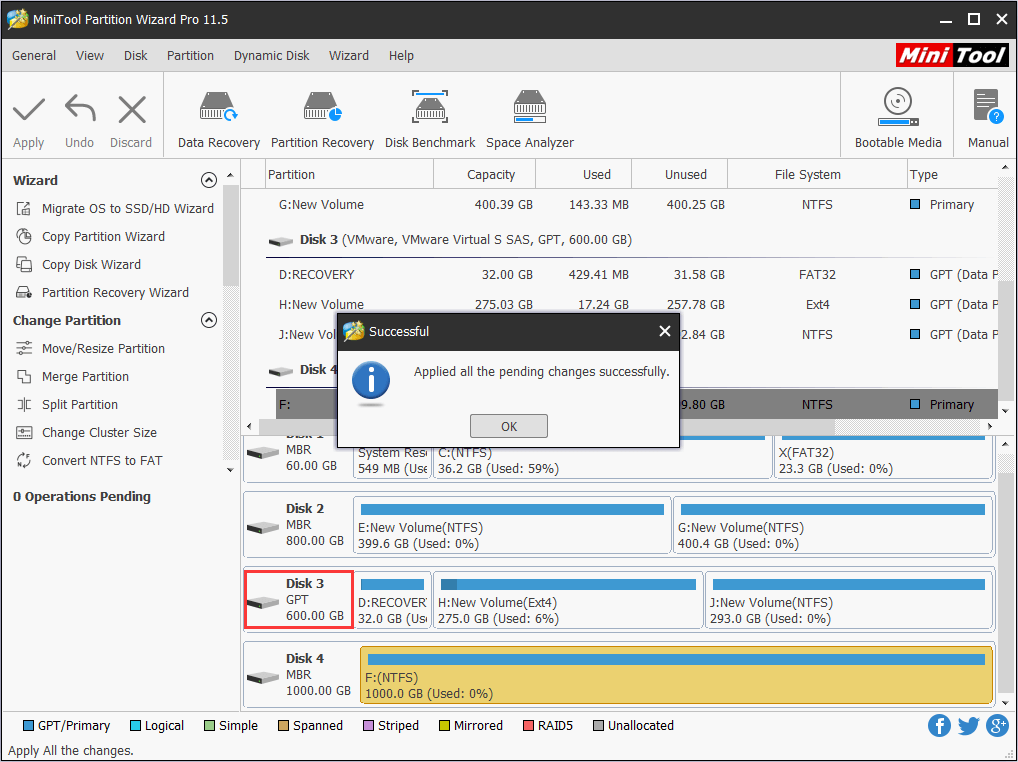
Launch MiniTool Partition Wizard -> select the disk you want to convert -> choose “Convert MBR disk to GPT” or “Convert GPT disk to MBR disk” function from the menu -> click “Apply” to make all changes performed. You will see all your partitions are still there on the drive along with integrated data.
What Is the Main Tool or Utility that You Can Use to Manage Your Disk?
Today, disk partition management is of great significance for distributing disk space reasonably and protecting important data. Normally, there are 3 utilities to manage your disks, and they are: Disk Management Utility, Windows Command Prompt, and professional partition manager.
Disk Management Utility and Windows Command Prompt are born with Windows OS. That is to say, they are parts of Widows OS, free, official, and reliable. Their features? Well, Disk Management is easier to operate compared with Command Prompt, for it has visual interface, and offers basic functions. However, Command Prompt offers more than Disk Management can, and is especially favored by professionals. Due to these advantages and disadvantages, users have their own preference.
But in my opinion, third-party partition manager is more competition for most computer users.
When I say third-party software, I mean the programs that have won great reputation among global users, such as MiniTool partition Wizard, which enjoys more than 20,000,000 downloads on CNET. And in the next part, you will see how it improves user experience in disk partition management
What Command Is Used to Partition and Format a Disk?
As we have said, Command Prompt is a commonly used utility to manage hard drives. In this part, you will learn how to create, format, extend, shrink and delete a partition by using Command Prompt. Let’s get started:
1. To perform all actions presented in this article, you need to own administrative permissions and run Command Prompt as administrator.
2. If you misuse some commands, you risk losing your data. So be careful and make a backup of your data before going ahead. If anything bad should happen, seek help from Data Recovery to recover as much data as possible.
Option 1: Create Partition from Command Prompt
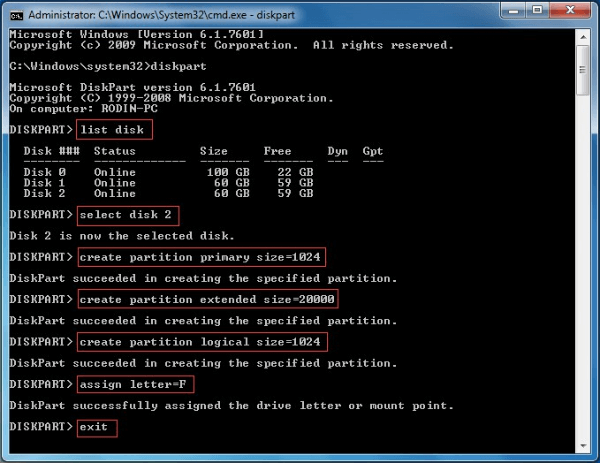
Step 1. Run Command Prompt. Then, type “diskpart” to access Diskpart Utility.
Step 2. After you’ve launched Diskpart, type the following commands in order and carry out them end with Enter key:
- Type “list disk“, this will display the key information of your hard drives connected to this PC. Please pay attention to the free space that is available.
- Type “select disk n” where “n” is the number of the hard disk you want to use.
- To create a primary partition, type “create partition primary size=[number]“, the unit of the number is MB. (example: create partition primary size=1024)
- To create a logical partition, first of all you need to create an extended partition. Type “create partition extended size=[number]“, and then type “create partition logical size=[number]“. Note that the size of the logical partition should be no larger than the size of your extended partition.
- Type “exit“.
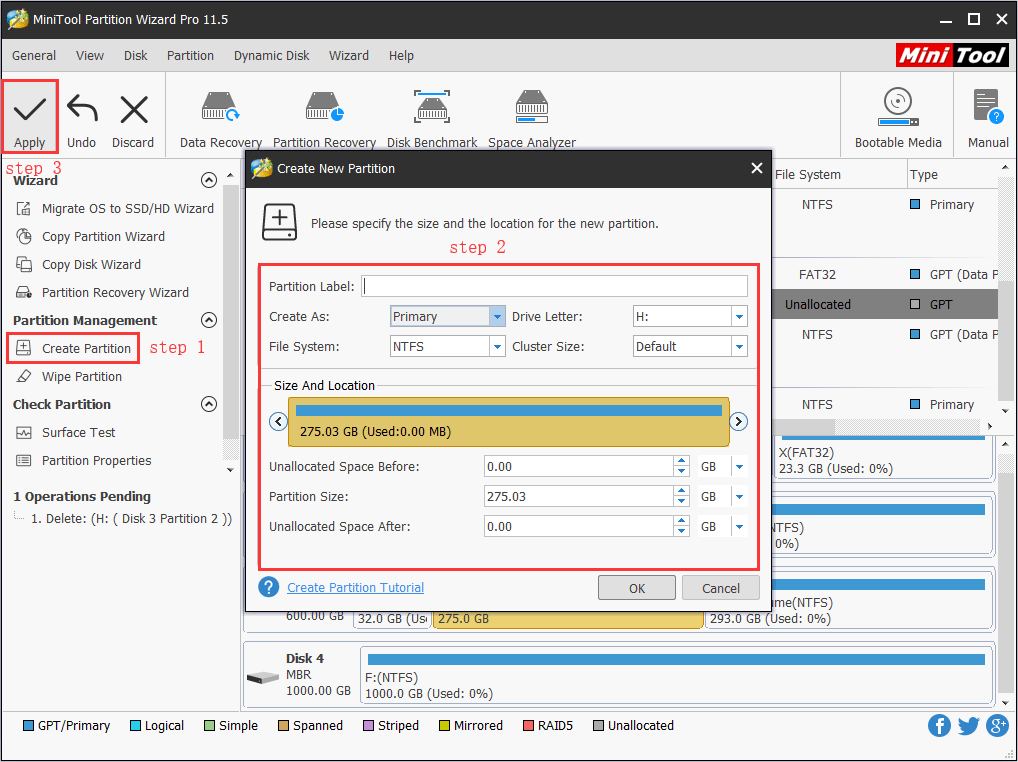
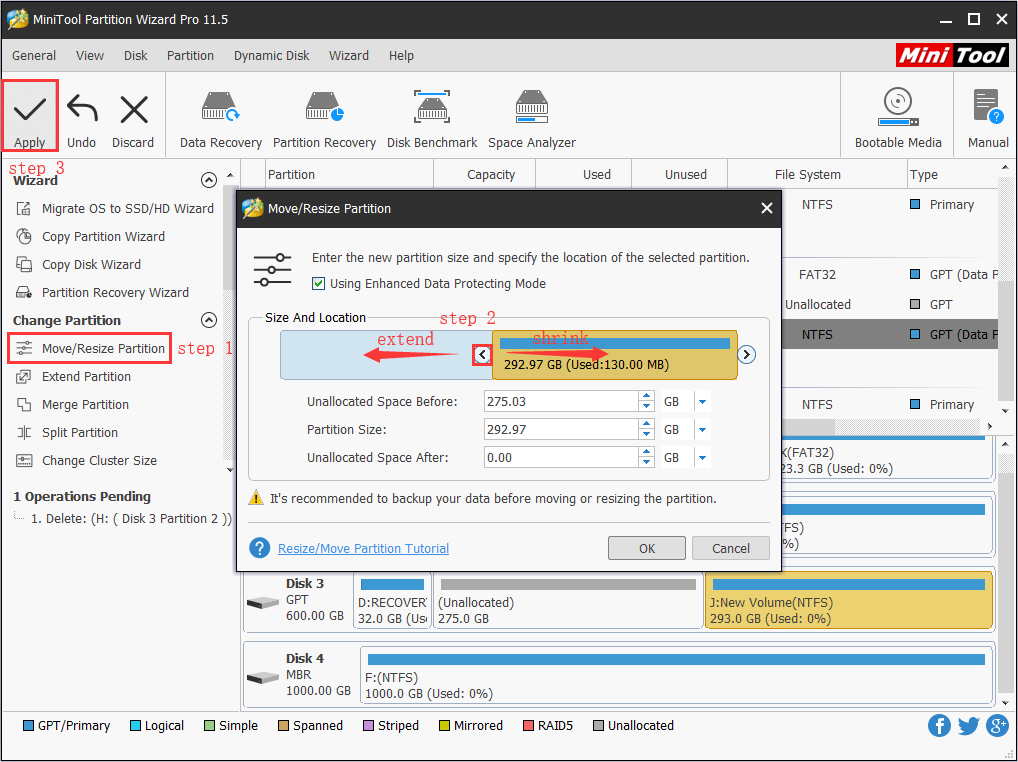
Easy, right? But if we use MiniTool Partition Wizard, creating partition is just a piece of cake. You just launch this program, hit the unallocated space to choose “Create Partition”, customize the property in the operating window and finally hit “Apply” button
You have to admit it’s really user-friendly:
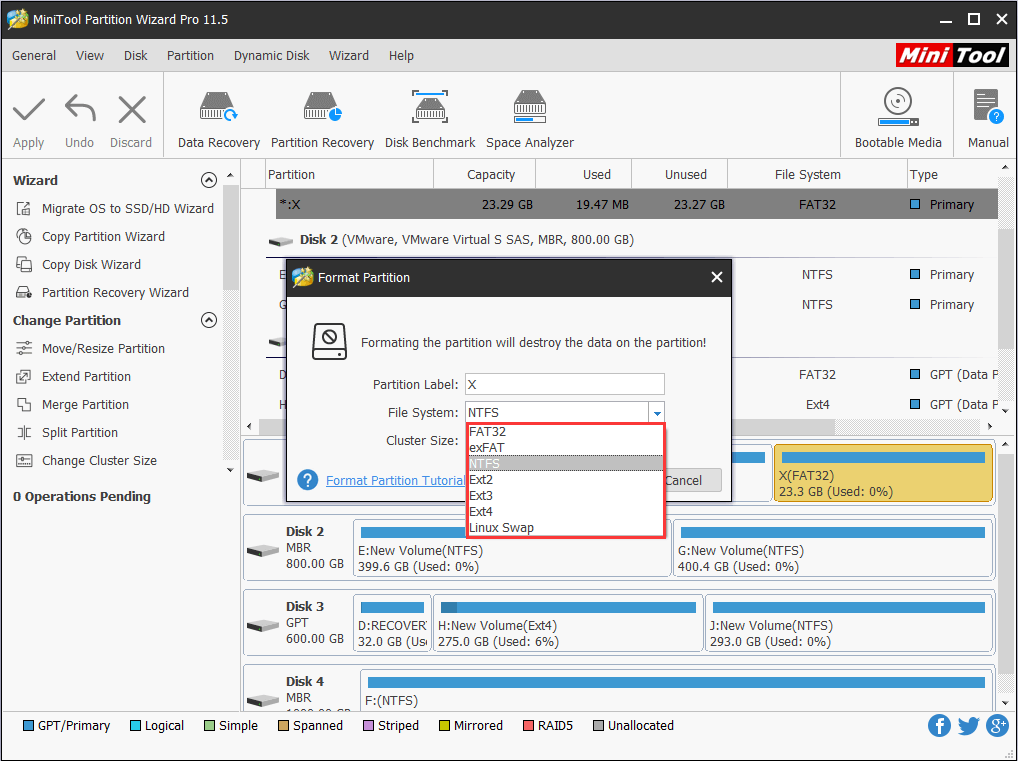
Option 2: Format from Command Prompt
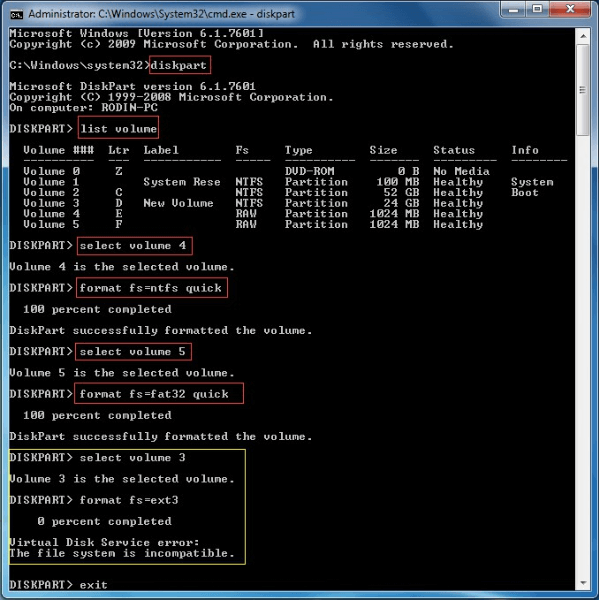
Format partition is necessary before you can use it to store data. To do this in Command Prompt, open Diskpart to run the following commands:
- Type “list volume“, all the volume will be listed there.
- Type “select volume n“, the volume you want to format will be selected.
- Type “format fs=ntfs quick“. Also you can type “format fs=fat32 quick” to distribute FAT32 file system to it.
- Finally, you can type “exit” to close Diskpart. Till now, you can see the new formatted drive in My Computer and make use of it.
Option 3: Extend Partition from Command Prompt
Sometimes, users may find that their partitions on basic disk or the volumes on dynamic disk are not big enough to store their data. Thus, extending partition/volume is necessary. Here is how you can use command line to extend partition/volume:
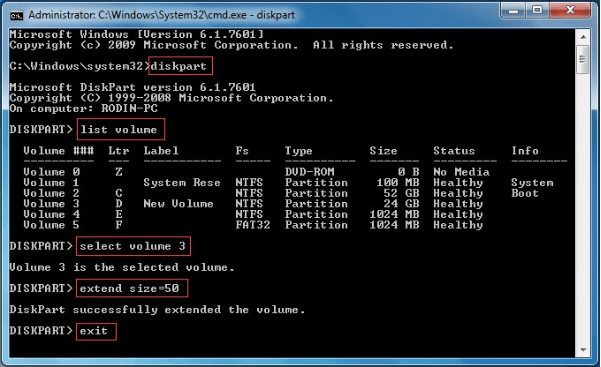
Step 1. Run Diskpart from Command Prompt.
Step 2. At Diskpart window, run the following commands:
- Type “list volume“.
- Type “select volume n“. Please make sure there is unallocated space/free space behind the primary partition/logical partition you want to extend.
- Type “extend size=[number]“.
Option 4: Shrink Volume from Command Prompt
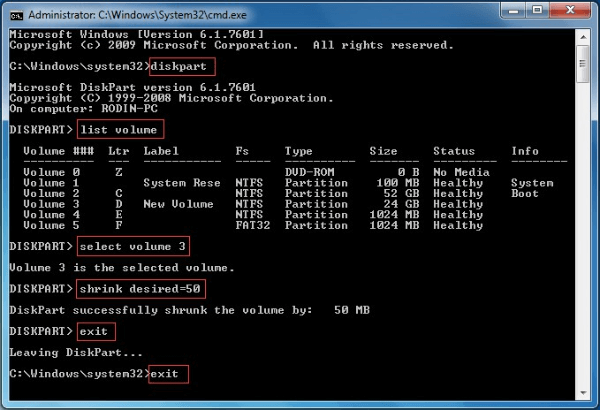
To shrink a partition by using Command Prompt, you need to enter the diskpart command prompt and then:
- Type “list volume“
- Type “select volume n“.
- Type “shrink desired=[number]“.
- Type “exit” to end up this progress.
1. Shrink Volume only helps to shrink partitions with NTFS or RAW file system.
2. Shrink Volume is only supported on simple or spanned volume on dynamic disks.
3. There may be some unmovable files like the page files located in the partition you intend to shrink, at this time, diskpart can only shrink the partition to the unmovable file point. If you need to shrink more space, you need find out and copy the unmovable files to another location, and then delete the original copy.
Option 5. Delete Partition from Command Prompt
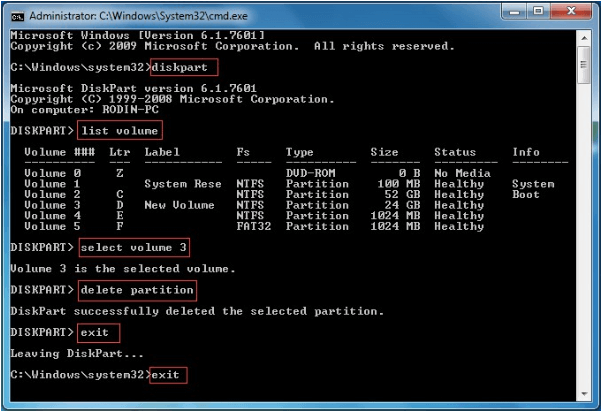
When you need to delete a partition from your computer, the procedure is quite simple. Step 1. Open CMD to run Diskpart.Step 2. Run the following commands in order:
- Type “list volume”.
- Type “select volume n”.
- Type “delete partition”.
- Type “exit”.
Despite the fact that you might think it’s hard to manage your disk partitions through Command Prompt, we hope that we have managed to prove that it’s not that difficult by giving detailed explanation. In short, as long as you know the correct commands, using Command Prompt can be a good solution. And if you turn to MiniTool Partition Wizard, you are saving time and effort.
Conclusion
His post mainly gives some information about hard drive management, to help you learn some basic knowledge. In this case, you will find it is not as that difficult as you have though to deal with some common issues. If you have any questions, feel free to leave us a comment below or email to [email protected] Thanks!
Default Partition Style Windows 7 FAQ
About The Author

Position: Columnist
Rodin is an enthusiastic IT writer focusing on Windows trends, disk partition management and data recovery. She loves to write and share her idea about the useful tips and tricks on personal computers' maintenance. If you are looking for methods to improve your computer performance, manage hard drives and recover data from different devices, Rodin can provide reliable solutions for data management.
User Comments :