The CPU fan error is a common one when booting Windows desktop computer or laptops. This can bring you much inconvenience. In this post, MiniTool will analyze the possible causes and offer you some effective solutions to fix the CPU fan error on boot.
Possible Causes for CPU Fan Error
CPU fan error is the warning for users when the computer shuts down automatically due to overheating and the fan(s) cannot cool the device completely. If your fan has errors and computer still overheats, the result is very serious.
Many other components of computer will be damaged permanently. So, what causes the CPU fan error? There are several reasons for the error.
- The fan itself has physical errors.
- Incorrectly CPU fan settings.
- Other elements that cause computer over-heating and the fan runs at a very high speed.
- Dust or other objects congest the vents of the fan.
- You connect the CPU fan incorrectly.
- CPU fan is damaged or broken.
After reading the above causes, you may doubt that how to fix CPU fan error. I will illustrate some methods for you right now. Please keep reading the article.
Solution 1: Move Your Computer
If you put your computer in the place that is exposed to strong sunlight or often gets hot, the PC can become overheating and shut down regardless of how much cooling the fan tries to cool.
To fix the CPU fan error, move your computer to a cool room or make sure that your PC is not exposed to direct sunlight all day long. After that, check if the CPU fan failure still persists.
Solution 2: Clean Vents and CPU Fan
If the Solution 1 fails to fix the error, you can check whether your CPU and its vents are full of dust. If so, clean them immediately. The simplest way to clean vents is to take brush from the vacuum cleaner and then clean the dust or debris.

To clean CPU fan, you need to turn your computer off at first. Then use an airgun or canned air to clean the CPU fan.
Solution 3: Check CPU Fan and Its Location
As said before, the physical errors with the CPU fan also might bring the problem. So, checking CPU and its location may helpful.
- If the CPU fan gets loose or dropped. so, you need to fasten your fans back into place with a screwdriver or glue according to your fan model. When checking the interior of the electrical device, make sure it shuts down completely (not enter the sleep mode) and disconnect with the power source.
- If you install the CPU fan by yourself, make sure that the location is right. It should be connected to the CPU header on the motherboard. The CPU header may be labeled “CPU Fan”, but if not, you can also find the three holes (three-pin plug for the fan) easily.
If you install the fan to other places, it might run when you turn your computer on, but the fan cannot cool CPU adequately.
Solution 4: Reconnect CPU Fan
There are several CUP fan connection ports on computer motherboard so that you can connect several different types of fans at the same time. Besides, you can also connect these different types of fans to other computer components. Therefore, you probably insert the fan into a wrong port.
Given to that fact, you need to reconnect your CPU fan. Then check if the fan works correctly.
Solution 5: Open BIOS and Change CPU Fan Settings
You can solve some technical issues by checking CPU fan settings in BIOS. How to open BIOS and change CPU fan settings? Here are steps to fix CPU fan error ASUS in BIOS.
Step 1: Reboot your computer. Press F2, F12 or Del buttons to enter the BIOS page.
Step 2: Click on Power tab and highlight Hardware monitor option from the pop-up list.
Step 3: Choose CPU Fan Speed Lower Limit option and change it into Ignore.
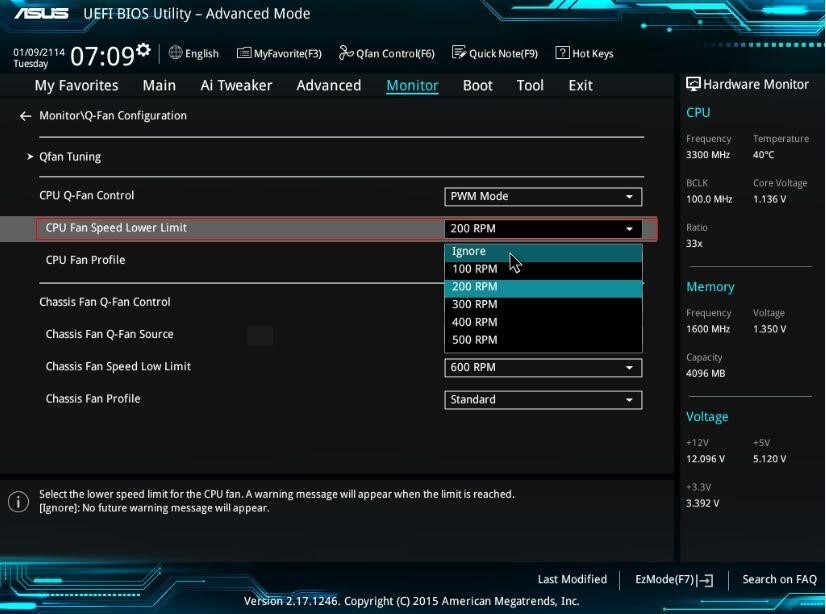
-image from asus.com
Step 4: Click Chassis Fan Speed option and change it into N/A.
Step 5: Pick the last option Power Fan Speed and change it to Ignore.
Generally speaking, your computer will not give you such CPU fan error message again after this operation.
Solution 6: Change a New CPU Fan
If all the above solutions cannot fix the error, probably it the fault of your CPU fan. At this moment, change a new CPU fan to solve the issue. If your computer warranty includes the repair of the fan or the fan has its own warranty, you can send it to the store.
How to Fix the Overheating Issue Caused by CPU Fan Error
If your CPU fan doesn’t work, your computer will become overheating. You can try some alternatives to fix the overheating issue before the fan error is solved.
- Use external fans or heat dissipation devices to cool your computer.
- Decrease computer CPU usage.
- Close your computer and wait for some time to restart (if possible).
User Comments :