AppHangB1 error is a problem that might randomly occur when you launch games on Steam or other applications. It is really a frustrating issue and has been reported by a large number of users. Luckily in this post, MiniTool summarizes some solutions provided by users on the forum.
About AppHangB1 Error
The annoying AppHangB1 error has been reported by plenty of users on the forum. According to the reports, this error comes up when they are trying to launching some applications (including Microsoft Edge, Photoshop, Excel, and etc.) and especially when they are starting any games through their Steam.
If this issue happens to you, your computer will be unresponsive, slow and even freezing, and the application or game will stop responding and be closed.
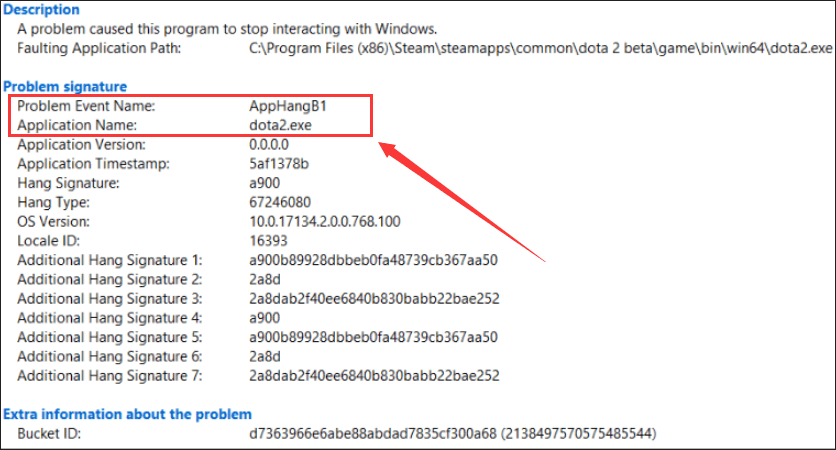
The error reporting will give a description of this problem: A problem caused this program to stop interacting with Windows. Besides, you can get more details about the issue by reading the Problem signature and Extra information about the problem.
As you can see in the following screenshot, the Problem Event Name is AppHangB1 and the affected application or game is displayed next to the Application Name.
Some users have tried relaunching the game or application and restarting their computer but in vain. And it is hard to figure out the culprit of the AppHangB1 error, as the problem might be different in different devices. What a frustrating problem, right?
Don’t panic, I have listed some effective solutions in the following contents. Without further ado, let’s start our troubleshooting journey.
How to Get Rid of Steam Apphangb1 Error
- Make some changes for your Steam
- Scan for virus and malware
- Disable your antivirus programs and Windows Firewall
- Boot your computer into safe mode
- Check your hard drive for errors
- Perform FSC scan
- Refresh your Steam
Fix 1: Make Some Changes for Your Steam
If you receive Steam AppHangB1 error unfortunately, perhaps some of your Steam settings are not configured correctly or certain game/Steam files are corrupted. In this case, you might need to make some changes for your games in Steam or for your Steam application. Here are some measures you can take.
Configure Launch Settings
At first, you can try configuring the launch settings on Steam, which has worked to help some users resolve Steam AppHangB1 error. This fix aims to help you launch Steams and the games in it with DirectX version 9 (dx9).
To change Steam launch settings, you can follow the given steps below.
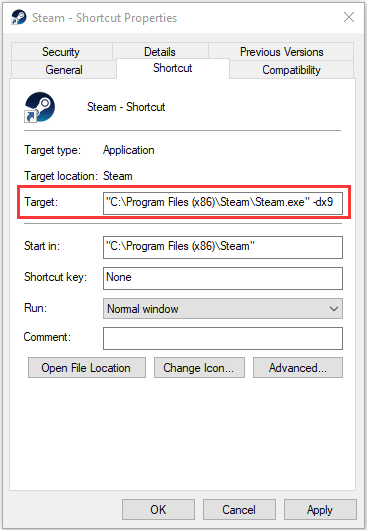
Step 1: Locate your Steam client folder in File Explorer. By default, it is saved in the path of C:Program Files (x86)Steam.
Step 2: Right-click the Steam executable and choose Create shortcut to create a shortcut in the same directory.
Step 3: Right-click the new shortcut and choose Properties.
Step 4: Under Shortcut tab, add -dx9 in the end of the path displayed in the Target box and click OK to save the change.
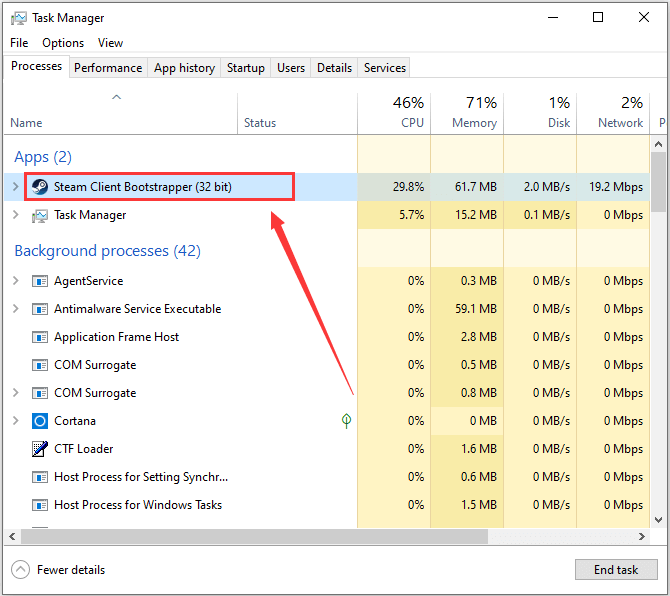
Step 5: Right-click the Start button and choose Task Manager to open it. Then, choose Steam Client Bootstrapper and click End task.
Once it’s done, you can restart your Steam to check if the problem event AppHangB1 disappears.
To change the launch settings for an individual game, you can refer to the following steps.
Step 1: Open your Steam client and go to LIBRARY.
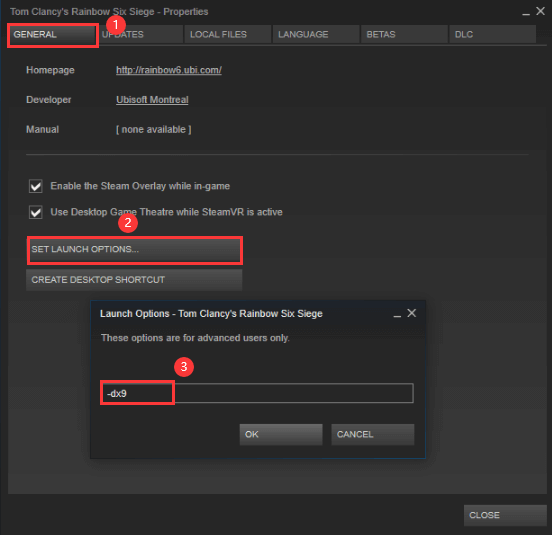
Step 2: Right-click the problematic game and choose Properties.
Step 3: Go to GENERAL tab and click SET LAUNCH OPTIONS.
Step 4: In the pop-up window, input -dx9 and click OK to confirm the operation.
Now, you can restart your Steam and you should be able to play the specific game properly.
Verify Integrity of Game Files and Repair Steam Library
Your Steam might work improperly if some game files are corrupted or missing. And Steam provides a feature to deal with this problem.
Step 1: Go to Steam LIBRARY, right-click the problematic game and choose Properties.
Step 2: Switch to LOCAL FILES and click VERIFY INTEGRITY OF GAME FILES.
Step 3: Go to Steam Settings > Download > Steam Library Folders.
Step 4: Right-click your Steam content information and choose Repair Library Folder.
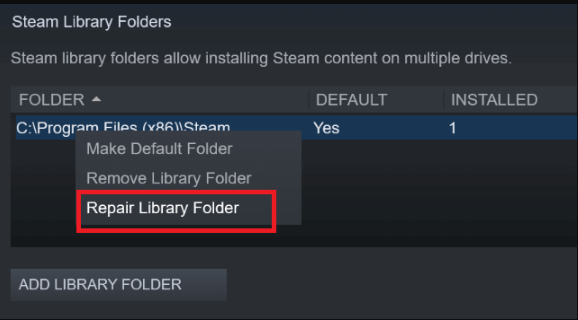
After that, restart your Steam as administrator and see if the problem is fixed.
Fix 2: Scan for Virus and Malware
Sometimes, your computer might be infected by certain virus or malware for odd reasons. As a result, some of your installed applications might be interfered and unable to work properly. The problem event AppHangB1 could also be caused by virus or malware.
Therefore, it is wise to scan your computer to exclude any potential threats from virus or malware. You can use your preferred third-party antivirus program as well as the built-in Windows Defender antivirus tool.
Here’s how to use this Windows tool:
Step 1: Press Windows + I to open Windows Settings.
Step 2: Go to Update & Security > Windows Security.
Step 3: Click Virus & threat protection under Protection areas section in the right pane.
Step 4: After opening Windows Defender Security Center, click Run a new advanced scan. Then, choose Full scan and click Scan now button.
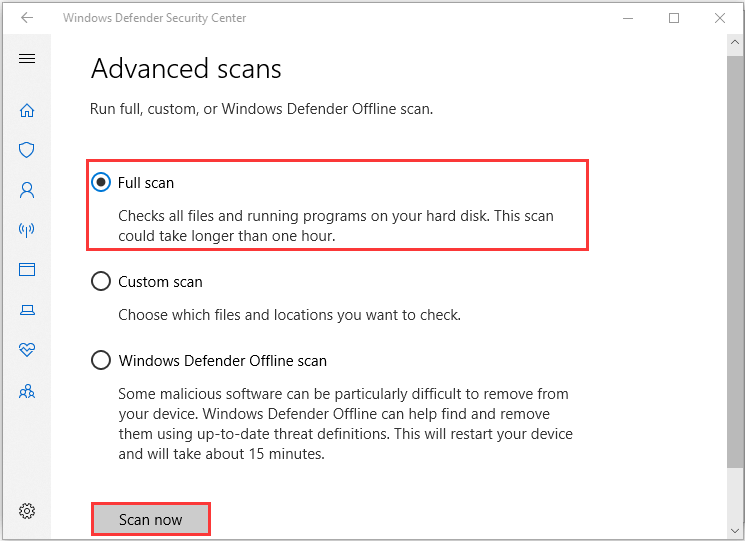
This tool will start checking all your files and running programs and this might take some time. You need to wait patiently until it is completed. After removing the potential threats, you can try relaunching the problematic application or game to see if the error is resolved.
Fix 3: Disable Your Antivirus Programs and Windows Firewall
Although antivirus programs can protect your computer from virus attacks, they might also conflict with other software and restrict them from working smoothly. So, if you have ruled out the possibility of virus infection, you can try disabling Windows Defender antivirus and other programs that function like it.
Besides, it is also necessary to temporarily disable Windows Firewall. If you are not sure how to do it, just follow the steps below:
Step 1: Open Control Panel.
Step 2: Go to System and Security > Windows Defender Firewall.
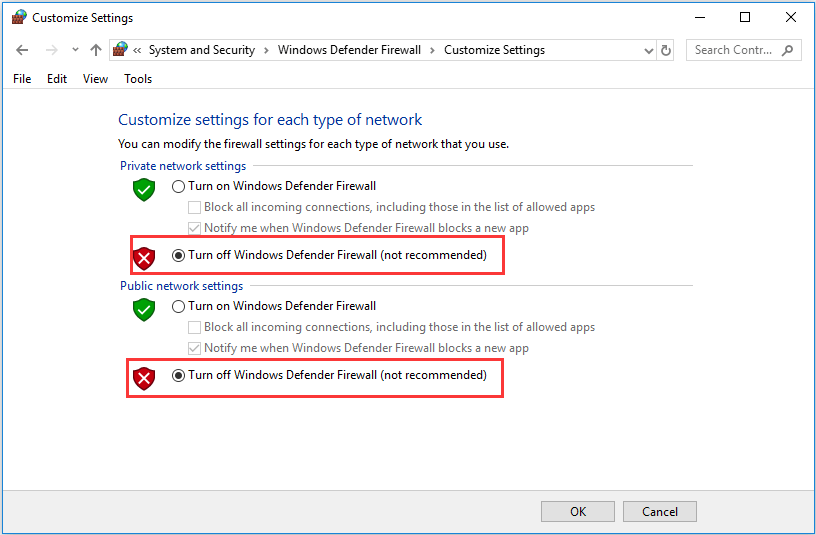
Step 3: Click Turn Windows Defender Firewall on or off in the left pane.
Step 4: Check Turn off Windows Defender Firewall option for both Private and Public network settings.
Fix 4: Boot Your Computer into Safe Mode
The safe mode is a diagnostic mode of your computer operating system which is used to diagnose any potential problems on your computer. In this mode, most programs and services are disabled, and only the essential system programs and services are allowed to start at boot.
By booting your computer into safe mode, you can find out whether a third-party program (besides antivirus you have checked in the former fix) is interfering with your steam and causes AppHangB1 error. How to enter safe mode on your Windows 10 computer? Here’s how to do it:
Step 1: Press Windows + R to invoke Run dialog.
Step 2: Type msconfig and click OK button to open System Configuration window.
Step 3: Switch to Boot tab, choose Safe boot among Boot options and then check Network.
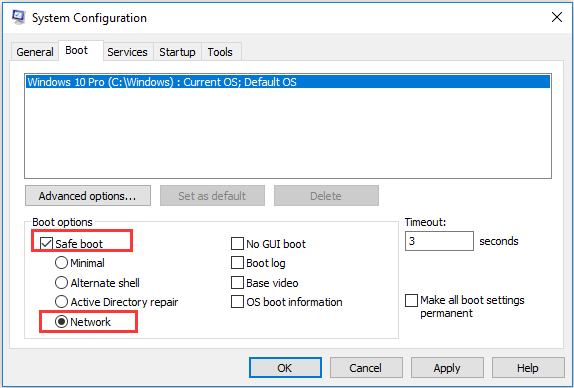
Step 4: Click Apply and OK to save the changes. Restart your computer to boot it into safe mode with networking and then open your Steam.
If the error still exists, it should have nothing to do with your third-party programs and you can jump to the next solution. If you have fixed the error successfully by this fix, you should find the suspicious program and keep it disabled or uninstall it.
Fix 5: Check Your Hard Drive for Errors
If your hard drive has file system errors, you might come across various problems on your computer including AppHangB1. Thus, checking hard drive for file system errors is always a good choice when you have no idea about the reason of a certain error. To achieve that, you have 3 options as follows.
Use File Explorer
Step 1: Press Windows + E to open File Explorer and then choose This PC in the left pane.
Step 2: Under Devices and drives section, right-click the drive for which you want to check file system errors and choose Properties.
Step 3: Switch to Tools tab and click Check button in Error checking section.
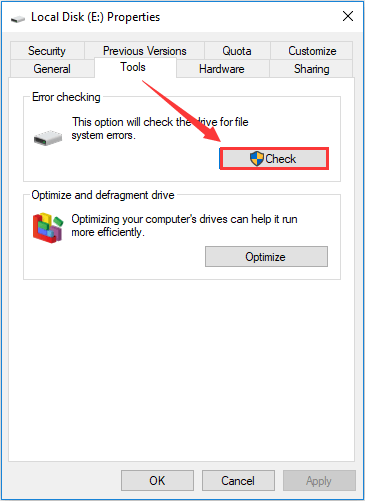
Step 4: Check Scan drive to start scanning the selected drive for errors.
You can keep using the drive during the scanning process. If any errors are found, you can choose to fix them immediately.
Use Command Prompt
Step 1: Open Run window.
Step 2: Type cmd and press Ctrl + Shift + Enter to run Command Prompt as administrator.
Step 3: Input the command chkdsk *: /f and press Enter key to execute the command. Here, * should be replaced by the drive letter of the drive for which you want to perform check disk.
Then, your computer will start scanning the drive, and any detected file system errors will be fixed automatically. Note that a restart will be required if you are performing the operation for the system drive.
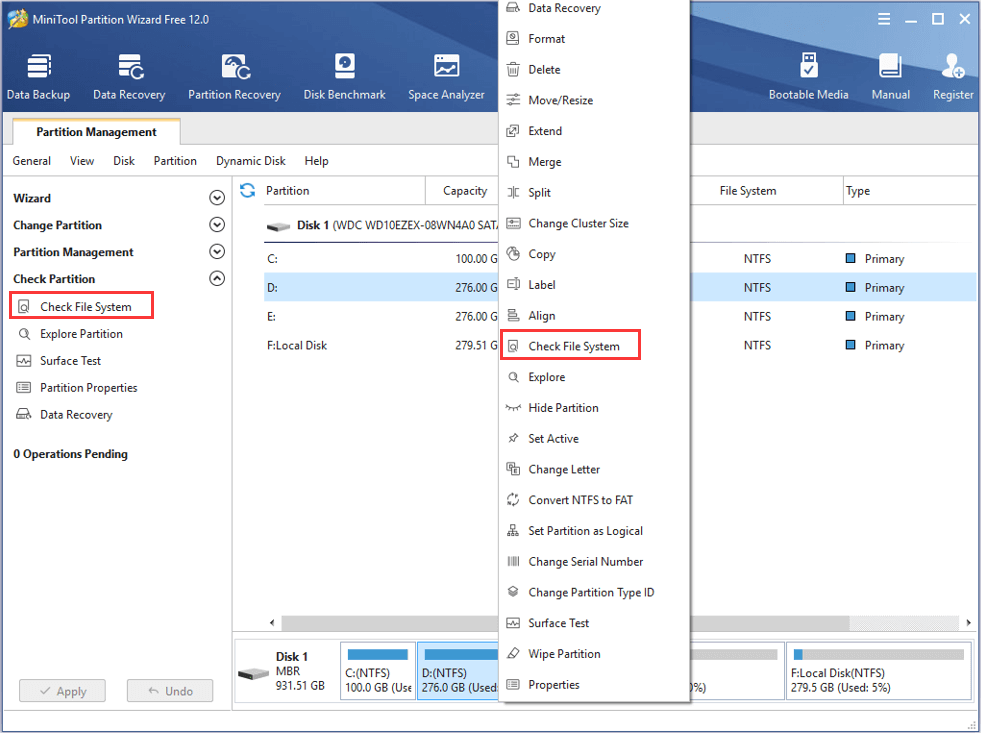
Use MiniTool Partition Wizard
If CHKDSK gets stuck, you can try a professional third-party program, and MiniTool Partition Wizard is recommended here for you.
MiniTool Partition Wizard is a reliable utility that can help you easily manage local drives, back up data, find back lost files and even migrate OS without reinstalling. You can also use this tool to check file system errors for your hard drive. Just click the following button to download it to have a try.
MiniTool Partition Wizard FreeClick to Download100%Clean & Safe
Step 1: Install MiniTool Partition Wizard on your computer and launch it to get the main interface.
Step 2: Right-click the target partition and choose Check File System from the pop-up menu. Alternatively, you can also select the partition and choose Check File System from the left tool bar.
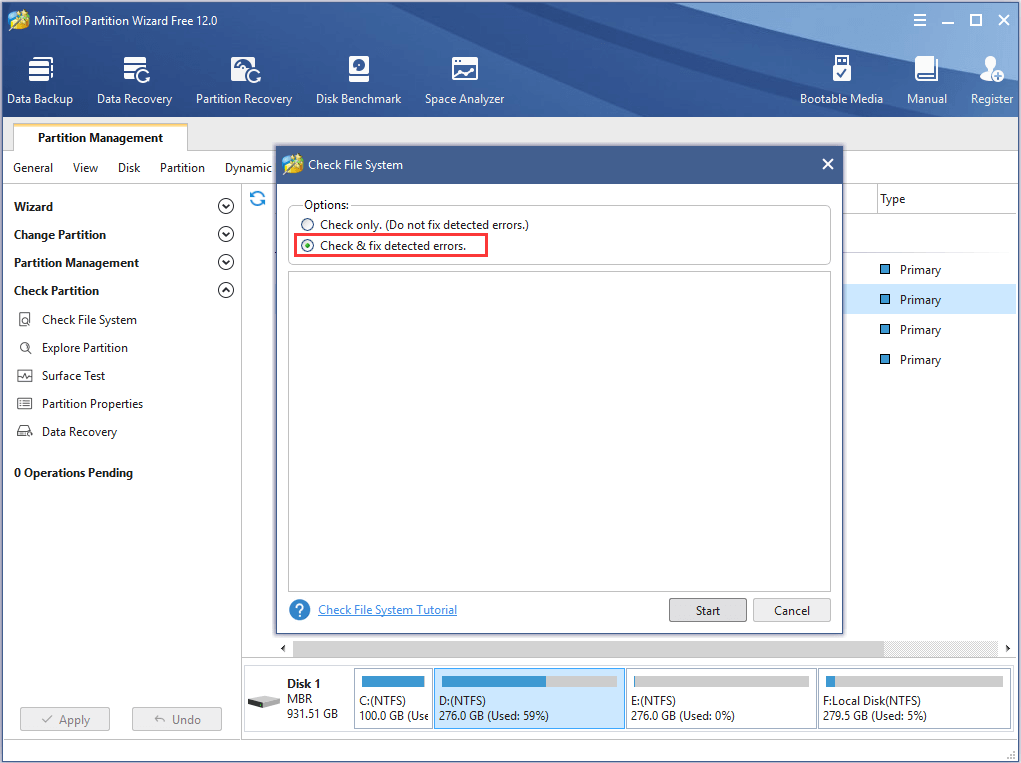
Step 3: Then, choose Check & fix detected errors option and click Start button.
How to check my hard drive for file system errors? Here are 3 methods.Click to Tweet
Fix 6: Perform FSC Scan
Another common reason for problem event AppHangB1 is that some dynamic-link library (DLL) files are corrupted or missing. In this case, you can simply use File System Checker (SFC) utility to fix the error.
To do that, you just need to open Command Prompt with administrative privilege, input the command sfc /scannow and press Enter. Then, wait patiently until verification 100% complete and restart your computer. Now, you can check if the error has been resolved successfully.
Fix 7: Refresh Your Steam
If you have tried all above methods but fail to fix Steam AppHangB1 error, you might need to refresh your Steam files, which has worked for plenty of users. The steps are listed below:
Step 1: Open File Explore and navigate to your Steam folder.
Step 2: Delete all the files, folders and programs in the Steam folder, except the Steam.exe executable file and the steamapps folder.
Step 3: Restart your computer. Then, go to the Steam folder again and double-click the Steam.exe to reinstall all the components deleted in last step. Keep in mind that you shouldn’t open Steam from the toolbar or any shortcuts.
After that, you should be able to use your Steam and play games in it without problem.
Bottom Line
This post has introduced 7 feasible methods to help you fix the problem event AppHangB1. Have you resolved this issue with the provided solutions in this post? Do you have any better solutions to this issue? You can share your experience and ideas in the following comment zone. You can also contact us via [email protected].
User Comments :