It is useful to let a window keep on top of others when working with limited screen space. The "always on top" feature can automatically configure your desktop to keep a window on top. How to keep a window always on top? Today, MiniTool will walk you through detailed steps to do that.
Why You Need Always on Top?
Windows 10 is a widely used system for a great many users. While some previous Windows 10 versions have been received with some criticisms due to various errors like 0x80070020, couldn’t complete the updates undoing changes, etc. Especially there is no Windows built-in tool for users to make a window always on top.
Always on top is a small third-party tool that can be used to keep window on top. This tool utilizes a very simple script to configure the window that you want to be prioritized, and you can change or remove it.
However, most programs don’t have this feature, and Windows doesn’t offer this feature. At this time, it is inevitable to utilize some tools to keep a window always on top. Please keep reading the following content.
How to Keep a Window Always on Top Windows 10?
In this section, 3 effective methods to keep a window always on top Windows 10 will be introduced.
Method 1. Use AutoHotkey Script
AutoHotkey is a free program that can enable you to create scripts to perform multiple actions using a single keyboard short. It can run in the background and sit in the system tray. Here is how to use AutoHotkey to keep a window always on top.
Step 1. Click here to download and install AutoHotkey on your Windows PC.
Step 2. Download the AlwaysOnTop.ahk script file from here. And then extract the .zip file and place the script to a folder that won’t be moved or deleted. You will find the following commands from this script.
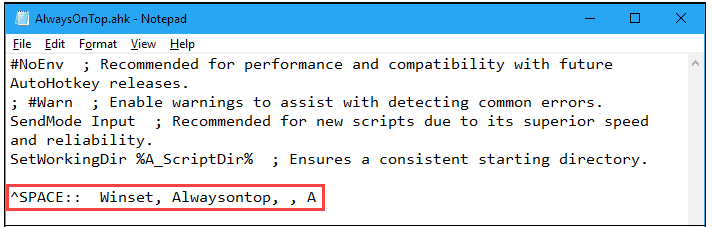
Step 3. Press Ctrl + Spacebar, this command sets will active the windows to keep always on top. You can also press the keyboard shortcut to disable always on top for the window.
Step 4. You can right-click the AutoHotkey icon to choose the script options.
![How to Change Refresh Rate on Windows 10 [Complete Guide]](https://images.minitool.com/partitionwizard.com/images/uploads/2020/02/how-to-change-refresh-rate-win10-thumbnail.jpg)
Method 2. Use TurboTop
TurboTop is also a program that can keep a window always on top. Here’s how to do that:
Step 1. Click here to download and install TurboTop on your computer, and then launch this program.
Step 2. Click on the TurboTop icon in the system tray. There will be a checkmark on the TurboTop menu, and select the title of the window that you want to keep it always on top.
Step 3. If you want to stop keeping the window always on top, you can click the icon again and select the window until there is no checkmark next to the window title.
Method 3. Use DeskPins
Apart from the above 2 methods, you can use DeskPins. It provides you with pins that you can grab and use to keep any window always on top. Similarly, this program also sits in the system tray. You can follow the steps below to operate it.
Step 1. Download and install this program from the official website, and then launch it.
Step 2. Right-click the icon in the system tray to pin a window on top.
Step 3. Then click on the title bar on the window that you want to keep always on top. Well, you can click the pin again to disable the “always on top” feature.
How to keep a window on top Windows 10? The 3 accessible tools are introduced to you. Have a try now.
User Comments :