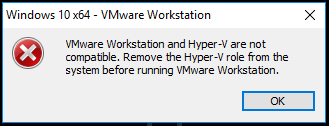
Recently, I migrated a Windows 10 Virtual Machine, to a host laptop also running Windows 10, and VMware Workstation 12. When I attempt to power on the VM, I get an error popup that states: VMware Workstation and Hyper-V are not compatible. Remove the Hyper-V role from the system before running VMware Workstation. Anyone know how I may resolve this issue? Thanks.https://communities.vmware.com/t5/VMware-Workstation-Pro/VMware-Workstation-and-Hyper-V-are-not-compatible-Remove-the/td-p/2236562
What Causes the VMware Hyper V Not Compatible
According to user reports, the “VMware Workstation and Hyper V are not compatible Windows 10” issue often occurs when migrating a Windows 10 VM or opening the VM Workstation. As the error message hints, the “VMware not compatible with Hyper-V” issue is related to the installed Hyper-V feature on the Windows host machine. Besides, incompatible hardware, insufficient system resources, and outdated VM can trigger the error too.
How to Fix It If VMware Workstation and Hyper-V Are Not Compatible
How to fix it if VMware Workstation and Hyper V are not compatible Windows 10/11? After investigating extensive user reports from different forums, we summarize 6 feasible ways to fix the error. Let’s start trying.
# 1. Preliminary Checks
Before heading to other slightly complex solutions, you can try the following preliminary checks to troubleshoot the incompatibility between VMware Workstation and Hyper-V.
- Make sure your PC has at least 60GB of storage space.
- Make sure your RAM has a minimum of 4GB.
- Make sure your processor is compatible with the 64-bit processor and supports AMD, Intel, and Qualcomm processors.
- Get to know how to locate the files & folders and their respective functions.
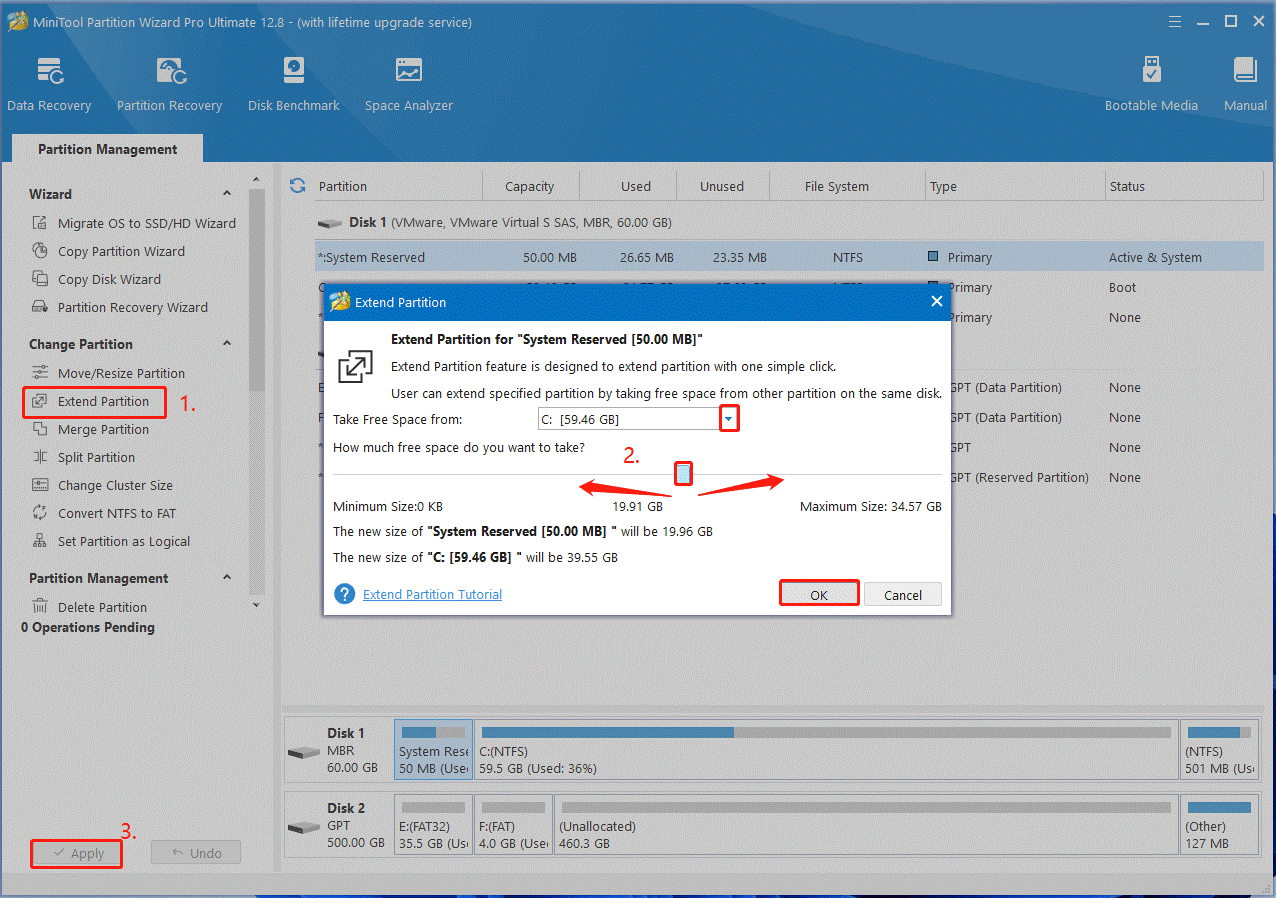
Further reading: If your computer doesn’t have enough disk space, don’t worry. MiniTool Partition Wizard can help you free up disk space by extending the partition, analyzing disk space, and upgrading to a larger SSD/HDD. Moreover, it can partition hard drive, convert MBR to GPT without data loss, recover data/partition, rebuild MBR, migrate OS, and more.
MiniTool Partition Wizard DemoClick to Download100%Clean & Safe
# 2. Uninstall Hyper-V in the GUI
As discussed above, the “VMware Workstation and Hyper-V are not compatible Windows 10” error is related to the Hyper-V feature. Here, you can follow the guide below to uninstall it in GUI.
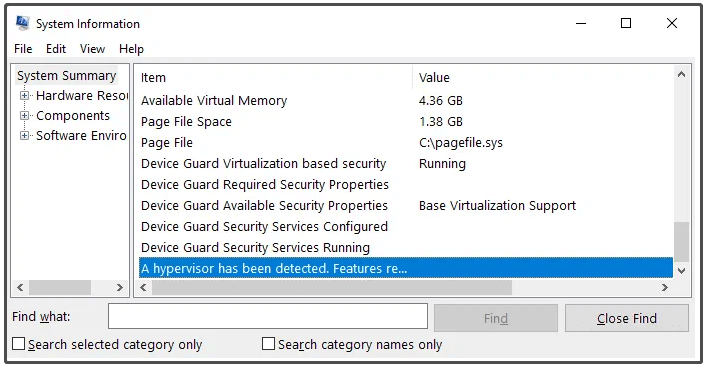
Step 1. Press the Win + R keys to open the Run dialog box, type msinfo32.exe in it, and press Enter to open the System Information window.
Step 2. Check if the Hyper-V is enabled and the Device Guard Virtualization-based security is running. If yes, proceed with the steps below to disable Hyper-V in GUI.
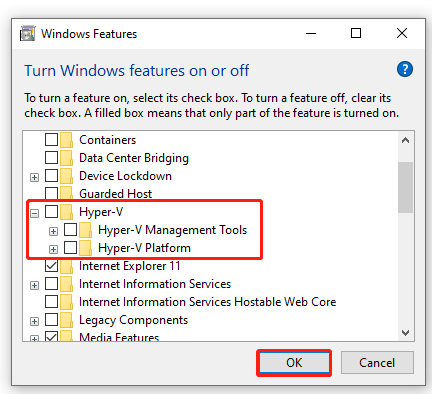
Step 3. Open the Run box again, type OptionalFeatures.exe in it, and hit Enter.
Step 4. In the Windows Features window, scroll down the list to find the Hyper-V option. If it is checked, untick the checkbox of Hyper-V, including its sub-options.
Step 5. Click on OK to save changes.
# 3. Disable Hyper-V Using PowerShell
Some users reported that the VMware not compatible with Hyper-V error can be solved by disabling Hyper-V in PowerShell.
Step 1. Press the Win + R keys to open the Run box, and then type powershell in it and press Ctrl + Shift + Enter keys to open the elevated PowerShell window.
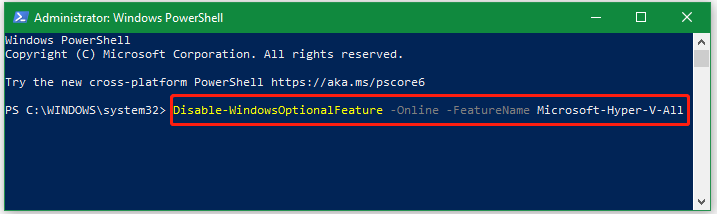
Step 2. In the pop-up window, type the following command and hit Enter to disable Hyper-V.
Disable-WindowsOptionalFeature -Online -FeatureName Microsoft-Hyper-V-All
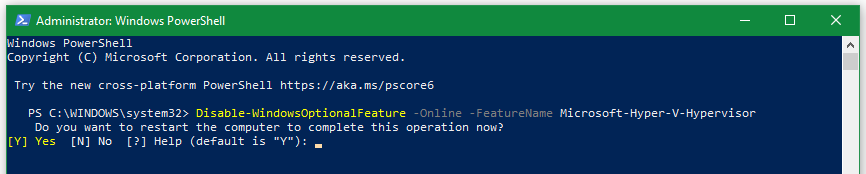
Or, you can run the following command to disable Hyper-V and restart computer.
- Disable-WindowsOptionalFeature -Online -FeatureName Microsoft-Hyper-V-Hypervisor
- shutdown -r -t 0
# 4. Disable Hyper-V Using BCDedit in CMD
Besides, you can fix the VMware and Hyper-V not compatible error by disabling Hyper-V in Command Prompt.
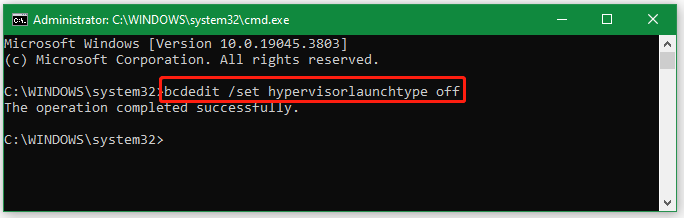
Step 1. Type cmd in the Search box, and then right-click the Command Prompt window and select Run as administrator. Then click on Yes in the UAC window.
Step 2. In the pop-up window, type the following command and press Enter to disable Hyper-V.
bcdedit /set hypervisorlaunchtype off
If you want to re-enable Hyper-V and set the default value back, run the command: bcdedit /set hypervisorlaunchtype auto.
# 5. Disable Virtualization Based Security
Disabling the Virtualization Based Security option can help fix the VMware Workstation and Hyper-V not compatible error. You may have a try.
Step 1. Open the Run box and run the gpedit.msc command to open the Local Group Policy Editor window.
Step 2. Navigate to the following path via the left search bar.
Computer Configuration > Administrative Templates > System > Device Guard
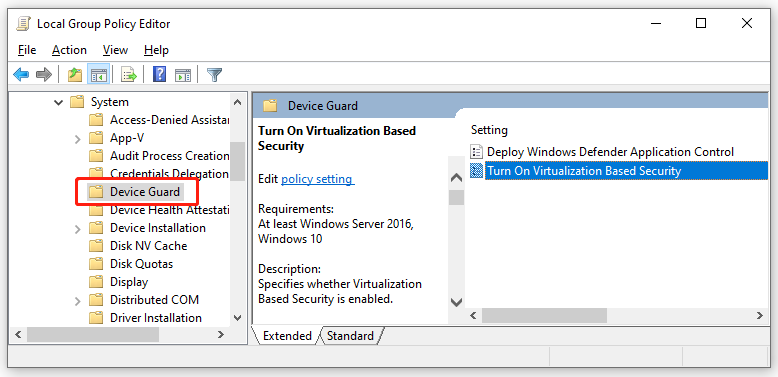
Step 3. Double-click the Turn on Virtualization Based Security option, set it as Disabled, and click on OK to save changes.
# 6. Update VMware Workstation
An outdated VM version can lead to the incompatibility between VMware Workstation and Hyper-V as well. If your host computer is running with Windows 10 version 2004 build 19041 or newer, you should update the VMware Workstation to version 15.5.6 or higher version. This can help run VMware on Windows 10 machines without disabling Hyper-V and Virtualization Based Security.
User Comments :