When attempt to open some applications or games, you are likely to receive the error message saying: The code execution cannot proceed because VCRUNTIME140_1.dll was not found. This error may be triggered by various reasons, like missing VCRUNTIME140_1.dll file, virus infection, improper installation, etc.
To fix the “VCRUNTIME140_1.dll not found” issue, you can refer to the following methods.
MiniTool Partition Wizard DemoClick to Download100%Clean & Safe
Method 1: Install All Pending Windows Updates
If your Windows is out of date, you’d better install any pending Windows updates to fix the “VCRUNTIME140_1.dll not found” issue. Here’s how to do this.
Step 1: Open Windows Settings by pressing Windows + I and then select Update & Security.
Step 2: Switch to Windows Update. Then click Check for update from the right side.
Step 3: After that, download and install all the available pending updates.
Method 2: Run SFC and DISM Scans
It’s also possible to repair the “VCRUNTIME140_1.dll not found” issue with the SFC and DISM scans.
Step 1: Press Windows + R to open the Run dialog. Then type cmd in the box and press Ctrl + Shift + Enter.
Step 2: After entering the elevated Command Prompt, type sfc /scannow and press Enter.
Step 3: Wait for the process to end. Then restart your computer and run Command Prompt as an administrator again.
Step 4: Type DISM /Online /Cleanup-Image /RestoreHealth and press Enter.
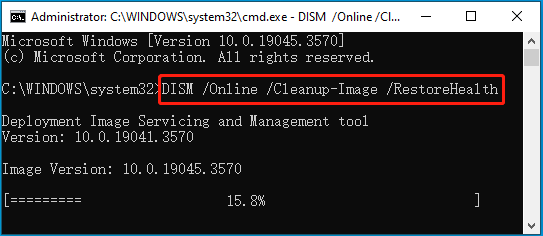
Step 5: Once the scan completes, restart your PC.
Method 3: Install Microsoft Visual C++ Redistributable Package
Installing the newest Microsoft Visual C++ Redistributable package may resolve the “VCRUNTIME140_1.dll missing” issue as well. To do this, you should go to the official Microsoft website, download a suitable Visual C++ Redistributable package based on your system, and then double-click the downloaded file for installation.
Method 4: Re-register the DLL File
Manually re-registering the DLL file is another way you can try when the “the code execution cannot proceed because VCRUNTIME140_1.dll was not found” issue occurs. You can re-register the DLL file by executing the following commands one after another in the administrative Command Prompt.
- regsvr32 /u VCRUNTIME140_1.dll
- regsvr32 VCRUNTIME140_1.dll
Method 5: Reinstall the Problematic Program
The “VCRUNTIME140_1.dll not found” issue may also happen due to problems with the installation of the program you want to run. In this case, it’s recommended that you uninstall the failing program and then reinstall it. This may help you retrieve the missing VCRUNTIME140_1.dll file as well.
Step 1: Open the Run dialog. Then input appwiz.cpl and press Enter.
Step 2: In the Uninstall or change a program window, right-click the target program and select Uninstall.
Step 3: Follow the given instructions to remove the program from your PC. Then go to the official website or Microsoft Store to install it back.
Are you bothered by the “VCRUNTIME140_1.dll not found” issue? Don’t worry. You can try to fix it efficiently by applying the above methods.
User Comments :