You will definitely feel annoyed when you find that your Lenovo computer has no sound when you are using it. Fortunately, this article from Partition Magic will tell you the cause of this problem and how to solve the sound not working on Lenovo problem. Please continue reading.
Why Is the Sound Not Working on Lenovo?
It is annoying if there is no sound when using a computer, because we need sound when watching videos, listening to music, and holding meetings. What causes the sound not to work on Lenovo laptops? Here are some common reasons:
- The system or application volume may be mistakenly set to mute or very low.
- Outdated or damaged drivers may cause abnormal audio functions.
- Some installed security software and audio enhancer software may interfere with the normal function of audio.
- The system may select the wrong audio output device by default.
- Windows updates may cause incompatibility with audio drivers.
How to solve this problem? Here are 6 methods for you to try.
Fix 1: Make Sure the Volume Is Audible
Sometimes you accidentally click on the mute button, and the sound on your computer goes silent, so you need to reset the volume. Click the sound icon in the lower right corner of the computer screen, and then move the volume slider to at least halfway.
If this doesn’t solve the problem, move on to the next solution.
Fix 2: Update Audio Drivers
This problem can occur if you’re using an incorrect or outdated audio driver, so you should update your audio driver to see if that fixes the problem.
Here are the steps:
Step 1: Open the Device Manager.
Step 2: In the Device Manager window, you can expand Sound, video and game controllers category.
Step 3: Right-click your audio driver and select Update driver.
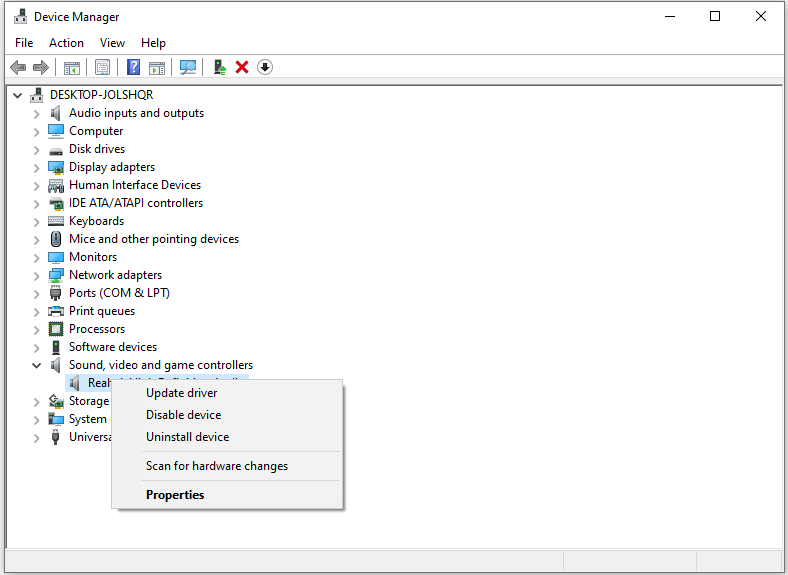
Step 4: In the new pop-up window, choose Search automatically for drivers.
Fix 3: Run Audio Troubleshooter
If you have the no sound on Lenovo problem, you might be able to fix it by running the troubleshooter. Windows 10 has a built-in troubleshooter that can help fix any hardware-related issues.
Step 1: Press the Windows + I keys together to open Windows Settings.
Step 2: In the Settings window, you can click Update & Security > Troubleshoot.
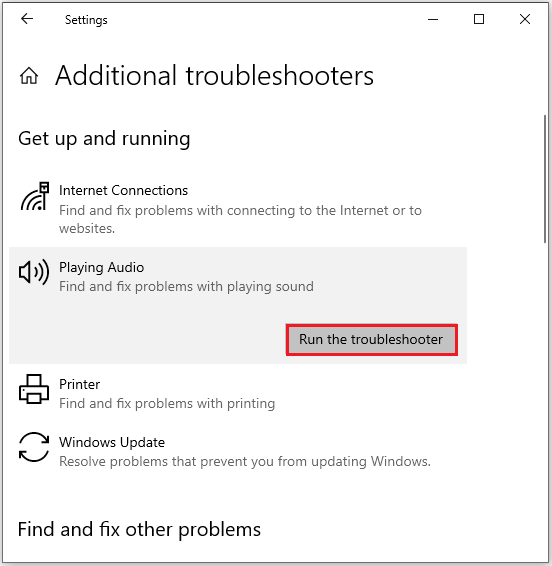
Step 3: Click the Additional Troubleshooters option on the right side.
Step 4: Click the Run the troubleshooter button next to Playing Audio. Then follow the on-screen instructions to finish the process.
Fix 4: Turn off Audio Enhancements
Audio enhancements can improve the sound quality of your hardware. It can also interfere with your sound system for some reason. Therefore, disabling audio enhancements may solve the Lenovo laptop sound not working on Windows problem.
Step 1: Tap on the sound icon in the right corner of the computer screen and select Sounds.
Step 2: Click the default audio device and select Properties.
Step 3: Click on the Enhancements tab.
Step 4: Select Disable all sound effects.
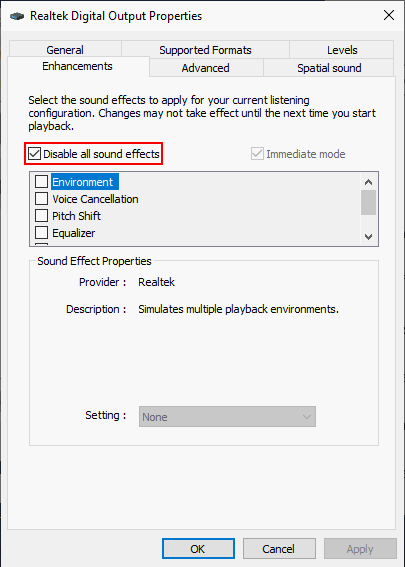
Step 5: Click OK.
Fix 5: Scan for Virus
There is also a possibility that a virus or malware is preventing you from using your audio device on your Lenovo. To verify this, you need to perform a full scan.
Step 1: Press Windows + I to open Settings.
Step 2: Go to Update & Security > Windows Security.
Step 3: Choose Virus & threat protection in the Protection areas section.
Step 4: Click Scan options.
Step 5: Choose Full scan and click the Scan now button.
Fix 6: Perform a System Update
Microsoft frequently releases new features through Windows updates. If you’re experiencing sound not working on Lenovo, running a Windows Update might help resolve the issue.
Step 1: Press the Windows + I keys together to open the Windows Settings window, and click Update & Security.
Step 2: Select Windows Update from the left menu, then click the Check for updates button on the right to automatically download and install the latest updates for your system.
Bottom Line
Next time your Lenovo laptop audio isn’t working, you’ll know what to do! The above methods are very easy to use, and I hope they are helpful to you.
About The Author

Position: Columnist
Cecilia has been an editor at MiniTool for two years. She primarily focuses on disk and partition-related content, with particular expertise in disk cloning, partition recovery, and PDF document conversion. She is dedicated to providing users with clear and accurate solutions to help them efficiently resolve common computer problems.
User Comments :