This guide explains how to change Outlook notification sound in Windows. You’ll learn 2 methods to customize your email alerts from MiniTool Partition Wizard, including using the Outlook settings and the Control Panel in Windows Settings.
Why Change Outlook Notification Sounds?
While Outlook’s default notification sound is useful, it may not suit everyone’s preferences.
Here are some common reasons why some people choose to change it:
1. Prioritize important emails.
By setting unique alert tones for specific senders, you can quickly identify important emails and prioritize them.
2. Reduce distractions.
The frequent default “ding” sound can disrupt your focus. You can set a quieter alert tone for regular emails or mute alerts for unimportant senders to reduce distractions.
3. Distinguish between different notification sources.
Using custom sounds, you can distinguish between different types of alerts, such as new emails and meeting reminders.
4. Fix sound issues.
Sometimes, Outlook notification sounds may not sound. This could be due to changes in your sound settings or file corruption. Resetting your notification sounds can resolve the issue.
How to Change Email Notification Sound
In the new version of Outlook, you can change the notification sounds for emails directly.
In the classic version of Outlook, the default notification sounds are derived from Windows system sounds, which you can change through the Control Panel.
Here are the detailed steps:
Method 1: Use Outlook Settings
Microsoft has introduced the ability to customize email notification sounds in the latest version of Windows Outlook.
You can choose from the system’s built-in notification sounds or add your own sound files.
Step 1: Open the Outlook app on your PC.
Step 2: Click the Settings icon in the top-right corner.
Step 3: Go to General > Notifications. Ensure the Notifications in Outlook toggle is On.
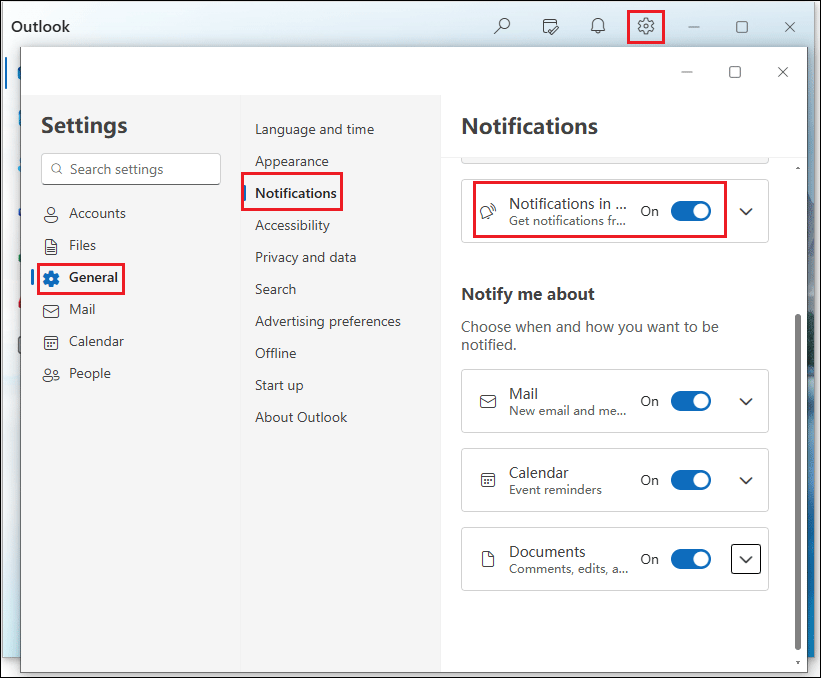
Step 4: Under Notify me about section, turn on the toggles for Mail, Calendar, and Documents.
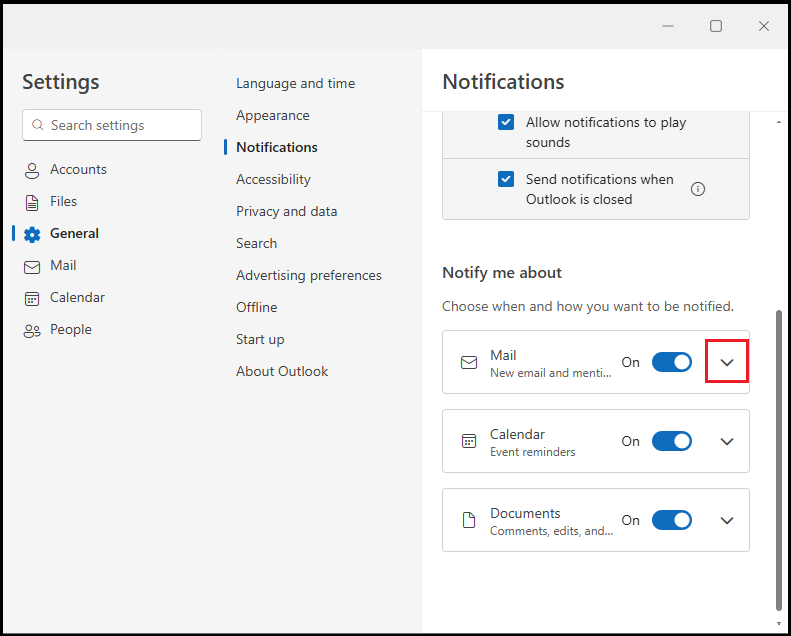
Step 5: Expand the down arrow next to Mail.
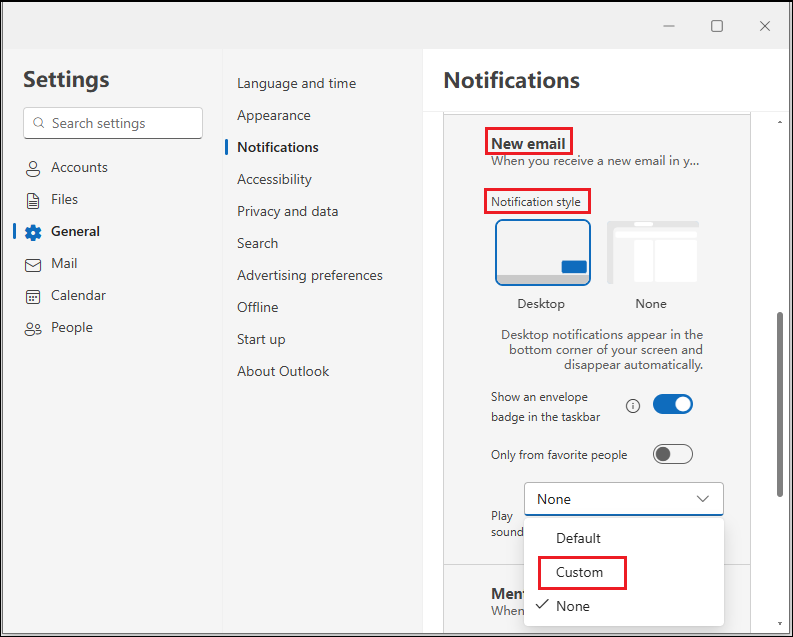
Step 6: In the New mail notifications style options, select the dropdown menu next to Play sound. Here, you’ll find three options: Default, Custom, and None.
- Default: When this option is selected, Outlook uses the default system notification sounds.
- Custom: Selecting this option allows you to choose a specific notification sound from the default audio list, or you can browse or upload your own audio files.
- None: When this option is selected, Outlook will not emit any sound notifications.
Method 2: Use Control Panel
This method of changing email notification sounds works not only for older versions but also for newer versions of Outlook app.
Step 1: Type Control Panel in the Search box and choose Open.
Step 2: Select View by to Large icons and click Sound.
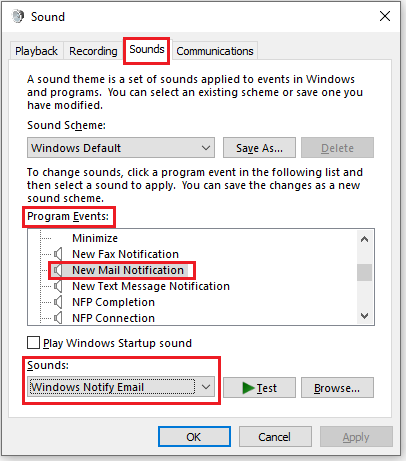
Step 3: Switch to the Sounds tab and scroll through the Program Events list, and select New Mail Notification.
Step 4: Expand the Sounds dropdown list and select an alternative sound.
Step 5: Click Apply, then OK to save the changes.
Bonus Tip: How to Fix Outlook Notifications Aren’t Working
If you’ve enabled notifications in Outlook but aren’t receiving reminders, first check your status in Teams, then confirm that your Windows notification settings are correct.
Here are the detailed steps:
1. Check status in Teams.
Ensure that your Teams status is not set to Do not disturb.
2. Check Settings in Windows.
Step 1: Click Start, and then select Settings.
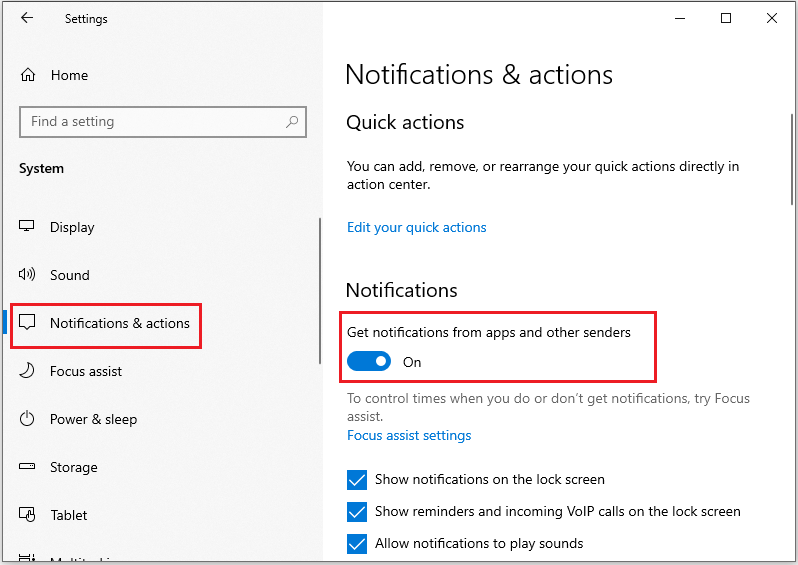
Step 2: Go to System > Notifications.
Step 3: Confirm Get notifications from apps and other senders is turned On. Ensure the senders are listed and their notifications are enabled.
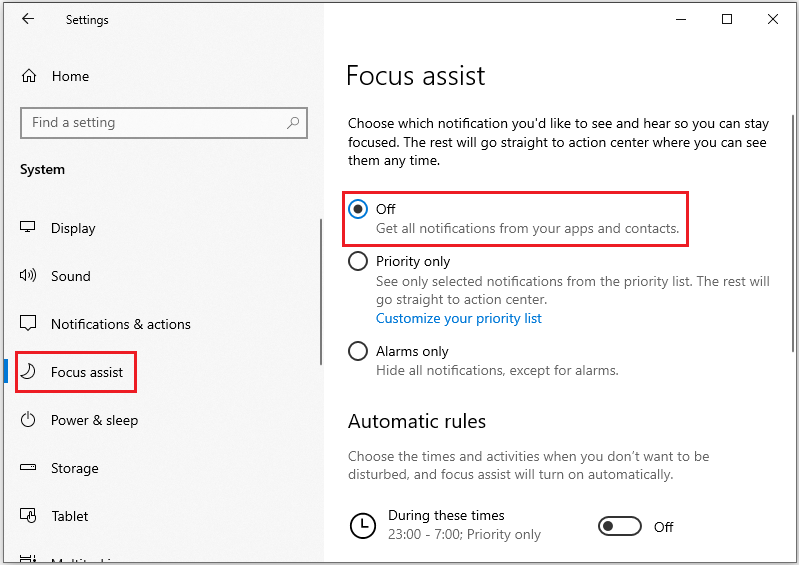
Step 4: Select Focus assist and confirm Get all notifications from your apps and contacts is Off.
3. Review battery saver settings in Windows.
Notifications may be paused when your device is in Battery Saver Mode. To enable them again:
Step 1: Select the Start icon, then press Settings.
Step 2: Go to System > Power & sleep. Then, click Additional power settings under the Related sections.
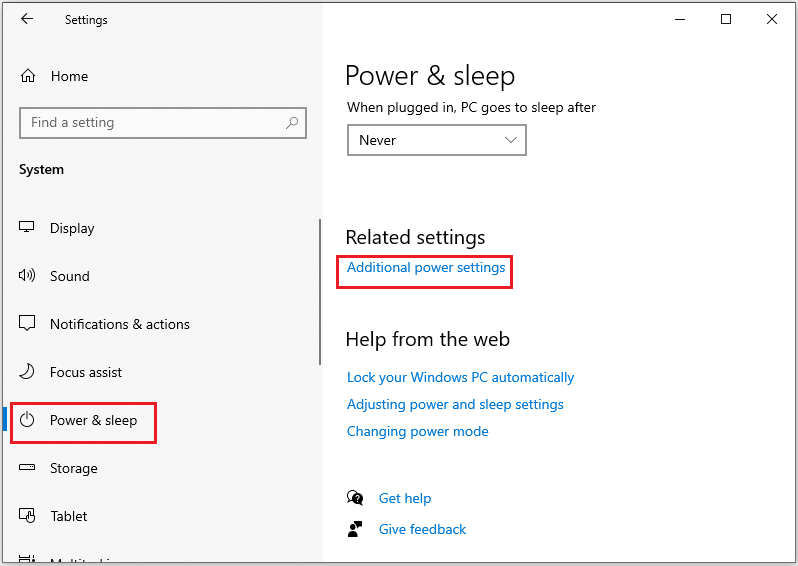
Step 3: Ensure Power Saver is turned off to resume receiving notifications.
Change Outlook Notification Sound FAQ
Step 2: Select Options.
Step 3: Click Advanced on the left side of the Outlook Options window.
Step 4: Scroll down to the Reminders section.
Step 5: Make sure the Play reminders sound option is selected. If it isn’t, select it to turn on the sound.
Step 6: Click the Browse button and navigate to your desired sound file. Only .wav files are supported.
Step 7: Select the sound file and click Open, then click OK.
Step 2: Tap the Settings gear icon.
Step 3: Select Notifications.
Step 4: Tap on the account you want to change, and then select Sound. Then choose a ringtone from the available list.
Bottom Line
That’s it! By following the steps above, you can easily change your Outlook notification sounds and customize new email alerts to your preferences.
If you have any questions or suggestions while using MiniTool Partition Wizard, you can contact us at [email protected] for further assistance.
About The Author

Position: Columnist
Cecilia has been an editor at MiniTool for two years. She primarily focuses on disk and partition-related content, with particular expertise in disk cloning, partition recovery, and PDF document conversion. She is dedicated to providing users with clear and accurate solutions to help them efficiently resolve common computer problems.
User Comments :