Thinking about replacing the hard drive in your ASUS TUF A15? Not sure how to go about it or what to watch out for? This guide from Partition Magic provides a detailed step-by-step tutorial to help you through the process of the ASUS TUF A15 SSD upgrade.
ASUS TUF A15 is an all-around gaming laptop that performs well in terms of performance and durability. It runs Windows 11, can be equipped with up to NVIDIA GeForce RTX 4070 GPU, and has a 15.6-inch screen.
In addition, this laptop is equipped with an M.2 NVMe PCIe Gen 4×4 solid-state drive and supports dual SSD slots. This makes it easy and efficient to add a new SSD or upgrade the ASUS TUF A15 SSD.
If you need to upgrade the computer and don’t want to re-download the operating system or other useful files, then you need to migrate the data from the old disk to the new disk. You can refer to the following guide.
ASUS TUF A15 SSD Upgrade Guide
Below, I will introduce you to the steps on how to upgrade ASUS TUF A15 SSD from 4 aspects.
Part 1: Check SSD Compatibility
Before buying a new SSD for your computer ASUS TUF A15, you need to check if the SSD is compatible with your PC.
- Slot type: TUF A15 supports PCIe 3.0 and PCIe 4.0 NVMe SSDs.
- Capacity limit: Most models support up to 2TB per slot (depending on the computer).
- Number of SSD slots: Some versions are equipped with two M.2 slots.
Part 2: Initialize New SSD
For a brand-new disk, you need to initialize it before you can use it. Here is how to initialize the disk:
Step 1: Connect the new SSD to your PC.
Step 2: Press the Win + R keys together to open the Run box. Then, input diskmgmt.msc and click OK.
Step 3: Right-click the new SSD disk and select Initialize Disk.
Step 4: In the window that appears, choose the same partition style as the original SSD (either MBR or GPT), then click OK to confirm.
Part 3: Clone Old SSD Data to New SSD
To migrate old data to a new disk, you need to use professional migration software. MiniTool Partition Wizard is a good choice. It includes functions such as Copy Disk and Migrate OS to SSD/HDD to safely transfer your data.
The following takes the Migrate OS to SSD/HDD function as an example.
This software not only can help you clone the hard drive but also help you delete/extend/resize/create partitions, format USB to FAT32, rebuild MBR, etc.
MiniTool Partition Wizard DemoClick to Download100%Clean & Safe
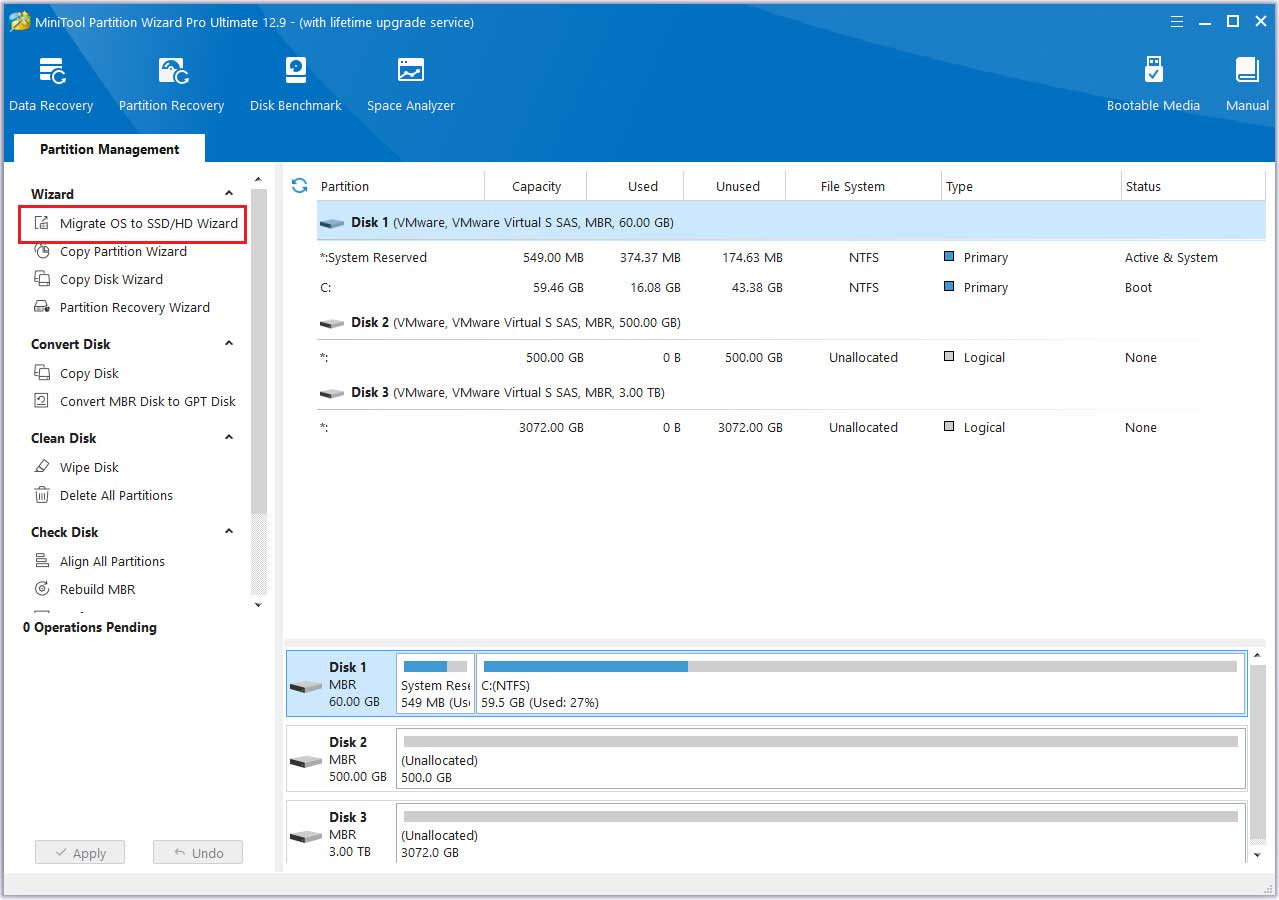
Step 1: Launch MiniTool Partition Wizard to its main interface. Click on the Migrate OS to SSD/HD Wizard feature from the left action panel.
Step 2: Select the option that best suits your operating system migration requirements, then click Next.
Step 3: Choose the new SSD as the target disk and click Next.
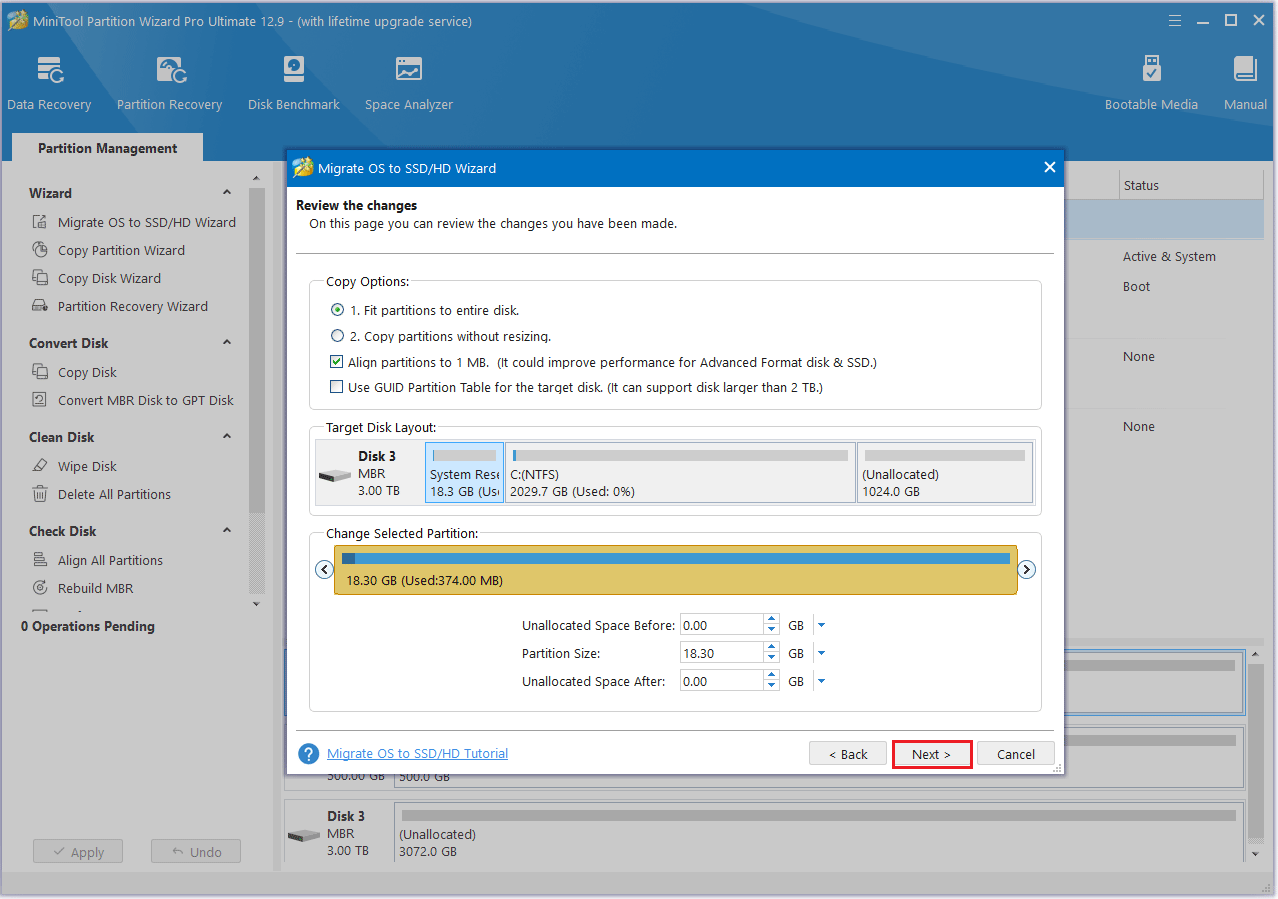
Step 4: Adjust the disk layout in the “Review the changes” window, then click Next.
- Fit partitions to entire disk: The partitions on the source disk will be extended by an equal proportion to fill the entire new SSD.
- Copy partitions without resizing: All the partitions on the source disk are copied into the new SSD without changes in size or location.
- Align partitions to 1 MB: The Align partitions to 1 MB option will apply 4K alignment on the SSD.
- Use GUID partition table for the target disk: The Use GUID partition table for the target disk option will apply GPT on the SSD, but it only appears when the source disk is an MBR disk.
- Change Selected Partition: You can resize or move the partition according to your needs.
Step 5: A warning window “How to boot from the destination disk?” will appear. Click Finish > Apply to finish the process.
Part 4: Replace the Old SSD with the New SSD
After the data has been migrated to the new disk, you will need to install another disk in the computer’s card slot.
First, you will need to turn off the computer and turn it upside down, and remove the bottom cover. Find the SSD slot for your model. If you are replacing an old SSD, unscrew and remove the original SSD. If there are two SSD slots, you can find another slot to install the second SSD. After installing the SSD, put the bottom cover back on the computer.
Bottom Line
After reading this article, you probably know the ASUS TUF Gaming A15 SSD upgrade process. If you need it, you can refer to this article. I hope this article can help you.
About The Author

Position: Columnist
Cecilia has been an editor at MiniTool for two years. She primarily focuses on disk and partition-related content, with particular expertise in disk cloning, partition recovery, and PDF document conversion. She is dedicated to providing users with clear and accurate solutions to help them efficiently resolve common computer problems.
User Comments :