About the Hardware Tab in Drive Properties Windows 10
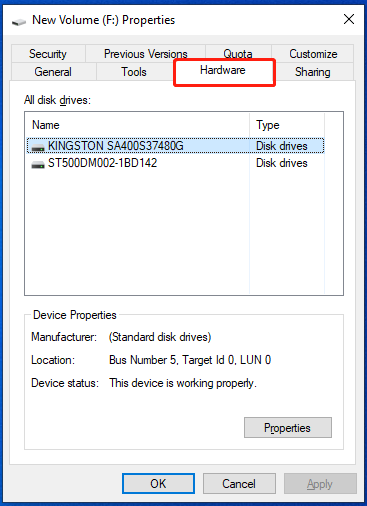
The Hardware tab in the properties window of each drive in your Windows 10 enables you to see the device properties for the corresponding drive. To access the Hardware tab, you can follow the steps below.
- Press Windows + E to open File Explorer.
- Go to This PC.
- Right-click the specific drive from the right side and select Properties.
- Navigate to the Hardware tab in the prompted window.
For some reason, you may plan to remove or add Hardware tab in Drive Properties Windows 10. Below this post summarizes possible ways to help you. If you have no idea how to do this, you can focus on the following content.
MiniTool Partition Wizard DemoClick to Download100%Clean & Safe
How to Add Hardware tab in Drive Properties
To add Hardware tab in Drive Properties, there are two ways available. You can pick one according to your preference.
Way 1: Via Local Group Policy
Step 1: Open the Run dialog by pressing Windows + R.
Step 2: Type gpedit.msc in the text box and then hit OK to open Local Group Policy Editor.
Step 3: Navigate to the following path:
User Configuration\Administrative Templates\Windows Components\File Explorer
Step 4: Scroll down to find and double-click Remove Hardware tab in the right panel.
Step 5: In the pop-up window, select Not Configured or Disabled.
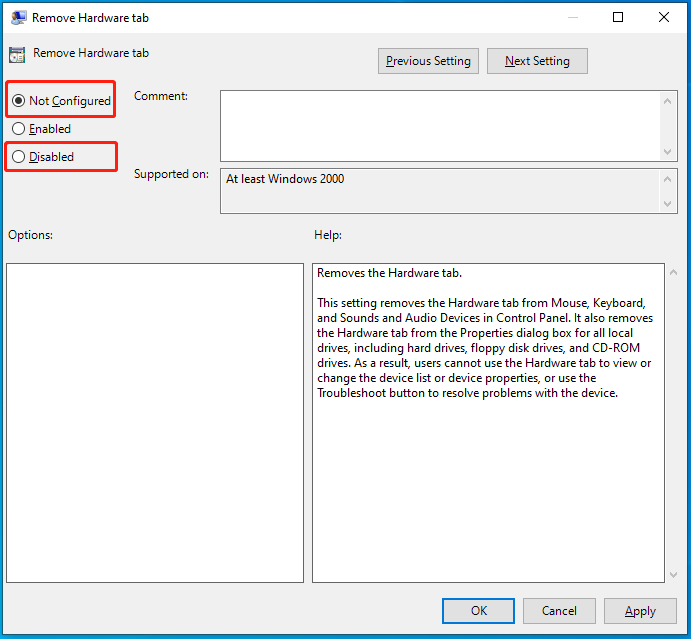
Step 6: Finally, click Apply and OK to save the change.
Way 2: Via Notepad
Step 1: Type notepad in the Run dialog and press Enter to open Notepad.
Step 2: Type the following content in the text editor.
Windows Registry Editor Version 5.00
[HKEY_CLASSES_ROOT\Drive\shellex\PropertySheetHandlers\{5F5295E0-429F-1069-A2E2-08002B30309D}]
[HKEY_CURRENT_USER\Software\Microsoft\Windows\CurrentVersion\Policies\Explorer]
“NoHardwareTab”=-
[HKEY_LOCAL_MACHINE\SOFTWARE\Microsoft\Windows\CurrentVersion\Policies\Explorer]
“NoHardwareTab”=-
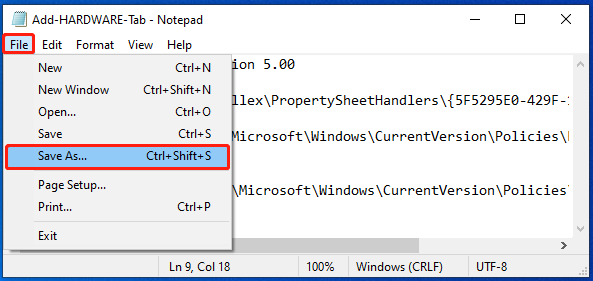
Step 3: After that, click File > Save As. Then follow the given steps to save the file.
- Name the file with the .reg extension, e.g.Add-HARDWARE-Tab.reg.
- Choose All Files for Save as type.
- Choose a location and click Save to store this file.
Step 4: Right-click the saved file and select Merge. Then follow the on-screen instructions to confirm the operation.
How to Remove Hardware tab in Drive Properties
In this section, we collect two ways how to effectively remove Hardware tab in Drive Properties.
Way 1: Via Local Group Policy
Step 1: Open Local Group Policy Editor and go to the following path:
User Configuration\Administrative Templates\Windows Components\File Explorer
Step 2: Find Remove Hardware tab from the right side. Then right-click it and select Edit.
Step 3: In the next window, choose Enabled and then click Apply > OK to save the change.
Way 2: Via Registry Editor
Step 1: Type regedit in the Run dialog box and then press Enter to open Registry Editor.
Step 2: Go to the following path in Registry Editor:
HKEY_CURRENT_USER\Software\Microsoft\Windows\CurrentVersion\Policies\Explorer
Step 3: Right-click empty place on the right side. Then select New > DWORD (32-bit) Value to create a new value.
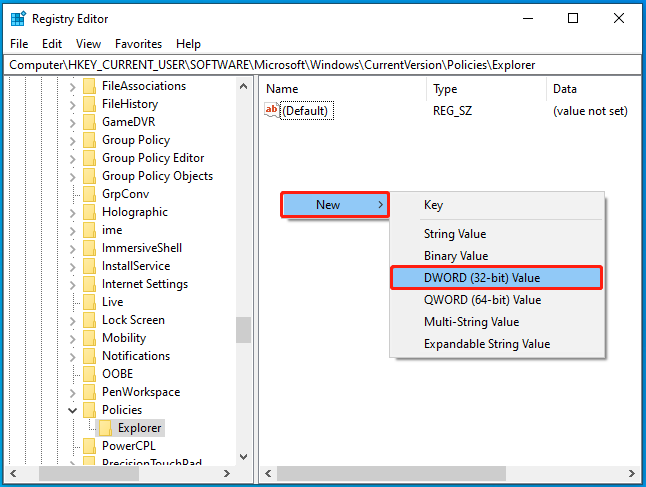
Step 4: Name the newly created value NoHardwareTab. Then double-click it and set its Value data to 1.
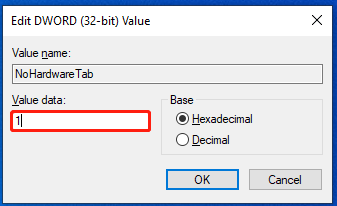
Step 5: Once done, click OK and restart your PC. Then the Hardware tab is removed from Drive Properties.
After reading this post, you may know how to remove or add Hardware tab in Drive Properties Windows 10. If you have any problems with this topic, you can leave a message in the comment part below.
User Comments :